Xiaomi does not work play market. How to disable Google services on Xiaomi without Root rights
Currently, various models of smartphones and tablets from the Chinese company Xiaomi are becoming more and more popular. In connection with the official launch of the payment service from Google, there is a need for a detailed analysis of a number of important aspects, among which the key question is how to set up Android Pay on Xiaomi.
What Xiaomi models support the service
Before examining the questions of application, it is necessary to find out with which devices the contactless payment application is compatible. The gadget must meet the basic requirements for using the program. These include the following parameters:
- Official firmware of the operating system.
- Locked bootloader.
- Disabled root rights.
For contactless offline payment in stores through trading terminals, the device must have an NFC chip. Its availability can be found in the technical specifications. If there is no NFC sensor, the Android Pei program can only be used to pay for purchases in online stores and applications.
The list of popular Xiaomi models on which Androi Pay is supported in full mode (built-in NFC chip):
- mi2A;
- mi5s and mi5s plus;
- mi note2;
- mi mix.
On which Xiaomi won't Android Pay fully work (no short-range communication sensor)? This list includes models from the Redmi and Mi Max line.
Because metal makes it difficult for the NFC system to transmit radio waves, most models with a sensor are made of plastic, glass or ceramic. Thanks to the features of the technology of the gadget, Android Pay works great on Xaiomi mi5 and mi5s, despite the presence of metal in the case.
Setting up
If the Xiaomi model and its parameters meet the requirements, you should install the program on the device. Find Android Pay in the Google Play Market and download it. After completing the procedure, we proceed to the configuration.
Step-by-step setup of Android Pay on Xiaomi:

In a similar way, you can add several cards, select the main one or use the one you need for each specific purchase.
We proceed to setting up the device itself. It is necessary if the device has an NFC sensor, if it is not, nothing needs to be done. We go into the settings, select the "More" section. We find the NFC block and put it in the "On" mode. We select the HCE wallet (Wallet HCE) in the "Security element location" section.
In the "One-touch payment" section, select the Android Pay application in the "Default payment method" field. In the field "Use default application" set "Always". The configuration is complete, the gadget and the service are ready to use.
How to run Android Pay on Xiaomi?
When making a payment, you need to activate the service. For this:

 |
 |
 |
A common cause of problems in the operation of the payment service on Xiaomi is the presence of an outdated firmware version on the gadget. To solve the problem, you just need to update the OS to a fresh one. In some cases, the updated firmware allows Android Pay to work even without locking the bootloader.
Installing Magisk Manager (root administrator) allows you to solve the problem with root rights (the service works without disabling them). Checked with Android Pay on mi5s and mi5 models.
What to do if Android Pay on Xiaomi does not respond to the trading terminal?
To solve this problem, you need to make the following settings:
- Go to "Settings", open the "Security" section.
- We select "Permissions", "Other permissions".
- Select Android Pay and put all the checkboxes to allow.
- Go to "Security" again.
- We select "Autostart" and put a tick in front of the application.
- We return to "Settings", go to the following sections - Battery and performance - Battery consumption by applications - Turn on and select the Android Pay application. In it we put "No restrictions" and "Allow".
- We check the standard settings (described above) and try to bring it to the terminal.
The standard Google app store is used on virtually all devices running the Android operating system. We will tell you how to register and use Play Store in this manual.
To start using the store, you must either sign in to your Google account or register.
To enter the "Play Store":
Enter your login (Google email address); Enter the invented username with the ending "@ gmail.com"; * You can only enter Latin letters and numbers. Enter the invented password with a length of at least 8 characters; If you wish, you can enter your phone number to receive appropriate notifications (you can skip this item); Click "Agree" to agree to the privacy terms and conditions of use; Congratulations! Google account has been created and you can now use the app. You must agree to the Google Play Terms of Service before use. * You can accept or refuse to receive the newsletter. This will not affect the application in any way. After all the manipulations, we go to the main working window of the program: at the top there is a search bar with a voice input function (just click on the microphone and say aloud the name of the application that you want to install on the gadget), in the center - the recommended programs. To install any program: · Select the application by searching by categories, or enter the name into the search bar by yourself; * Consider the installation process using the application using the "Mi Fit" application; · After going to the application page, press the "Install" button and wait for the download process to finish; * After installation, you can click the "Open" button and use the application. You can open the context menu of the application with a swipe from the left edge of the screen: applications are managed here - installing updates / uninstalling, etc. It is also possible to set up an account, activate a promo code or make settings for the Play Store itself. We hope you now know exactly how to download all the applications you need using Google Play Store. Check back on the Xistore pages for more helpful tips!
click "Next" and enter the password;
click "Next";
to create an account, click on "Or create a new account"; 


Hello Sergey. Your site is awesome, everything is written very clearly. I have this problem, I will write the names in Russian this way faster 🙂 and so on the miui phone (Xiaomi Redmi 3s) and on the Asus tablet there was a problem that the Wi-Fi network YouTube and Play Market do not work, at first all the videos on YouTube were gray , but played, then disappeared completely and writes that you will connect to the network, and if everything works and loads on the mobile Internet.
Everything works on a computer via Wi-Fi. I called the Internet company that distributes our Internet, this is via the Osc cable, they said they had all the rules, this is a Wi-Fi router. I found your site, I decided to reset the router to the factory settings, according to your recommendations, I installed everything again, I started the router, all the rules are working. on a computer and in a phone, a tablet too, but the YouTube and play market remained lifeless. What to do?
Answer
Hello. If you open YouTube and Google Play on your phone and tablet through the mobile Internet, then for some reason I'm sure that the problem is in your Internet provider. There is hardly anything in the router settings. Moreover, no one changed them. Everything stopped working suddenly.
It would be nice to check:
- Whether YouTube opens through a browser on a phone or tablet.
- And will there be access to these services if you connect your ASUS or Xiaomi to another Wi-Fi network.
What can be done? I would try changing DNS addresses. On your phone and / or tablet, go to the Wi-Fi settings and open the properties of your Wi-Fi network to which you are connected. There you can statically set the settings. Write DNS: 8.8.8.8 and 8.8.4.4
The error "No internet connection" and "Check network connection" may no longer appear.
A separate article with basic solutions:. There I showed in detail how to change DNS on Android.
A brand new Xiaomi Redmi Pro smartphone came for review, and since there is still no international firmware on it that can be installed without unlocking the bootloader, I had to tinker a bit with the software to install the Google Play Market and all the necessary applications. The process is quite simple, you just need to do everything in order.
Russification
In order for all newly installed applications to work in their native and understandable language, you need to activate the Russian locale using the MoreLocale2 application. You can always find the latest version of the program on the developer's website or on Google Play:
Before installing third-party applications, do not forget to activate the corresponding setting: Settings -\u003e Additional settings -\u003e Privacy -\u003e Unknown sources.

If you already have superuser rights, then you can launch the Locale application and activate the Russian language in it. And for those who do not have them, you need to give the program permission to change system settings. To do this, we perform the following procedure:
- in the device settings in the About phone section, 7-8 times click on the MIUI version item, until the bottom appears an inscription that Developer Mode is activated;
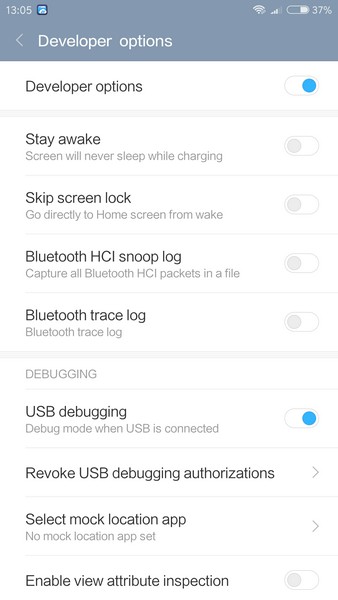
- in the newly appeared section Developer options (Settings -\u003e Additional settings), activate USB debugging;
- download and install the latest adb-setup version;
- find a new folder on drive C adb and while holding down the Shift key on the keyboard, right-click on it. In the menu that appears, select Open command window;
- we connect the smartphone to the computer using a USB cable. When the menu appears on the phone screen, select Transfer files (MTP);
- in the command line on the PC, enter - adb devices... If you did everything correctly, then after executing the command, the serial number of your device should be displayed MBP ... ... If there is an inscription after the number unauthorized, then you need to give permission for USB debugging on the smartphone screen;
- after which we repeat - adb devices... Now there is an inscription device opposite the number;
- we introduce - adb shell pm grant jp.co.c_lis.ccl.morelocale android.permission.CHANGE_CONFIGURATION... Thus, we give the MoreLocale2 program the right to make changes to the smartphone configuration.

- disconnect the phone from the computer and launch the Locale application, in which we select the Russian language.
Now the Russian locale is activated in the phone and all installed applications will work in Russian.
Install Google Play Services
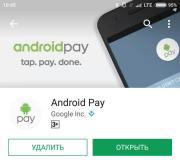
All the hardest things are behind us, now we proceed to the main part - installing the Google Play Market and all the necessary applications. Download and install the updated version of Google Installer on your smartphone. We launch the Gapps application that appears on the desktop, in which you need to click on the blue circle with the inscription Install (you may have hieroglyphs if you missed the activation of the Russian locale).

The application will download the necessary files by itself.

You only need to periodically authorize and confirm the installation of applications.

After successful completion, you will be able to create a Google account and sync the smartphone with your account, as well as install the necessary applications from the Google Play Market. Locale and Gapps are no longer needed and can be safely removed.