Automatic BIOS setup on the computer. How to open advanced bios or advanced mode
Topic: Starting the CMOS Setup Utility
Purpose of classes: -Know the purpose of CMOS Setup Utility and the purpose of program sections
- be able to launch the CMOS Setup Utility program
Be able to navigate the purpose of the control keys.
Equipment: Pentium PC
Brief theoretical information.
CMOS Setup Utility
We are talking about a program that allows you to configure the most important component of any computer - the motherboard (to be more precise, all the nodes, in the aggregate of its components). Since any motherboard is, in fact, the main unit of a PC, the ability to control its operating modes is quite worthy of special attention.
The program that allows a PC user to access its low-level settings is called CMOS Setup Utility, that is, a utility for changing the contents of CMOS memory. Quite often you can find the name BIOS Setup.
Starting the CMOS Setup Utility
1. Starting the CMOS Setup Utility program is possible only at the moment of starting the computer after turning it on or restarting (Fig. 4.1).
This was done for practical reasons, because setting up the components of the motherboard requires a certain level of training from the user. This approach can at least reduce the likelihood of accidentally running the BIOS setup program.
It is quite difficult to completely secure low-level computer settings from "naughty" hands, and there is no big need, because service centers need to live on something.
2. You can find out which key you can use to launch the program under consideration on your PC from the inscription displayed on the monitor screen within one to three seconds from the moment the image appears (Fig. 4.1).
The most common key used to launch the CMOS Setup Utility is ... You can also use the key of the same name located on the numeric keypad, which can have both full and abbreviated names.
Now about exactly when you need to press the program start key. There is no specific rule here, since the entry into the program is carried out differently on different models of boards. On some computers, the program starts immediately after pressing a certain key or key combination. On other PCs, you may encounter an option when the CMOS Setup Utility program starts only after the definition of drives (floppy drive, hard drives, and CD-ROM drives) is completed.
In general, it makes sense to start pressing any keys only after the keyboard is initialized. This is evidenced by a one-time short-term activation of all three indicators on the keyboard, after which one of them usually remains on (Num Lock), and the rest go out.
Today, with the constant increase in the speed of the central processing units, entering the CMOS Setup Utility program becomes more and more problematic, since it is rather difficult to catch the moment when to press the required key, so the following method can be recommended. As soon as the keyboard is ready for work, that is, it has been initialized, press the "magic" key at intervals of no more than one second, even more often. The maximum that you face in this case is a keyboard buffer overflow, which will be evidenced by the beeps emitted by the system speaker with each next key press.
Control keys
To date, the set of keys for control in the CMOS Setup Utility program has more or less established itself (Fig. 4.2). The most commonly used combinations are:
□
□
□
□

□
□

□
□
□
□
□ cursor keys<> and<↓> - allow you to select the required section, further inside the section with the same keys you can select the option to change and the value inside the window that opens (except for AMI BIOS, where the keys are traditionally used □ cursor keys<> and<> - have the same meaning, but only work if it is possible to move the cursor horizontally; □ □ <–> and<+> - similar to pressing keys □ □ □ Sections of the program All BIOS parameters available to the user are distributed in several sections (Fig. 4.7), each of which contains a number of functions of the same type that can influence the operation of a particular node of a personal computer. Standard CMOS Setup So called standard settings computer. The parameters in this section allow you to set the base system information for some hardware (such as hard disks, floppy drives), and set the system date and time. There is also an information window showing the amount of memory installed in the computer. If the BIOS is in a previously working system, then the parameters of this section, most likely, you will no longer need. However, if the battery powering the CMOS memory chip is discharged, or if there is any other failure that has led to the loss of information, you will probably have to re-set all the necessary configuration values. This may also be necessary when changing the hardware configuration. In later versions, this section has been renamed. It got the name Main and contains a few more additional parameters. For example, the items for setting a password to enter the installation program and to boot the system. BIOS Features Setup The section parameters allow you to define the operating modes of the system. They include: the initial testing process, the order of the system boot (the order of polling devices for the presence of a boot record), modes of operation of the keyboard and mouse, the operation of cache memory and much more. In later versions it was named Boot. Chipset Features Setup The options in this section allow you to customize the operation of the motherboard chipset. Using these options can significantly affect the performance of your computer. Most of the section values \u200b\u200bset the speed of the configuration components relative to the frequency of the motherboard (for the processor, this is the external frequency). May have a name Advanced Chipset Setup or simply Advanced. Power Management Setup Settings that define power management modes and power saving modes. Allows you to define the conditions for switching the computer into "sleep" mode and the conditions for exiting it. May have a name Power. PnP / PCI Configuration The section contains settings that allow you to configure the details of the distribution of computer resources between expansion cards (interrupts, DMA channels, I / O ports). Load BIOS Defaults Can be translated as "load BIOS defaults". Selecting this item in the installer allows you to load the safest values \u200b\u200bfor all BIOS settings in case of signs of unstable computer operation. For example, due to changes in some settings that control the operation of the memory or chipset. In this case, it is not always possible to unambiguously determine the real cause of the unstable operation. This option is preferable when "wandering" through the sections of the installation program caused the computer to freeze during the next boot. The "default" parameters are written to a special non-writeable area in the BIOS at the motherboard manufacturer and have the values \u200b\u200bthat are most secure for specific model boards. These are the maximum latency values, disabling caching and memory shading, frequency translation system bus in normal mode, etc. It may have a name Restore BIOS Defaults, Load Fail Safe. Load Setup Defaults Setting the values \u200b\u200bof the specified section, accepted by the manufacturer as the most optimal. To select a section, just place the cursor on it and press the key □ Load turbo defaults The item allows you to load optimized values \u200b\u200bfor most of the BIOS parameters. That is, values \u200b\u200bthat allow maximum use of the capabilities of the existing hardware... For example, the maximum supported system frequency is set! buses, minimum latency values \u200b\u200bwhen working with RAM, etc. □ Integrated peripherals The section contains parameters that determine the operating modes of the built-in controllers. Some BIOS versions do not have this section, but the options available in it are sure to be found in some other section. □ Password Setting The item allows you to set a password both for entering the installation program and for starting the computer. May have a name User Password, Supervisor Password, Change Password. □ Hard Disk Utility From the name it is clear that the section contains programs for working with hard drives. As a rule, these are programs for low-level formatting of non-SCSI disks. In modern BIOS, this item has been renamed to HDD Low Format... It is used when other remedies are ineffective. After the advent of hard drives larger than 10 GB, this item was no longer included in the BIOS, not only because all drives are formatted at the factory, but also because of the enormous amount of time it takes to format large arrays at a low level. □ HDD Auto Detection The item is designed to automatically determine the physical characteristics of IDE hard drives installed in the computer. It is not recommended to use it for hard drives smaller than 500 MB, since the automatic detection sometimes does not work correctly for them. To set the parameters, it is better to enter them manually (you will probably find all the necessary numbers somewhere on the sticker at the top of the disk). □ Save And Exit Setup Keystroke □ Exit Without Saving Exit the installer without saving the changes. It is used when, after changing the values \u200b\u200bof some parameters, you decide to leave their initial values \u200b\u200band do not want to manually restore them. The same effect can be achieved by restarting the computer with the key combination □ Save EEPROM Defaults Save CMOS content to floppy disk. Allows you to create a backup, with which you can later quickly restore the values \u200b\u200bof all parameters. □ Load EEPROM Defaults Control questions 1. Explain the purpose of the CMOS Setup program. 2. Tell us about the peculiarities of running the CMOS Setup program. 3. What keys are involved in the management of the CMOS Setup program. 4. Tell us about the purpose of the keys. 5. Tell us about the purpose of the section Standard CMOS Setup 6. Tell us about the purpose of the section Chipset Features Setup. 7. Tell us about the purpose of the section Integrated peripherals 8. Tell us about the purpose of the section HDD Auto Detection 9. Tell us about the purpose of the section BIOS Features Setup 10. Tell us about the purpose of the section Power Management Setup You have bootable CD-DVD and you want to install an operating system on your computer, in order to do this you will need tune accordingly BIOS and boot from disk. We can also use the choice of devices in the boot menu, but this function is not always present, for example. on older motherboards. There is also no universal button for entering BIOS or boot menu... Many motherboard manufacturers assign for this purpose different keys. The surest way to identify such keys is to read the documentation for this laptop or computer, but whatever key is, you must always press it at the very beginning of the download ... As soon as you turn on your computer, it automatically starts the BIOS program BOOT-ROUTINEwhich in turn calls the subroutine POST (eng. Power-On Self Test), it checks the processor, rAM (RAM), hard disk (HDD), motherboard elements and other main peripherals. One short a signal indicates that such a self-test completed successfully... The passage might look something like this POST: The most common BIOS key is DEL, we will give other options below. You see the following prompt on the screen: " Press DEL to run Setup", ie press the key DEL to log into BIOS... Also during the passage POST may display a graphical splash screen with the name of the manufacturer of the computer or motherboard. Acer - Esc or F12 or F9; Asrock - F11; Asus - Esc or F8; Compaq - Esc or F9; Dell - F12; ECS - F11; Fujitsu Siemens - F12; Gigabyte - F12; HP - Esc or F9; Intel - F10; Lenovo - F12; MSI (Micro-Star) - F11; Packard bell - F8; Samsung - Esc; Sony Vaio - F11; Toshiba - F12 The menu for selecting boot devices looks like this: You just need to select the desired device from the list and click Enter. List of the most common keys for entering BIOS Setup
: ABIT - Del; Acer (Aspire, Altos, Extensa, Ferrari, Power, Veriton, TravelMate) - F2 or Del; Acer (old models) - F1 or Ctrl + Alt + Esc; ASRock - F2 or Del; ASUS - Del; BIOSTAR - Del; Chaintech - Del; Compaq (Deskpro, Portable, Presario, Prolinea, Systempro) - F10; Compaq (older models) - F1, F2, F10 or Del; Dell (Dimension, Inspiron, Latitude, OptiPlex, Precision, Vostro, XPS) - F2; Dell (old models) - Ctrl + Alt +, or Fn + Esc, or Fn + F1, or Del, or Reset twice; ECS (Elitegroup) - Del or F1; eMachines (eMonster, eTower, eOne, S-Series, T-Series) - Tab or Del; eMachines (some older models) - F2; Foxconn - Del; Fujitsu (Amilo, DeskPower, Esprimo, LifeBook, Tablet) - F2; GIGABYTE - Del; Hewlett-Parkard (HP Alternative, Tablet PC) - F2 or Esc, or F10, or F12; Hewlett-Parkard (OmniBook, Pavilion, Tablet, TouchSmart, Vectra) - F1; Intel - F2; Lenovo (3000 Series, IdeaPad, ThinkCentre, ThinkPad, ThinkStation) - F1 or F2; Lenovo (old models) - Ctrl + Alt + F3, Ctrl + Alt + Ins or Fn + F1; MSI (Micro-Star) - Del; Pegatron - F2, F10 or Del; Samsung - F2; Sony (VAIO, PCG-Series, VGN-Series) - F1, F2 or F3; Toshiba (Portege, Satellite, Tecra) - F1 or Esc. AMI BIOS - change the boot priority of devices.
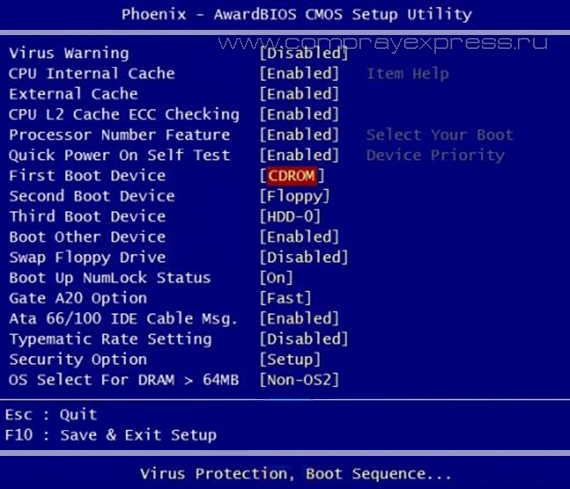
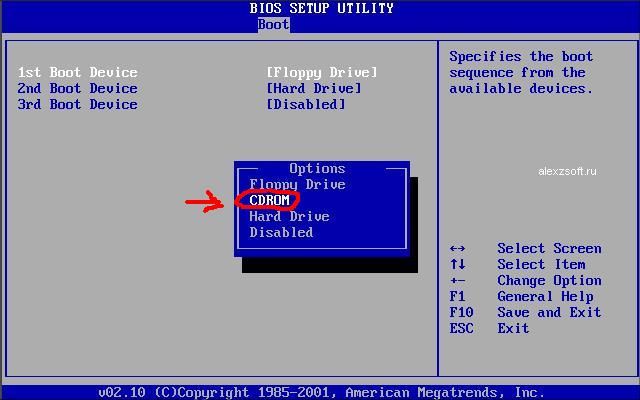
Use the Enter, +/- and arrow keys on the keyboard to change settings and navigate the BIOS menus. Move the arrows to the tab Boot and select Boot Device Priority: Here we will see boot sequence: floppy drive first ( Floppy drive), then hard disk ( Hard drive), and the third device is turned off ( Disabled). If you want to boot from a disc, then you need the first device on this list to be a CD-DVD drive. Use the arrows to switch to the first device ( 1st Boot Device), press the key Enter and in the menu that appears, select CDROM.Booting from a flash drive is similar. To exit BIOS and save the settings made ( Save and Exit), press the key F10 and confirm ( Ok) with the key Enter. Choose from the menu Advanced BIOS Features and enter ( Enter). Here, if we want to boot from the floppy drive, we need to make sure that this device became the first on the list... Use the arrows to switch to the first boot device ( First Boot Device) and change to CDROM... Then exit with saving the settings made ( Save and Exit) by pressing F10. During the initial system self-test (pass Post) errors may occur. If they are not critical, then after a certain message is displayed, the computer will continue to boot. If serious errors are found, the computer system will try to inform the user about them, but often it is impossible to display such information on the screen. In this case, you will need to be guided by sound signals (they are given by the system speaker, speaker, upon completion of the procedure Post). With the help of them, the system reports the results of the self-test. Below is list of such signals for different versions BIOS ( BIOS). Therefore, if your computer "beeps", then you can easily identify the malfunction of the PC. No signals Continuous beep - the power supply is faulty. 1 short - no errors were found. 2 short - minor bugs found. 3 long 1 long and 1 short - problems with RAM. 1 long and 2 short - a problem with the video card. 1 long and 3 short - an error occurred while initializing the keyboard. 1 long and 9 short - an error occurred while reading data from the read-only memory chip. 1 long repeating - incorrectly installed memory modules. 1 short repeating - problems with the power supply. No signals - the power supply unit is faulty or not connected to the motherboard. 1 short - no errors were found. 2 short - RAM parity error. 3 short - an error occurred during the operation of the first 64 KB of main memory. 4 short - the system timer is faulty. 5 short - the central processor is faulty. 6 short - keyboard controller faulty. 7 short 8 short - defective video memory. 9 short 10 short - it is impossible to write to CMOS memory. 11 short - faulty external cache memory (installed in slots on the motherboard). 1 long and 2 short - the video card is faulty. 1 long and 3 short - the video card is faulty. 1 long and 8 short - problems with the video card or the monitor is not connected. 1-1-3
- error of writing / reading CMOS data. 1-1-4
- error in the checksum of the contents of the BIOS chip. 1-2-1
- the motherboard is faulty. 1-2-2
- error initializing the DMA controller. 1-2-3
- an error occurred while trying to read / write to one of the DMA channels. 1-3-1
- RAM regeneration error. 1-3-3
1-3-4
- an error occurred while testing the first 64 KB of RAM. 1-4-1
- the motherboard is faulty. 1-4-2
- error in testing RAM. 1-4-3
- system timer error. 1-4-4
- error in accessing the input / output port. 3-1-1
- error in initializing the second DMA channel. 3-1-2
- error initializing the first DMA channel. 3-1-4
- the motherboard is faulty. 3-2-4
- keyboard controller error. 3-3-4
- video memory testing error. 4-2-1
- system timer error. 4-2-3
- line error A20. Defective keyboard controller. 4-2-4
- error when working in protected mode. The central processor may be defective. 4-3-1
- an error while testing the RAM. 4-3-4
- real time clock error. 4-4-1
- Serial port testing error. The error can be caused by a device using this port. 4-4-2
- error while testing the parallel port. The error can be caused by a device using this port. Good day. You work at your computer, you work, and then ... bam 😢, and you need to reinstall the system, or enable the function keys, or disable USB ports, etc. You can't do without BIOS setup ... I on the blog quite often touch on the topic of BIOS (since a number of tasks simply cannot be solved without setting it up at all!), but there is no generalizing topic in which all the main terms and parameters would be analyzed. So, in fact, this article was born ... Note: BIOS settings are based on Lenovo B70 laptop as an example. Many parameters, names of sections and tabs will be similar with other brands and models of laptops. I think that collecting all the variety of brands and all kinds of versions in one article (or even a section of the site) is simply unrealistic ... I believe that the first place to start this article is with the question of entering the BIOS (or there will be nothing to configure). In most PC / laptop models, to enter the BIOS, you need to press the button F2 or Del (sometimes F1 or Esc) immediately after turning on the device. Some laptops (e.g. Lenovo) have a dedicated button Recovery (which is pressed instead of the power button). After that, usually, a plate appears (as in the photo below) - to configure the BIOS, you need to select the item. In the BIOS, all settings have to be set using the keyboard (which is somewhat frightening for novice users who are used to doing everything in Windows with the mouse). It is also worth noting that all settings are set in English (although most of the settings are easy enough to understand what they mean, even for those who have not studied English). And so, about the buttons ... I draw your attention to the fact that in almost every BIOS version at the bottom of the screen (or on the right) all the most basic control buttons are written with which it is configured.
Bottom control buttons // Dell Inspiron laptop In general, the buttons are as follows:
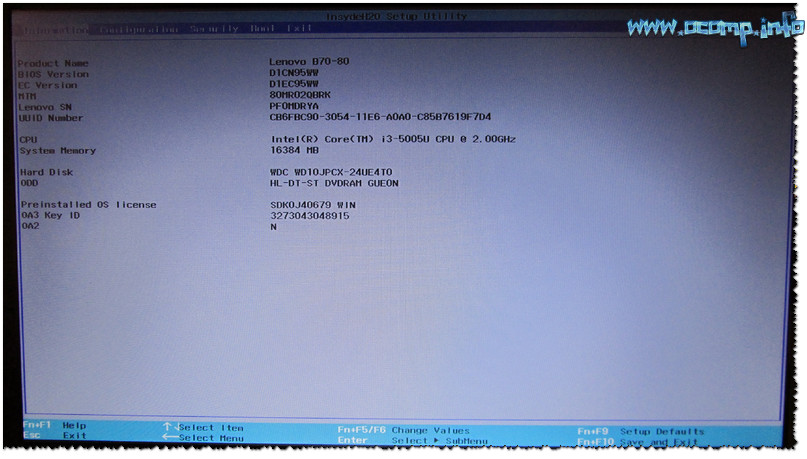
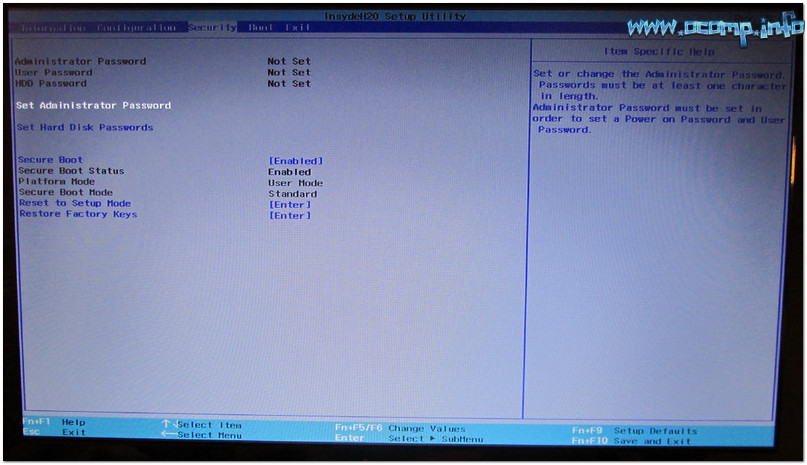
Important! In some laptops, in order for the function keys (F1, F2 ... F12) to work, you must press the Fn + F1, Fn + F2 ... Fn + F12 key combination. Usually this information is always indicated at the bottom (right) of the window. Main tab in Laptop BIOS which you see when you enter. Provides basic information about the laptop: One of the main tabs for setting many parameters. In different laptops, the tab contains different settings, the main parameters are: A tab for setting security (for some users - one of the main ones). Here you can set an administrator password for accessing the BIOS settings or for accessing the hard disk. The main settings items in this section: Download section. Also one of the most frequently used sections, it is almost always necessary for editing when installing Windows. The boot mode is also set here: UEFI (new standard for Windows 8/10), or the old boot method (Legacy, for Windows 7, XP). New items for editing the download queue will appear after saving the settings and entering this menu again!
Note: if support for the old mode is enabled, you can (even need to!) Change the boot priority from devices (for example, first check USB devices, then try to boot from CD / DVD, then from HDD). Basic settings in this menu:
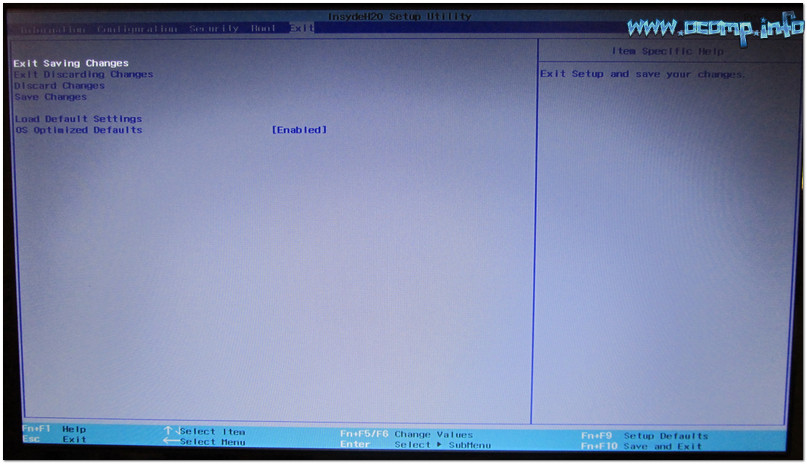
Note: it is worth noting that, in new version UEFI stopped working the ability to raise menu items using the F6 button, but it was still possible to lower another item with the F5 button. I think everyone knows this word - it is translated from English as output... This section is also used in almost all laptops (and PCs) to reset the settings to optimal (or safe). Key points:
In order not to climb into the BIOS settings and not select (not set) the boot queue, it is very convenient to use the boot menu, calling it only when it is necessary to boot from a USB flash drive (for example). Here's a reference article on this topic (link below). Hot keys for entering the BIOS menu, Boot Menu, recovery from a hidden partition -
By calling the Boot Menu, you will see the usual list of devices from which you can boot. Most often this list is (example in the photo below): Use the arrows and the Enter key to select a device to boot. In general, as in the usual BIOS setup. This concludes the article. To obtain information on methods of correcting a computer (PC) and increasing its performance, the material that illuminates the Bios settings in pictures and explains in detail the algorithm of actions will help. The changes made will be protected by a lithium battery built into the motherboard and maintaining the required parameters in the event of a voltage loss. Thanks to the program, it is possible to establish stable interaction operating system (OS) with PC devices. Logging into Bios is carried out when the system starts up and an inscription appears on the monitor informing about the start of the download. You will need to press the "F2" key several times to access the settings menu. Attention! Some motherboards are adapted for pressing the DEL button - the correct operation is written in the lower corner of the screen. There are several menu options with certain differences in the order of the main and additional items. Let's pay attention to the most common version of Ami, consisting of the following key sections: Attention! The present section of the network configuration Boot, allows you to adjust the parameters regarding the speed of system boot, keyboard and mouse settings. After completing work or reading the menu Bios Setup Utility, you need to press the burning Exit key, which automatically saves the changes made. Let's start with the MAIN section, which is used to modify the settings of the hard drive and adjust the time indicators. Here you can independently configure the time and date of your computer, as well as configure the connected hard drives and other drives. To reformat the mode of operation hard disk, you need to select a hard disk (for example: “SATA 1” as shown in the picture). Everywhere using the "ENTER" key and arrows, the Auto mode is set. The exception is subsection 32 Bit Transfer, which needs to be fixed with the Enabled setting. Important! It is required to refrain from changing the "Storage Configuration" option, which is located in the "System information" section and not to allow correction "SATADetectTimeout ”. Now let's proceed to the settings of the basic PC nodes in the ADVANCED section, which consists of several sub-items. Initially, you will need to set the necessary processor and memory parameters in the Jumper Free Configuration menu of the system configuration. Choosing Jumper Free Configuration, you will go to the Configure System Frequency / Voltage subsection, here you can perform the following operations: The POWER item is responsible for powering the PC and contains several subsections that need the following settings: It is recommended not to change the APM configuration, but it is quite possible to correct the general power supply in the Hardware Monitor subsection, which simultaneously opens access to temperature modes and adjusting the fan speed. Direct boot is controlled by the parameters found in the BOOT section. Here it is allowed to determine the priority drive, choosing between a flash card, floppy drive or hard drive. If there are several hard drives, then the priority hard drive is selected in the Hard Disk sub-item. The PC boot configuration is set in the Boot Setting subsection, which contains a menu consisting of several items: Choosing a hard drive The PC boot configuration is set in the Boot Setting subsection, The main task of the Boot section is to determine boot devices and set the required priorities. Attention! If you want to restrict access to the PC, then set the password inBIOS in subsectionSupervisorPassword. Let's pay attention to the basic points, mainly in need of adjustment during the operation of the PC. Special attention should be paid to the EXIT item, which has 4 operating modes: The given step by step instructions explain in detail the purpose of the main BIOS sections and the rules for making changes to improve PC performance. Hello, I wanted to write detailed instructions on installing Windows, as I remembered that some may have difficulties to install boot from disk... Therefore, in this article I will tell you how to put boot from disk in BIOS. There are different types of bios and some of them first puzzle over where to put the boot from the disk. Now I will try to show you, and after this article, I think you yourself will be able to boot from a disk in any bios. The main types are Award BIOS
and on i'll show them based on how to set boot in BIOS from CD-ROMto boot Windows from cd or dvd disk.
I also recently supplemented the article, so it is possible that your bios will be. Here we choose Advanced BIOS Features Here we set the load from CD-ROM, then we save ( F10 yes). Selecting a tab BOOT. Push Boot Device Priority and Enter. We choose CDROM... Then save (F10). Also, in addition to selecting Enter, there are other selection keys, for example, these: If you don't know English, let me explain what is written on the right: Press the Up or Down arrow to select a device, then press F6 to move the device up the list, or F5 to move equipment down the list. Click ESCto exit to the menu. Therefore, select the CD-ROM with the arrows and then press F6until the CD-ROM drive is at the very top. Sometimes the choice is the plus keys (+) and minus (-)... And sometimes a list of active and inactive devices appears. In which pressing the key R you put the CD-ROM active to put the boot from the disk. After all installations save (F10 + enter). In a modern BIOS, everything is simpler. There are several options here. The first of them, when the BIOS is loaded, you can simply drag the disk to the first place with the mouse and save the changes by pressing F10. But if you do not have such a function, then go to the advanced settings (Advanced Mode) or if there is a boot. In advanced settings, go to the boot tab and go down until you see the device boot lines. We go to point number 1 enter. The download options will appear. Select dvd-rom and save F10. Also, if you have a password for bios, you can reset it by removing the battery on the motherboard for 10 minutes. If it does not help, you can use it. And you can also try before loading Windows to call the boot dialog of the initial device. For this, before booting Windows you need to press the boot key of the device, they may all be different f1 to F12, and can also be a key Enter. Do not be afraid to do something superfluous, you can always get out without being saved, and your experience and knowledge only increase from experiments \u003d) I think after studying the article to put boot from CD-ROM will not be difficult, what do you think?


... Item may have a title Do Not Write To CMOS And Exit.A list of the most common keys for entering the boot menu:


Phoenix-Award BIOS - change the boot priority of devices

Post error beeps
AWARD BIOS signals:
AMI BIOS signals:
PHOENIX BIOS signals:
How to enter BIOS

Control buttons
Sections and tabs

Boot

Exit
How to choose from which device to boot a laptop (Boot Menu)

Main section - Main menu
Advanced section - Additional settings
Power section - PC power
BOOT Section - Boot Management
Tools section - Detailed settings of basic parameters
Exit Section - Exit and Save
BIOS types
How to put boot from disk in BIOS?
Award BIOS


AMI BIOS (American Megatrends, Inc.)


What other types of cr-rom installation are there?

Modern bios