Setting up WiFi on Byfly Promscape M 200A. How to configure Modem "Promsvyaz" m200a to router mode
The company Promsvyaz has already long been known for its rebranding of Chinese modems, routers and ONT-terminals Huawei. and ZTE. Promsvyaz M-200 A is another Chinese - ZTE ZXV10 W300 modem with IPTV and FON support, just outside the smallness modified and with the firmware from Promsvyaz (native ZTE smallness is distinguished by an external appearance of the web interface). On the firmware, the commocate web interface is one to one as on the ASUS AAM6010 and AAM6020BI modem and special difficulties in the setting is not available.
Configure Modem Communication M-200 A
IN local network Aypishnik device ordinary - 192.168.1.1, web interface addressing, respectively http://192.168.1.1 :
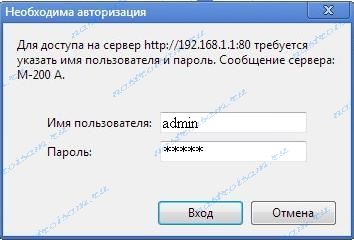
Login to access in the interface option - Admin and password as well as Admin. After passing authorization, we fall into the web interface.
Configuring MO-200 A MO-200 A MODEMA IN ROUTER MODE (ROUTER).
Rostelecom In the MRF Volga and Beltelecom (Byfly.
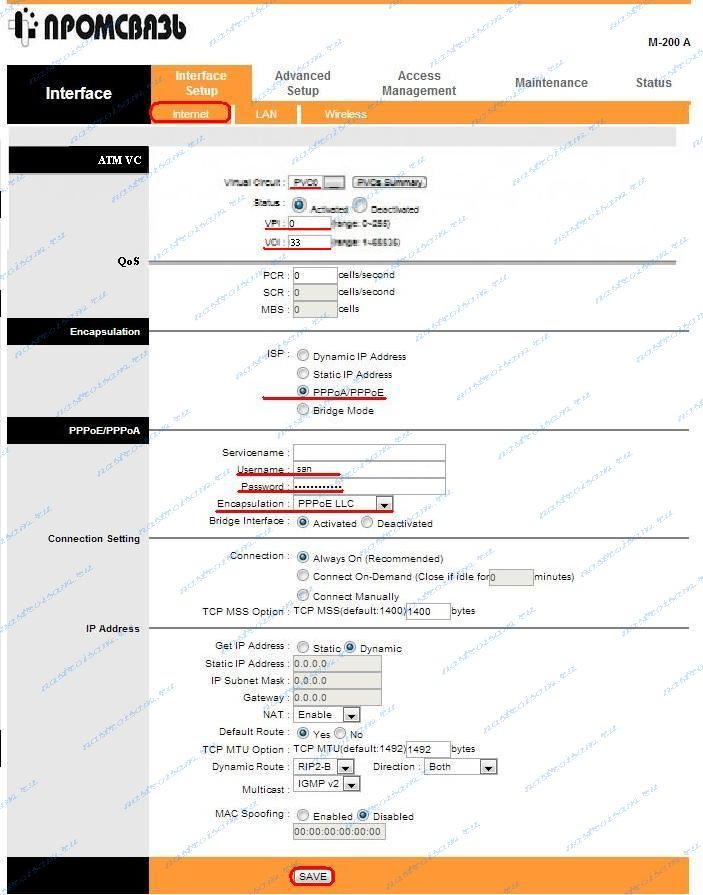
Then we descend lower and select the PPPOE / PPPOA type in the Encapsulation section.
Further in the PPPOE / PPPOA section, enter data for authorization: Username username name and password - PASSWORD. These data were issued when connected to the provider.
Also, I recommend in the Connection Settings section CONNECTION Specifies to Always ON.
Click the Save button to save the modem settings Promsvyaz M-200 A.
Configuring Modem Communication M-200 A In Bridge mode (Bridge).
For the WAN connection option, select the Interface Setup section? Internet:
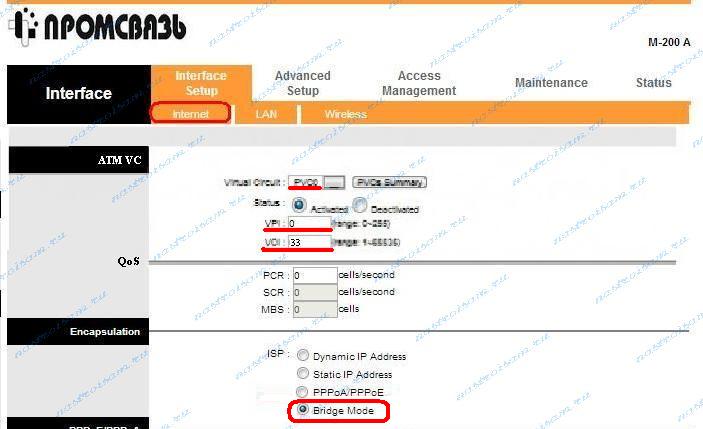
In the ATM VC section, you select the 1st ATM connection: for this, the Virtal Circuit list has been elected PVC0. In the VPI and VCI fields, we prescribe proper characteristics - they need to be found in the technical support of their own provider. For example, U. Rostelecom In the MRF Volga and Beltelecom (Byfly.) Specifications VPI / VCI - 0/33.
Then we descend below and select the Bridge type in the Encapsulation section.
Promsvyaz M-200 A.
Setting up a local network on modem Promsvyaz M-200 A.
Local network options Lan. Are you in Section Setup? LAN:
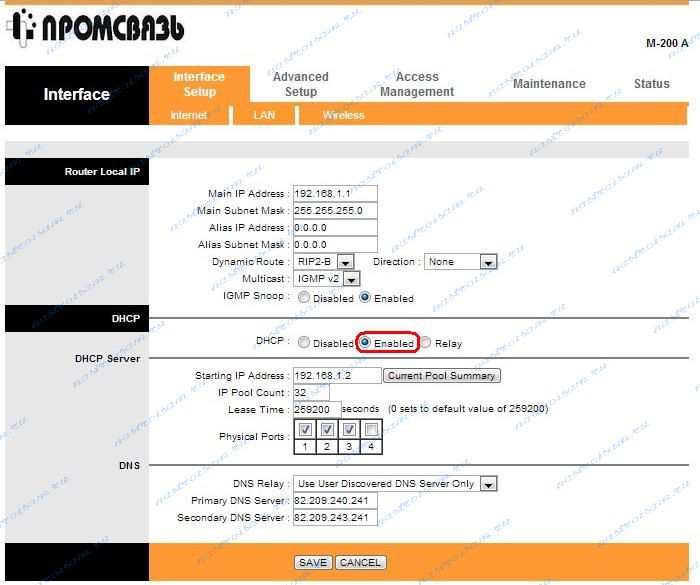
In principle, the default options are suitable for 90% of cases. In this section, you can change the address of the device on the local network, change the sabase itself. Also, here you can enable or disable DHCP server
. This is done in the DHCP subsection, and the DHCP-North options themselves are in the DHCP-Server subsection. If you have an IPTV service connected, then you need to take a tick for the port where the STB-prefix is \u200b\u200bturned on in Physical Ports.
In the DNS section, the DNS Relay parameter is better to leave in value by deflot, so that the addresses of the provider NS servers are adapted by the machine.
Click the Save button to save the modem options Promsvyaz M-200 A.
WiFi Setup on Modem Communication M-200 A.
Options wireless network WiFi Are you in Section Setup? Wireless:
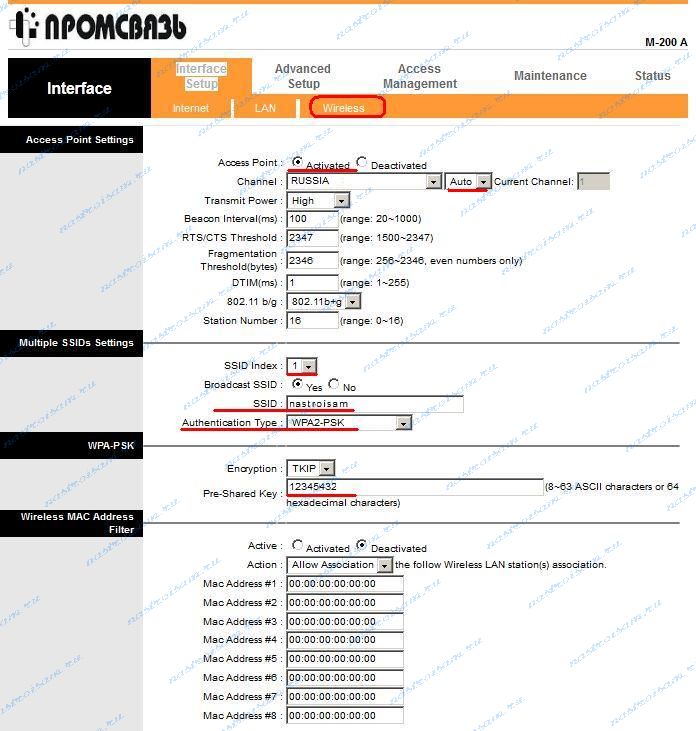
Checking in front of the Access Point parameter stood an Enable check mark. If you need to turn off WiFi at Promsvyaz M-200 A - Check the box deactivated.
In the Channel field for RF - Indicate Russia.for Belorussia — Belarus.. Mode Leave AUTO.
Below, in the Multiple SSIDS SETTINGS subsection, we select SSID Index - 1
, in the SSID field we prescribe identifier created wireless network. They may have any word on the British layout.
Encryption type - Authentication Type - select WPA2-PSK. If you have wireless devices, unsupporting this type of deetheetification - choose WPA-PSK.
Below in the Pre-Shared Key field you need to register security key Wireless network. It may not matter what a letter, the cyphine or mixed sequence is not shorter than 8 characters.
Click the Save button to save the modem options Promsvyaz M-200 A.
This article tells how to set up wireless communication Wi-Fi On the M200A modem. The article also has a video structure.
Note: In order to connect to the modem, for its subsequent reconfiguration, you must install a network connection to the local \\ wireless network with it. When configuring the modem, Windows 7 was used with Internet Explorer browser, in other browsers there may be a problem with the modem setting.
Step 1
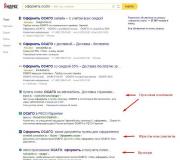
Open Internet Explorer browser, in address line We enter the address " 192.168.1.1 "(Without quotes).
Figure 1 - in internet Browser Explorer Go to the modem setting at "192.168.1.1"Step 2.
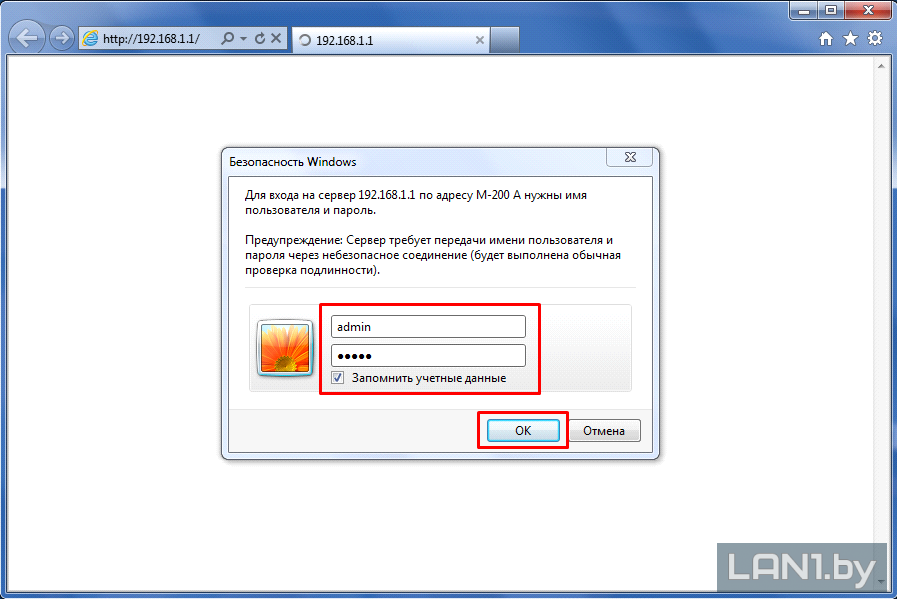 Figure 2 - Authorization Window
Step 3.
For wi-Fi works First you need to create a connection to the Internet service! After you click the " OK.", PET in the modem settings. Next you need to go to the tab " Interface Setup.", Then into the tab" Wireless." In deposit " Wireless." in field " Access PointActivated." In field " Persd." choose " Activated." Next in the field " Broadcast SSID" choose " Yes" In the tab " SSID.»Enter the name of your network, the name is arbitrary, in the tab" Authentication Type»Select the value" WPA-PSK / WPA2-PSK" Next, go to the "Encryption" field and choose the value " TKIP / AES.", And in the tab" Pre-Shared Key»We enter a password, in an arbitrary form and press the button" Save.».
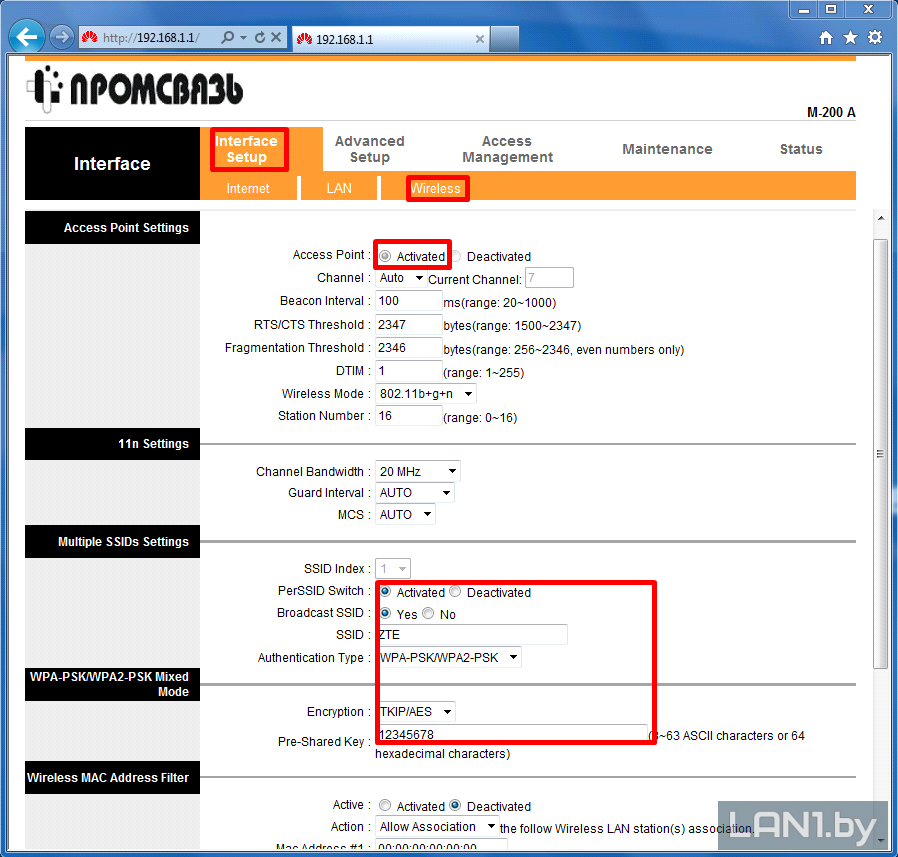 Figure 3 - Wi-Fi Setup
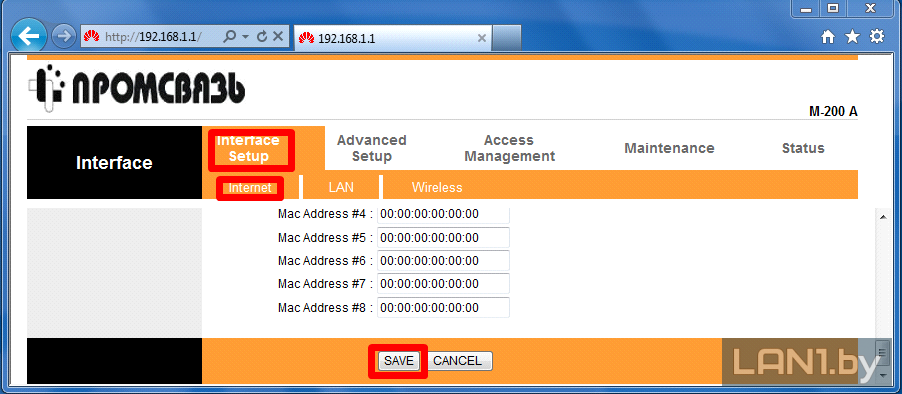 Figure 4 - Setting Wi-Fi
Step 4.
Next you need to go to the tab " Advanced Setup.", Then into the tab" VLAN." In deposit " VLAN." in field " VLAN FUNCTION»You will need to choose the value" Activated." Next, click on the field " Assing Vlan Pvid for Each Interface».
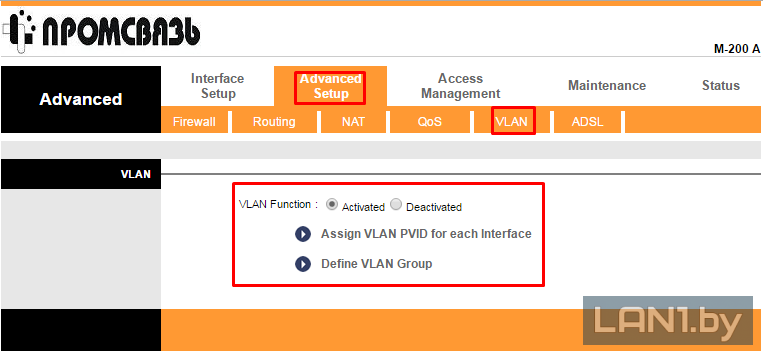 Figure 5 - Activation "Port Mapping"
Step 5.
In the field that opens " VC #"- numbers created connections, fields" Port #"- modem ports, field" BSSID» — Wi-Fi connection. All of them are divided into groups: 1 - Internet, 2 -Zala, 3- Ohrana. When connecting the Internet service and Zala set: " Port #one", " Port # 2.», « Port # 3."- for the Internet, and" Port # 4."- under ZALA," Wireless Lan BSSID # 1"Under Wi-Fi" Pvid1" Next, click " Next».
 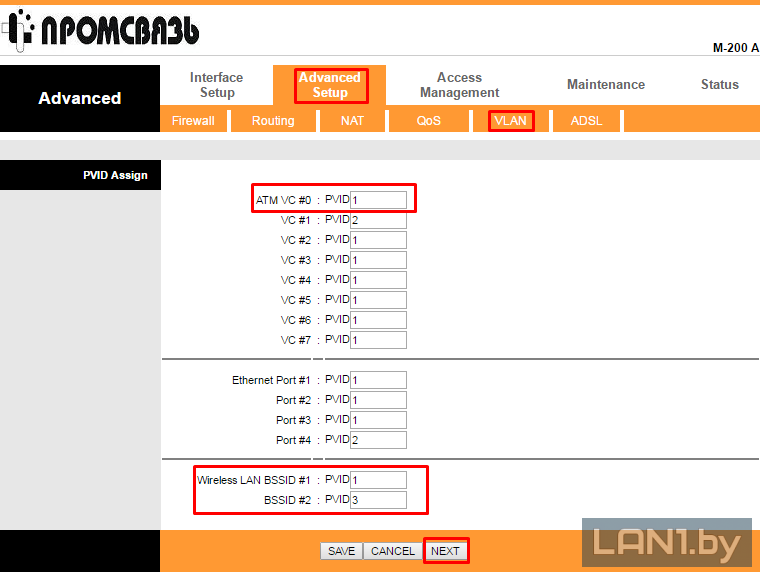 Figure 6 - Setting up ports
Step 6.
In the tab " VLAN INDEX.»Select a custom group. For example, a group 1. In the field " Active.»Click" Yes", in field " Vlan ID."- Also the number of the group, in the table" ATM VCS.»Choose Cos. this connection, in field " Ethernet»Select ports on which this connection will work, in the field" Wireless Lan.»Select the Wi-Fi port (always 0) and press the" Save." (Normal port setting: " LAN1." - the Internet, " LAN2.»- Security / Internet," LAN3."- Internet / ZALA," LAN4."- Zala / Internet," SSID1.»- Wi-Fi)
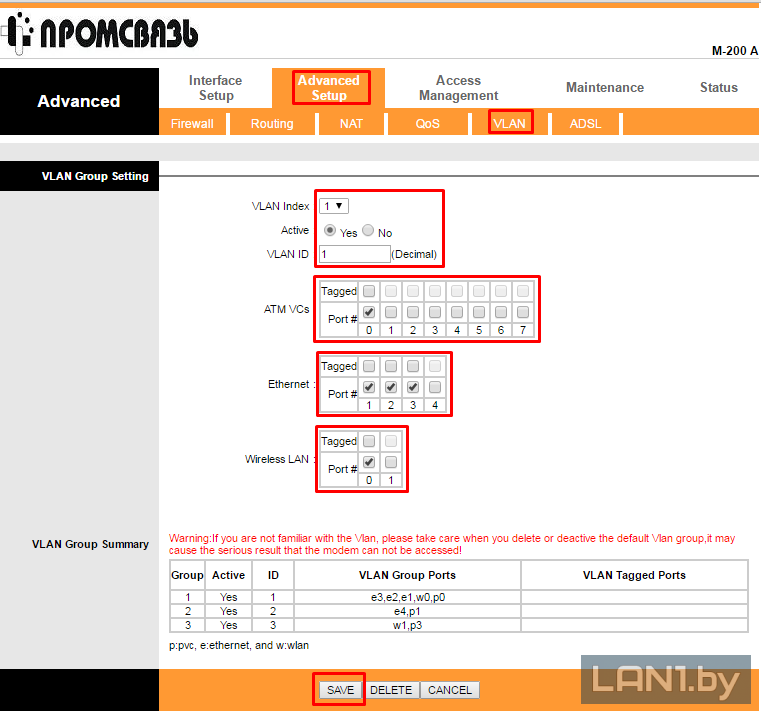 Figure 7 - Setting Port Mapping
5 Total (100%) 2 votes
Wireless network - most convenient way Home network construction, which is the ability to connect several devices at once. It is not surprising that more and more users choose exactly wireless technology. But to enjoy all the advantages of Wi-Fi, it must be configured.
Often the question arises, how to set up a Wi-Fi service provided by FLY. You can do it yourself without resorting to the service of the Master. Consider the entire process in detail by taking the modem configuration of the M-200A modem as an example. Why is this device? Because the process of its connection is identical to a similar procedure for another number of modems.
The first step is to connect the device to a computer or laptop using the Patch Cord. To configure the modem, you need to go to his web interface. Open any browser and register the following value in the address bar: 192.168.1.1. You will be prompted to specify the username and password - by default, and the other will be the word "admin" .M-200A
The web interface does not open
If after entering the address you do not see the window offering specifying the username and password, try to restart the modem. Perhaps simply an initialization error occurred. To restart the device, turn it off from the network for a few seconds, then connect. Try to open the web interface again.
The next step in the event of a repeat failure will be resetting the modem settings to the factory parameters. It may be needed if someone has already tried to configure the router mode, but made a mistake.
To do this, on the case of the device, find a small button or hole, near which "Reset" is written. If this is a button - hold it until the device restarts. If the hole is to use a small needle, drowned it until it stops and waiting for the reboot of the modem.
Working with MO-200A Modema Web Interface
If everything has passed successfully, proceed to setting up the modem. It will be produced in two stages - specifying the connection mode and directly configuring the Wi-Fi network.
Initial setting
Click the Interface Setup tab. The first section is "Internet", you first need to configure it.
In the ISP section, select "PPPOA / PPPOE"
Next, write its settings. "UserName" and "Password" must be specified in the contract.
For the BRIDGE INTERFACE parameter, set the "Activated" value.
For the "Default Route" parameter, set the "YES" value.
By installing all the necessary parameters on the modem, click "Save".
Now you have to configure directly Wi-Fi on the MO-200A Modem.
Select the next tab - "Wireless".
Activate the Persd SWITCH parameter by setting out the value "Activated" opposite it.
Below you will see the SSID string. Write the name of your Wi-Fi point in it - it can be any.
The "Authentication Type" string allows the user to select the Security Standard. It is recommended to install the WPA2-PSK parameter here as the most reliable.
Next you need to come up with and write an eight-digit password in the "Pre-Shared Key" line. It will then be needed to access Wi-Fi, configured on the MO-200A Modem.
After selecting the parameters and enter the required data, press "SAVE".

Network Check and Error Correction
If you have completed all actions correctly, your modem Promsvyaz M-200A can work in the router mode, distributing wireless Internet. If you set up the services of the BYFLY provider on a laptop, disconnect from it network card Patch Cord and search for available connections.
In the list of available points, select the name of the network that you just settled, and click "Connect". It will be proposed to enter the security code - an eight-digit password that you prescribed when configuring a modem in its web interface. Click "OK" and wait until you connect to the BYFLY wireless network.
Try to open any Internet resource. If no portal is loaded or you cannot connect a laptop to a wireless network, try following:
Go through the control panel to the Network Management Center.
Select "Change Adapter Settings".
Find a label " Wireless connection", Right-click on it. Select the "Properties" string.
In the list of components that are used when connected, select the "Internet version 4" protocol. If the tick is set near "Version 6", remove it.
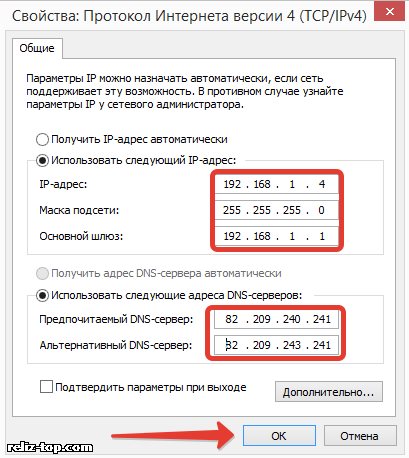
After you install "Protocol version 4", it must be configured. In the properties of this protocol, you must manually specify the IP address: 192.168.1.4. The string of the "subnet mask" will be filled automatically. The main gateway must be viewed 192.168.1.1.
Important note: If the laptops are somewhat, then the actions described are necessary on each. However, when writing an IP address, be sure to change the last digit - 4, then 5, 6, etc., and depending on the number of laptops to be connected to your Wi-Fi network.
Next, configure the DNS server. Preferred - 82.209.240.241. Alternative - 82.209.243.241. Then click "OK" and "Close".
Note: The specified parameters can be clarified in the contract concluded with the provider (in this case - byfly) or on the official website of the Internet service provider.