How to reduce the size of photos. How to compress a photo or picture without losing quality in various ways? Reduce image size in pixels online
Is the image size too large? Doesn't fit into a letter or website? Now let’s quickly figure out how to make him lose weight! Probably everyone has at least once encountered the need to reduce the size of an image. After all, pictures from digital cameras and even from mobile phones They are not at all small in size.
It's not difficult to master a couple of techniques. To do this, it is not at all necessary to install such a monster as Photoshop. It can be done standard means Windows 7/8/10 or using third-party utilities.
How does this even work?
Before resizing images, it is useful to understand how it works, which way to go and how much the image can be compressed. Several image formats are used in everyday life:
- BMP – uncompressed images, very large in size
- JPG or JPEG – compressed images, the most common format
- PNG and GIF are also compressed images. They weigh more than JPG, but have additional features, like a transparent background or animation (gifs)
There are also a million other formats, but it is important to understand that:
- BMP can always be reduced tens of times by simply converting it to JPEG
- PNG and GIF - can also be compressed, but not by tens, but by 1.5-3 times, while losing transparent background or animation, if there were any.
- If the file is already JPEG, then you can compress it by reducing the resolution and/or quality
Resolution is the number of pixels in an image horizontally and vertically. For example, a camera with a 10.1 megapixel matrix has a photo resolution of 3648×2736 pixels. It may need to be reduced to 640x480 pixels, for example. That is, you can reduce the size of a photo by converting it to another format or reducing the image resolution.
INTERESTING: if your file has a BMP extension, then it can be reduced many times by simply resaving it as a JPEG. If you use 100% quality, then the difference will not be noticeable by eye. How? Read below.
How to reduce image size using standard Windows 7/8/10 tools
For this we need the standard Paint image editor. You can watch the video or read the article:
Actions by point:


- And enter in percentage by how much to reduce the image, or specifically in pixels. By the way, in Windows XP you can only enter percentages. If you leave the “Maintain proportions” checkbox, the image will not be flattened or stretched.

- Save the image as JPEG.

The only thing that cannot be done in Paint is to change the JPEG saving quality (compression quality), but this can be done in third-party utilities. By the way, the Paint program will also be useful for you.
Compress photo sizes using Irfan View
The Irfan View program is one of the most popular, very easy, and allows you to adjust photos in different ways. Around the world, about 1 million people download it every month! Download the wonderful and free IrfanView program on the official website from the Download section.

During installation, you can click “Next” all the time. To apply the Russifier, you need to enter the menu when you first start “Options -> Change language...” and select “RUSSIAN.DLL”.

After installing the program, in context menu images will appear “Open with -> IrfanView”. Let's choose it.
Let's go to the menu "Image -> Resize Image"

The window provides the opportunity to change the size at your discretion, as you wish. You can enter the desired size in pixels, centimeters or inches, or as a percentage, you can select one of the standard sizes, or just click the “Halve” button

I also recommend choosing the “Lanczos (slowest)” conversion algorithm. This is the highest quality algorithm, and slow speed will be noticeable only when batch converting tens and hundreds of images (this function is also available in the program).
Now save the file in the menu "File -> Save As" and select the JPEG type. Here you can choose the JPEG compression quality. The higher the better. The loss of quality from 90% is almost imperceptible, and at 100% there is almost no loss of quality, but the file size increases. For large images intended for uploading to the site, it makes sense to check the “Progressive JPG format” checkbox. In this case, the image will not load from top to bottom, but first a blurry silhouette will appear, and then full version. I think you've seen this on the Internet.

I just want to send an email in Outlook!
And if the task is simply to reduce the size of the investment in Microsoft Outlook, then in the letter editing window, click “Attachment Options...” and select “Select picture size:” and your preferred size. You can set “Large (1024×768)” (“Large”) if there are few images in the attachment.

Now you can easily save pictures with the required resolution for a website, email, or without installing Photoshop. Share this useful advice with friends using social network buttons!
Reducing the size and weight of a photo is as easy as shelling pears, and you don’t need any special tools for this. online services. If you need to reduce the size of one photo, you can get by with the program preinstalled in Windows. Coping with reducing the size of a large number of photos free program FastStone or you can use Adobe Photoshop and Lightroom.
In some cases you may need to reduce the size of a photo:
- photos are intended for uploading to a website (for example, for a blog, article, photo report from a trip) and the files need to be reduced to the optimal size;
- you must send the photo by mail ( high quality no photo required);
- I want to submit a photo to a competition that requires files of a certain size.
- you need to upload a photo to a site that has restrictions on photo size (in pixels - px) or file weight (in megabytes - MB);
1 | A way to reduce the size of a photo in Paint (pre-installed on Windows).
Paint can handle multiple files well, but reducing large numbers of photos this way will take a long time. Before reducing the file size, be sure to create a copy, since Paint will overwrite the file with the new settings on top of the original when saving.
Open the photo in Paint (by right-clicking on the photo and selecting from the list the desired program- Paint), in the top panel, click on Resize. In the menu that opens, you can select percentages or pixels.
 Reducing photo size in Paint
 2 | A way to reduce the size of a photo in Adobe Photoshop.
To resize a photo in Photoshop, you need to press the key combination Alt+Ctrl+I or go to the Image menu Image size. Make sure there is a checkmark in the “preserve proportions” box. If you need to reduce the size of a large number of photos, then you should create an Action and then use it using automatic batch processing (this is a topic for a separate article and if you don’t know how to do this, then read on - there will be an easier way to reduce a photo ).
 Reduce photo size in Adobe program Photoshop
 Photoshop has another tool - saving files for the Web (implied for sites on the Internet), where in one window you can immediately change not only the size of the photo, but also the degree and type of jpg compression, remove metadata and evaluate the result (including seeing the weight final file). To open this Photoshop tool, you need to press the key combination Alt+Shift+Ctrl+I or go to the File menu Save for Web.
3 | A way to reduce the size of several photos in Adobe Lightroom.
In Lightroom you can not only quickly process a large number of photos. It has a lot of useful tools, and reducing the size of a photo is just one of them. To resize a photo in Lightroom, you need to select the files, click the Export button and adjust the settings in the Image Sizing fields.
 Reducing photo size in Adobe Lightroom
 4 | A way to reduce the size of a photo using a free program.
A convenient free program that can quickly reduce any number of photos - FastStone Photo Resizer. It can be downloaded from the developer’s website (faststone.org) and used completely free of charge. To open the menu for resizing photos, you need to check the "Use advanced options" box and then click on the "Advanced options" button that appears.
 Reduce photo size in FastStone program Photo Resizer
 In this program, along with changing the photo size, you can add an inscription or logo (watermark) to the photo, change the resolution or the number of colors. There are many settings - if you have the desire and time, you can study them all.
Sometimes you need to reduce the size of photos to send by email or upload to a dating site or your favorite social network.
The fact is that modern cameras take photographs in high resolution, which is of course very cool, but at the same time such photos also have an impressive size. Up to several tens of megabytes.
Of course, on websites such a large photo will take a very long time to open, and those who have a slow Internet connection may not even wait for it to load entirely.
What to do then? It's simple, we can make the photo smaller or compress it. However, this will not be noticeable on the website - the photo will still be just as natural.
There are many programs for reducing the size of pictures and photos, and there are also sites that allow you to do this online.
In this article we Let's look at a few programs first and then provide a link to site that will reduce the image online.
We use the standard Paint program
The Paint program is available by default in operating system Windows 7 and other versions. In order not to search for it for a long time, you just need to click on the “Start” icon and enter “Paint” in the search bar:
The program we are interested in will be in the list of found ones. Let's launch it.

There will be an icon in the form of a document on the left.

When you click on it, a menu drops down from which we select “Open”.

We find a photo on the computer that we will reduce.

Then in the program menu, click on “Image” and “Resize”

Switch the button to “Pixels” and enter the number you need. Please note that if the “Maintain proportions” checkbox is checked, then when you enter a horizontal value, the vertical value will automatically change.
If you want your own value both here and there, then uncheck the box, but then the image will be distorted: stretched or compressed (if it is not proportional).


Disadvantage of the Paint program The point is that we cannot influence the compression force. So we'll look at a very similar program, Paint.NET.
Resize and compress the image using Paint.NET
Paint.NET provides us with ability to influence compression force and the size of the output photo. Therefore, we recommend using it.
This program is also usually already installed on the computer. Try pressing start again and entering Paint.NET.
If found, run it, if not, then follow this link http://paintnet.ru/download/ it can be downloaded. The program is free. Install it and run it.
Just like in the program described above, open the file on your computer, and then go to the “Image” > “Resize” menu, or the keyboard shortcut Ctrl + R.

We also set the parameters we need.


Free SmallFoto batch image processing program
This program is very easy to use, with free license, and allows you not only to reduce and compress images, but also to put a watermark on top, process and rename several pictures at once, i.e. supported batch processing- whole folders.
Appearance of the SmallFoto program:

Select "Source"— a folder on your computer with your original images (the folder can contain any number of pictures or photos);
Also select the “recipient folder” where the thumbnail copies will be saved. You can create it in advance.
Select the size, format and quality you need by clicking on the appropriate buttons and pressing “Start”. That is, everything is very simple. The same photos will appear in your “Recipient Folder”, just in the new size you wanted.
Reduce photo size online
Nowadays, there are many sites where you can go, upload a photo and get a small copy of it.
This means that you don’t even have to launch any programs to resize the photo. Of course, on online sites there are much fewer options than the programs provide, but if it’s important for you to quickly reduce the width and length of something, then why not use them.
This opportunity will not be provided by the website www.avazun.ru, but here is the exact link of the tool http://www.avazun.ru/tools/razmer/

Click and select a photo on your computer. After downloading, a window will appear with the ability to set the dimensions, and a download button.
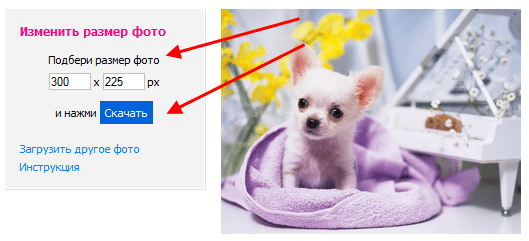
Download the resulting image to your computer.

Let's imagine what it has become for you topical issue how resize picture without photoshop? At the same time, you are on the Internet, and you need to crop a photo or picture for the questionnaire. You will do the right thing if you sit at your computer, or with a tablet, or with a smartphone in your hands, and go to the site.
After all, on this resource you can use an application for cropping photos online. Please note that the application supports gif, bmp, jpg, png formats. It is located in the “Working with Images” block called “Cropping Images”.
And, performing simple operations here, we resizing the image. After all, like everything else within the service, this application very easy to use. It provides the opportunity to get high-quality results very quickly.
With his help we resize photo. We trim it. And to do this, you just need to upload the desired image, select the fragment you need to trim and press the “Cut” button, having previously received information about the size of the future image. That is, the process involves a percentage increase or decrease in the image. There is always the opportunity to see how you cropped the photo and then save it.
What other features does the application provide?
When we resize a photo online, this does not mean that the whole process, which takes a matter of seconds, boils down to simply cropping the image online.
Anyone working with the image can still spend additional (but literally just a matter of) seconds to rotate the photo or flip it if necessary. But this is not all there is to it. You can also add beautiful effects or a frame. And all it takes is a few clicks.
It is not surprising that the site’s users are people of various professions, ages and even hobbies. This is because some people prefer not to search for the application they need on various Internet resources. And this online service is good for many because it concentrates a wide variety of but frequently used applications.
And many of those who spend a lot of time on the World Wide Web (including in order to change photo), end up on the site quite naturally. Whether he is a designer or a webmaster, a journalist or a motorist. After all, many links on the Internet lead here, and the service is available to everyone without registration.
The service is also free. It can be used when preparing photos and music for blogs and websites. In addition, there is no need to download files, install and subsequently update programs.
This is appreciated both by those who are engaged in professional photography and by those for whom spending time with a camera is simply a great hobby. After all, the site has a suitable application for them. For example, for someone who is tormented by the question, how to resize an image?
Why is such a function needed?
The reason why one or another Internet user is forced to look for an online photo editor to use may be different. But, as experience shows, this is usually caused precisely by the need to quickly resize photo.
And this is usually the case. Let's say someone needs to upload an editable image to a website. For example, as a VKontakte avatar. As a rule, on most resources in global network For images uploaded to the service, there is a restriction on its dimensions. And this in this particular case means that you need to resize the photo online.
There is no way to do without this. However, the limitation is not only for dimensions. The limitation also applies to the weight of the image. That is, the problem requires such a solution when you need to reduce the photo. And this is very easy to do using an online photo editor.
But the “enlarge photo” function is used when it is necessary to increase the size of the image. Just like photo reduction, this function is used when someone processes an image very often.
For more detailed characteristics popular service We should also mention such a “trick” as Instagram-style photographs. That is, in this case, the service provides the opportunity not only resize, but also to give the desired look to the photographs. Moreover, we are talking about those cases when you do not have mobile device and Instagram account.
We assure you that on personal computer Processing photos is much more convenient and enjoyable. The “Instagram style photo” feature works exactly the same as online photo cropping. This means the following: you need to upload a photo, apply effects and then save it to your computer. So, in particular, you can create the effect of an old photograph from an ordinary photograph.
To understand what processes are involved in the mechanism for changing image sizes, read the building material of any bitmap. In short, these are small colored squares that, like a mosaic, make up a picture.
When we talk about sizes, we say about permission. It is written as the sum of pixels in one row in width and one column in height and is written like this: 655x382. These are the dimensions of the following art:
Therefore, when resizing the image, we must change the values of these pixels in width and/or height.
In case of size reduction, for example, let's change our example to 300x175, the image will already consist of 300 pixels in width and 175 pixels in height. No narrowing occurred. Photoshop recalculated the pixels in the image and figured out which ones it could get rid of.

But this process is not reversible. If you need to return everything back or do even more, then a new process will start - increase.
In case of increasing size, Photoshop calculates which pixels are missing and adds them based on complex processing algorithms. This process cannot be of high quality, so when the image is enlarged, the quality is lost. The picture loses the clarity of details and becomes blurry. For clarity, I will enlarge the example above to its original size. Compare:

Thus, when enlarging, the quality will greatly depend on the initial size of the image and on the course to which you need to “grow”.
Image Size Dialog Box
So, the most basic way to resize an image is to use the menu command:
Image - Image Size.
Hotkey: Alt+Ctrl+I.
A dialog box will open:

This dialog box allows you, firstly, to obtain information about the current image dimensions, and secondly, to actually change them.
Pixel Dimensions
To change the image size change the values Width and Height. By default they are measured in pixels, but you can select percentages from the drop-down list.
Notice the bracket and chain icon. This means that when you change the width or height, the second value will automatically change in the same proportions as the original image. This is necessary so that it does not turn out compressed or elongated. To enable/disable this function, check the box. "Keep proportions"(Constrain Proportions).
Document Size
I mentioned this group of settings when talking about the printer. Permission(Resolution) changes the pixel size and affects print quality. For printers, feel free to set it in the range of 200-300 pixels per inch.
The Width and Height values tell us what sizes of paper the image can be printed on. Changing the numbers will change the size of the image. Please note that there is also a function for maintaining proportions.
Scale Styles
Determines whether the program will scale any layer styles applied to the image. It is recommended to leave this option checked, otherwise, for example, the shadow you added may end up being larger or smaller than the picture itself.
Interpolation
This is your key to changing resolution without affecting image quality. Interpolation Resample Image is the process by which Photoshop responds to a resizing command by adding or subtracting pixels. The problem is that when interpolating, the program “makes assumptions”, and this can ruin the quality of the image.
When you first start the program, setup Interpolation is turned on, and is responsible for increasing or decreasing the number of pixels in the image. These processes reduce image quality as the program either creates pixels or chooses which ones to remove accordingly. By disabling the setting, you protect quality by locking the pixel size.
When you check the box Interpolation, you need to select a method from the drop-down list below. Why might this be needed? Sometimes you'll need Photoshop's help to create an image larger or smaller than the original.
For example, if you have an image with the resolution 200 pixels per inch, the size of which when printed is 4x6, and the size of the printed version should be 5x7 and it is advisable to keep the resolution at 200 pixels per inch. To do this, you can check this box.
The drop-down options below the Interpolation check box determine what form of math Photoshop uses to add or remove pixels. Because higher image quality means more work than better picture, the more time the program needs to complete the above process.
Here are your options, sorted by quality (worst to best) and speed (fastest to slowest):
- By neighboring pixels (preserves sharp edges) (Nearest Neighbor). Although this method results in the most low quality images, it can be useful because it creates the smallest files. This is useful if you are transferring files over the Internet and you or the recipient has a slow connection. This method works by looking at the colors of surrounding pixels and copying them. It is known for creating jagged edges, so you should only apply it to images with hard edges, such as illustrations, that have not been smoothed.
- Bilinear. If you choose this method, Photoshop will guess the color of the new pixels, choosing a middle ground between the color of the pixels immediately above and below, and to the left and right of the one being added. The result of this method is slightly better than when choosing the option By neighboring pixels and it's still pretty fast, but you're better off using one of the following three methods instead of Bilinear.
- Bicubic (best for smooth gradients). This method determines the colors of new pixels by averaging the colors of the pixels directly above and below the new one, as well as the two pixels to the left and right of it. This method takes longer than the previous two, but creates more smooth transition in areas where one color is replaced by another.
- Bicubic Smoother (best for enlargement). Close to the previous method in the way new pixels are created. Using this method, the pixels are slightly blurred so that new ones can be superimposed on old ones, giving the image a smoother, more natural look. Recommended use this method to enlarge images.
- Bicubic Sharper (best for reduction). This method is also similar to the method Bicubic (best for smooth gradients) in the way it creates new pixels, but instead of blurring entire pixels to improve the blending of new and old like the previous method, it only softens the edges of the pixels. It is recommended to use this method to reduce images.


