How to disable Secure Boot protection in BIOS with UEFI support. Disable UEFI Secure Boot in BIOS How to enable uefi boot in msi BIOS
From the point of view of individual marketers, this is secondary, and the main thing in a computer is a certain UEFI substance...
In fact, UEFI is by no means an attribute of coolness. It's just new and improved software(firmware) of motherboards, which replaced the BIOS. Today, this “beast” lives on all computers released after 2010-2011, and not only on gaming ones, but also on “typewriters”. Let's figure out what UEFI is, what it is global differences from BIOS and how to find it mutual language during installation operating systems.
UEFI vs BIOS
From the point of view of an inexperienced user, UEFI is the same BIOS, only in a graphical shell. But on laptops, with its appearance, nothing has changed at all - the same console interface, the same sections. Yes, BIOS and UEFI setup utilities may be similar. Outwardly, their differences are not visible, but they (like that gopher) exist.UEFI is not just a firmware whose task is to check the health of devices after starting the PC and transfer control to the operating system (the main BIOS functions). This is an almost full-fledged operating system with its own services and applications.
However, new developments do not always bring complete advantages. It’s probably impossible to be better than the old one in everything, so UEFI wins in some ways, but loses in some ways to BIOS.
Advantages of UEFI over BIOS

UEFI GUI
- A simple and intuitive graphical interface in many languages, including Russian (on desktop platforms) with support for mouse control.
- Supports drives larger than 2.2 TB with an unlimited number of partitions.
- Much faster loading of the operating system. Thus, Windows 10 installed on an SSD disk partitioned according to the new GPT standard loads in just 4-15 seconds.
- Own OS boot manager. Allows the computer to boot from media that does not have its own bootloader.
- Installation support third party applications and drivers that extend UEFI functionality.
- Protection against the introduction of malicious code into system bootloaders and its own environment (provided by the Secure Boot protocol built into the interface).
- Own network driver, thanks to which updating UEFI and its components does not require starting the operating system. By the way, UEFI drivers are available for use in the OS.
- Quick transition to the UEFI environment from the Windows 8 and 10 interface.
Disadvantages of UEFI compared to BIOS

BIOS console interface.
- Lack of support for 32-bit operating systems, which limits user freedom of choice. Computers with UEFI only support 64-bit Windows versions, and “whist” and “seven” – partially. Only “eight” and “ten” x64 are fully supported.
- Lack of support hard drives, partitioned using the MBR standard (a traditional type of partition that was widely used before the release of Windows 8). The MBR specification limits the number of primary partitions to 4 and the disk size to 2.2 TB, so it is now considered obsolete.
It is still possible to install a 32-bit or older system on a UEFI computer (provided the hardware is compatible), but it is much more difficult. The user has to manually switch UEFI to BIOS emulation mode, sometimes wandering through the settings for a long time, since the necessary functions are often not visible.
And in BIOS mode, the most useful UEFI features are disabled, such as quick start computer and protection against boot viruses.
How to switch to UEFI from Windows 10
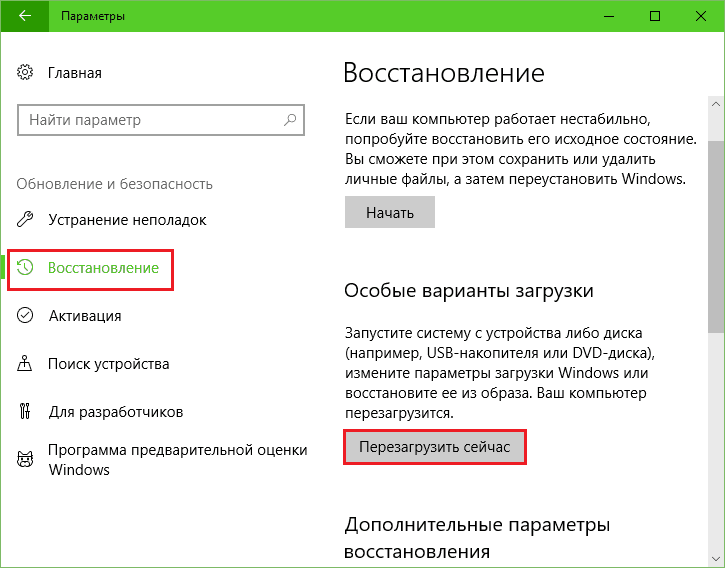
On older computers and laptops - before the release of Windows 8, to enter the BIOS settings you have to turn off the machine and press the specially designated key the next time you turn it on. The key responds to pressing until the operating system starts loading, which is about 2-4 seconds. With the advent of UEFI and the new disk partitioning standard - GPT, only a few seconds pass from pressing the power button until the desktop appears, and the OS starts loading almost simultaneously with turning on the computer. It is almost impossible to catch the moment when the system responds to the BIOS entry key. That's why Microsoft has made this task easier for users by building the UEFI migration feature right into Windows.So, to switch to the UEFI interface from Windows 10, save everything open documents, launch the Settings utility and go to the “ Update and recovery».

Open the subsection " Recovery" and on the right next to the item " Special download options» click « Reboot now».
After the restart, the menu “ Action selection", where you should click " Troubleshooting"(in some versions of "tens" this item is called " Diagnostics»).
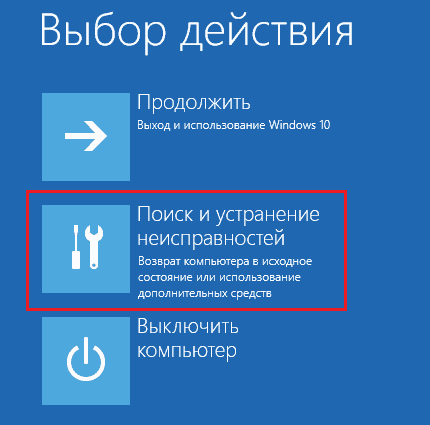
The next step is to go to " Extra options ».

Finally, you are almost there: all you have to do is press “ Firmware SettingsUEFI" After clicking on this item, the computer will reboot again and take you to the right place.

Absence in " Additional options" UEFI transition point means that the computer does not support this feature. One of the reasons may be that the PC is running in BIOS emulation mode, for example, if it uses MBR disks. On such machines, you can get to the area you are interested in only one way - the traditional one, as in the BIOS, that is, by pressing specific key after switching on. And to prevent this process from turning into a test of your reaction speed, you can slow down the loading of Windows somewhat. For this:
- Log in through the utility " Options"in the system settings, then - in the power and sleep mode section and open" Additional power options».

- Click in the transition bar " Button action" or " Lid closing action"(on desktops there is no last option).

- Click " Change settings that are currently unavailable" In area " Shutdown options» uncheck « Enable Fast Startup" After the next start, the computer will boot more slowly, and you will easily have time to press the button to enter the BIOS.

How to switch to BIOS mode to install an unsupported OS
As we have already found out, to install a 32-bit or old version Windows (XP, Vista, 7), you need to switch to BIOS emulation mode, which in different firmware editions is called CSM (Compatibility Support Module) or Legacy. The option to switch to this mode is most often located in the “” section and is literally called:- CSM Boot.
- Launch CSM.
- Legacy.
- CSM Support.
- Legacy Support.
- Legacy BIOS, etc.
To activate, set it to Enable or select Disable UEFI Boot and save the setting.

How to disable Secure Boot
From the point of view of UEFI developers, older and 32-bit operating systems have unsafe bootloaders that should be “banned and not allowed.” Therefore, to install such systems on a computer, along with BIOS activation, it is also necessary to disable Secure Boot - a technology that checks the digital signatures of bootloaders and, if there are none, blocks the system from starting.By the way, on some firmwares this must be done before enabling BIOS emulation, since otherwise CSM/Legacy will not appear in the configuration utility.
The Secure Boot management option may be located in the following UEFI sections:
To deactivate, change it to the Disable state.

In certain editions of the firmware, after enabling the BIOS and disabling Secure Boot, you must specify in the settings the type of operating system to be loaded " Other OS»:

How to create an installation flash drive for a computer with UEFI
With the transition to UEFI, the requirements for bootable USB flash drives have also changed. Now flash drives created according to the old rules, for example, using the utility Microsoft Windows USB/DVD Download Tool, can only be used to install legacy and 32-bit OS versions in BIOS emulation mode.To bet on computer Windows 10 x64 in UEFI mode with Secure Boot active, the boot media must have a FAT32 file system. This imposes a limit on its size (maximum 4 GB), but NTFS, unfortunately, is incompatible with the Secure Boot Protocol. But otherwise, the process of creating bootable flash drives has been greatly simplified. Now you can do this even without programs.
The easiest way to create an installation USB flash drive with Windows 10 is to simply copy the distribution files onto it. In the same way as copying data from folder to folder. There is no need to create a bootloader on the flash drive, since it is already included in UEFI.
To copy a distribution kit in ISO format to a flash drive, just open the latter in Windows Explorer.

If you don’t have the Tens distribution kit or you simply prefer to create bootable media using programs, use the Microsoft utility. To prepare the flash drive for installation, in addition to the flash drive itself and the utility, you only need Internet access. How does the “sacrament” of recording take place and what is your participation in it?

Another simple free utility designed to create bootable drives for UEFI is . The necessary settings are installed on it in literally 3 mouse clicks.

The most important thing here is to choose the right partition scheme and type of system interface. For compatibility with Secure Boot and disks larger than 2 TB, select from the list " GPT for computers with updated: October 29, 2019 by: Johnny Mnemonic
In the last article we talked about that. Now I'll tell you how to set it up Computer BIOS For Windows installations from a disk or flash drive.
1. What is BIOS and UEFI
Each motherboard has special program to boot your computer and configure settings various devices. This program is flashed (programmed) into a special chip on the motherboard and is therefore called firmware.
Previously, all motherboards had firmware called BIOS, which had a simple graphical interface with white letters on a blue background and was limited in functionality. For example, in the BIOS it was impossible to use the mouse, select a language, and there were no graphic elements(pictures) due to the limited volume of the chip BIOS memory. Also, motherboards with BIOS did not support disks larger than 2 TB due to limitations old system disk partitioning (MBR).
Nowadays, many motherboards have a new type of firmware called UEFI, which has improved graphical interface using beautiful background, hand-drawn buttons, the ability to select a language (including Russian) and some improvements. For example, support for a new type of disk partition (GPT), which allows you to use hard disks volume more than 2 TB.
What type of firmware your motherboard has can be found in its manual on the manufacturer's website motherboard or laptop, as well as visually when entering the Setup configuration program. The Setup program is also flashed into the motherboard and is used to change BIOS or UEFI settings.
2. How to enter BIOS Setup
To enter the Setup program, immediately after turning on the computer, press the “Delete” button on the keyboard. On some motherboards and laptops, the “F2”, “F10” or “Esc” keys are used for this. You can read which button to press in the messages that appear immediately after turning on the computer.
In text form

Graphically

If you don’t have time to read, then press the “Pause” button on your keyboard to pause the download. You can continue loading by pressing any key. If you press the key designated to enter Setup, you will immediately be taken to the motherboard setup program.
Classic BIOS

UEFI interface

3. Basics of working in Setup
3.1. Control keys
The Setup program is a set of various parameters, grouped into separate tabs, depending on the purpose. On the right or below there will be a description of the keys with which all actions are performed.

To navigate between tabs, you usually use the “right” and “left” arrows on the keyboard. To move between lines within one tab, use the down and up arrows.

To change values, use the arrows to navigate to the required field, press the Enter key, and then use the arrows to select a new value from the drop-down menu. For this, the “+”, “-” or “Page Up”, “Page Down” keys can also be used.
To return up a level or to the previous page, press the Esc key. The “Esc” key on one of the main tabs will mean exiting the BIOS without saving the settings, which you will need to confirm or refuse to exit.
IN Setup program With the UEFI interface, you can perform all actions using the mouse.
3.2. Saving settings
This is a very important point. After making all the necessary settings, go to the “Exit” tab, select the “Exit and Save Changes” item using the arrows (“Exit and Save Changes”, the word order may be different), press “Enter” and confirm saving the settings by selecting the “OK” arrows or “Yes” and “Enter” again.
You can save the settings much easier and faster by pressing the “F10” key on the keyboard and confirming your decision. This key works in many versions of BIOS, UEFI and is often indicated in tooltips (bottom or right).
3.3. Cancel Settings
If you accidentally changed something or are not sure about the correct settings, then go to the “Exit” tab and select “Exit and Discard Changes” or press the “Esc” key until the message about exit without change settings and confirm the action (“OK” or “Yes”).
3.4. Restoring settings
To restore all settings to optimal defaults, go to the “Exit” tab and select “Load Setup Default”. After this, you can immediately change other settings or simply exit the BIOS and save the settings (“Exit and Save Changes” or “F10”).
4. Download options
Insert a bootable disk or flash drive into the computer on which you plan to install Windows. Now, in order to start installing Windows, you need to configure the BIOS (or UEFI) using the Setup program to boot from a disk or flash drive. You can also use the special boot menu of the motherboard for this ( Boot Menu). The last option is simpler and more convenient, but we will consider both methods.
5. BIOS setup
5.1. Changing boot priority
Go to the "Boot" or "Download" tab.

Install your DVD drive or flash drive first in boot device order.

If you install Windows from a disk, then the first item is to select a device like “ATAPI CD-ROM”, a name indicating the manufacturer or model of the drive. For example, “CDROM:PM-HL-DT-STDVD-RAM GH22NP” (this is an LG DVD drive).
If you plan to install Windows from a flash drive, then first choose something like “Removable Dev.” or the name of the flash drive indicating the manufacturer. For example, “USB: Patriot Memory” (this is a “PATRIOT” flash drive).
Transcend JetFlash 790 8Gb
The second one should be HDD, which is denoted as " Hard Drive", "HDD" or the interface to which it is connected, the manufacturer and model of the disk. For example, “SATA:3M-SAMSUNG HD502HJ” (this is a 500 GB Samsung hard drive with a SATA interface).
Please note that in the “Boot” section there may be other items responsible for boot priority, such as “ Hard Disk Drives" or "Removable Device Priority".

They also need to check that the DVD drive or flash drive comes first.

If you have two hard drives, then the one on which you install the system should be higher. But in this case, I recommend disconnecting one of the disks to avoid confusion and possible errors in installing the system. It can be connected after installation.
In the Setup program with the UEFI interface, everything is done similarly. Look for the “Boot” or “Download” section, find your DVD drive or flash drive there and move it to the very top of boot priority. Plus, you can use a mouse for this, which is easier and more convenient.

5.2. SATA controller operating mode
In principle, this is not so important, but many people are interested in this issue, so I decided to clarify it a little. SATA drives can work in compatibility mode with older IDE disks and in more modern AHCI mode. AHCI gives a small increase hard performance disk with multiple simultaneous accesses to it. This mode of disk operation occurs mainly on servers and is practically useless for an ordinary home computer.
When setting up the BIOS, you can select the mode SATA work controller.

These settings may be located in different places and have slightly different names, but the principle is the same everywhere. You are offered IDE compatibility mode or new mode AHCI.

In general, IDE compatibility mode is recommended for Windows XP, since it does not natively have SATA drivers and simply will not see the hard drive, which will not allow Windows to be installed. Drivers can be built into the Windows installation distribution, but this makes no sense, since it will not affect the speed of operation and may add problems.
There is a simpler and convenient way booting from a DVD or flash drive for both BIOS and UEFI - booting using the “Boot Menu”.
To call the boot menu, the “F8”, “F10”, “F11”, “F12” or “Esc” keys can be used. They can often be seen in tips on home screen computer boot. You can also find out this information from the instructions, on the website of the motherboard or laptop manufacturer, by searching on the Internet, or at random.

Immediately after turning on the computer, press and hold the “Boot Menu” key until the boot device selection menu appears.

Use the down and up arrows to navigate to the DVD drive or flash drive and press Enter.
Sandisk Cruzer
The advantages of this method are obvious - you don’t need to delve into the BIOS, you don’t need to return the BIOS settings back later (although this is not always necessary), and it’s enough to call this menu just once, since after you start installing Windows, this will no longer be needed. Additionally, using the "Boot Menu" does not change the BIOS or UEFI settings.
7. Download problems
Friends, due to the fact that many people had problems loading when installing Windows and some wrote about it in the comments, I decided to make a separate section where I collected methods known to me to solve these problems.
- If the computer stops loading at the very beginning and asks you to press F1, after which it enters the BIOS, then you most likely either have a low battery on the motherboard (the timing may be off), a problem with the processor cooler (it’s broken, it’s not connected there) or hard drive(errors in SMART).
- If the message “Reboot and Select proper” appears when you turn on your PC Boot device or Insert Boot Media in selected Boot device and press a key” this means that the boot area on the disk or flash drive is not found or is damaged. Try booting from installation disk or flash drives with using Boot Menu (Section 6 of the article), if that doesn’t help, make the bootable media again using the “Windows USB/DVD Download Tool” utility.
- If, after restarting the computer, the Windows installation starts from the beginning, then remove the boot disk or flash drive and restart the computer, the installation should continue from hard drive.
- Disconnect all unnecessary USB devices (flash drive, 3G modem, smartphone, printer) from the computer. You only need to leave the mouse, keyboard, DVD or flash drive from which you are installing Windows.
- If you have several hard drives, then disconnect all drives from the motherboard except the one on which Windows will be installed.
- Reset BIOS settings to default (described in this article).
- If the installer does not see the disk or error 0x0000007B appears at the end, change it in the BIOS SATA mode controller from AHCI to IDE or vice versa.
- If every time you boot your computer or laptop it enters the BIOS or opens the boot menu, then install BIOS option Boot Pop Menu to Disable state (if available).
- Disable Fast Boot in the Advanced section of the BIOS, and in the Boot section set the Launch CSM option to Enable (if available).
- In the Boot section of the BIOS, change the boot mode from EFI (UEFI) to Legacy (if available).
- Set the Secure Boot option in the BIOS to Disable (if available).
- Select in BIOS version installed Windows (if any).
- If you have a laptop, one Windows version is installed, but the other one is not and the BIOS setup tips did not help you, then contact support or the manufacturer’s forum. Updating the BIOS can also help, after which additional options may appear in it (sections 8-12).
- If possible, from a DVD, since there are many different problems with flash drives.
- Make from .
- Insert the flash drive into the USB 2.0 connector on the back of the computer (motherboard) or the USB 2.0 connector of the laptop. Booting from USB 3.0 does not always work.
- Try using the Boot Menu, as described in paragraph 6 of this article. This method is simpler and more reliable than setting boot priority in the BIOS and you can determine whether the computer sees your flash drive.
- An underscore on a black screen indicates that the computer freezes while accessing a flash drive or hard drive. If without a flash drive loading in progress further, then the matter is definitely in her.
- If the computer does not see the flash drive or does not want to boot from it, use a DVD or other flash drive for installation.
- If this is not possible, then change the type of flash drive from " removable media" to the "hard drive" using the "BootIt Next Generation" utility, format it using the "HP USB Disk Storage Format Tool" and make it bootable again using "Windows USB/DVD Download Tool". You can download all these utilities below in the “Links” section.
- If the problem occurs after selecting the Windows installation partition, then use the tips for setting up the BIOS (sections 7-12). When installing, remove old partitions from the disk or do it using boot disk Acronis Disk Director.
- If the installer reports that it cannot install Windows on the disk, then try running it or back.
Let me remind you that to exit the BIOS and save the settings, use the F10 key.
8. Links
In the following articles we will look at how to install, and.
Sandisk Cruzer
Transcend JetFlash 790 8Gb
Sandisk Cruzer
Hello, dear readers! Today we will talk about one seemingly complex topic, which will sound like this: UEFI Boot - what is it? and how to disable UEFI in BIOS.
Of course, for the average user, all these names and abbreviations mean nothing, but nevertheless, when buying modern desktop computers and laptops, you will still come face to face with these concepts.
Yes, friends, this is the same settings section on a blue background, which you can enter at the very beginning when you turn on the computer. Here's a picture to refresh your memory:

Many more enthusiasts here have tried to play with the voltage and frequency of the main processor in order to increase the power of their machine. So, the BIOS microprogram was replaced by another, more modern one.
And as you already understood, it is called UEFI. Among the new innovations in it, we can note support high resolutions screen, very large disks and working with a mouse.
If you read all the lines above and did not understand anything at all, then watch a short video to reinforce the topic:
So, it should definitely be said that a full-fledged UEFI system is not yet implemented in all modern computers. But some of its new functions, hitherto unseen, have been successfully implemented into the old BIOS shell.
And one of them is the so-called UEFI Boot (full name Secure Boot). The point of its work is to prevent substitution of the system boot source, thereby reducing the use of unlicensed software.
That is, the picture turns out to be such that now we will not be able to boot, for example, from a flash drive or third party drive. Indeed, in this situation, they simply will not be in the list of available devices:

But really, decide this problem it is possible and very easy. To do this you need to make a couple of settings and that’s it. So let's get to work. So to speak, enough theory.
And in order to disable UEFI functions in the BIOS, you must immediately enter it. As mentioned above, to do this you need to press a certain key combination immediately after turning on the computer.


Thus, we disabled the main UEFI protection function from third-party bootloaders. Then you should go to the “Boot” section and set the parameters as in the screenshot below:

After this, we should have a list of available devices. Now, by changing their position in the list, you can manipulate download sources. Again, using the author’s example, this can be done with a keyboard shortcut Fn+F5/F6:

Well, after all the parameters have been entered, all that remains is to save the changes. This is done in the "Exit" menu by selecting "Exit Saving Changes":

That's all, my friends, now you know exactly the answer to the question: UEFI Boot - what is it and how to disable UEFI in the BIOS. If you have any questions, feel free to ask them in the comments.
Well, if you suddenly want to learn more about UEFI BIOS, then watch a short video where this topic is covered more widely.
As soon as we turn on the computer, it immediately starts running a miniature operating system, which we know as BIOS. It deals with testing devices, memory, loading operating systems, and distributing hardware resources. Many of the features of this set of programs (usually about 256-512 KB in size) allow you to support older operating systems like MS-DOS, giving them many features. Since the days of the PC/AT-8086, the BIOS has changed very little, and by the time the first Pentiums were launched, its development had almost stopped. Actually, there was nothing to change in it except dual BIOS, support for network tools and the ability to flash the firmware. But there were a lot of disadvantages: initial entry into the real processor mode, 16-bit addressing and 1 MB of available memory, the inability to have a “repair” console. And, of course, the eternal problem of hard drive support. Even now, disks up to 2.2 TB are guaranteed to be supported, no more.
Back in 2005, Intel decided to change the BIOS to EFI/UEFI (Unified Extensible Firmware Interface). The EFI system is a more advanced base operating system. UEFI has been working on some Unix and Windows platforms for a long time, but a mass transition has not yet occurred, despite good intentions. And they are:
- Availability of the notorious console for repairing system parameters and installing the OS;
- The EFI partition makes it possible to perform some actions without loading the OS (watching movies, playing music);
- Internet access and therefore availability installed drivers network, TCP/IP stack, etc.);
- Presence of graphic mode and user scripts;
- Support for gigantic disks;
- UEFI storage on new format partitions (GPT);
- Full support for all equipment from the moment of launch.
UEFI can use a general-purpose execution engine like the JVM to run hardware-independent code, which opens up enormous possibilities for creating bootable software.

There is also criticism of this technology. In particular, its implementation may lead to cutting off new players from the operating system market: for this purpose there will always be some technological loophole in the code. Like, for example, the inability to boot Windows 98 from modern BIOSes. But what’s worse is that you’ll have to forget about the millions of MS-DOS programs and other systems that relied on BIOS functions to operate. Perhaps they will still be emulated, but there are doubts about this. And among them there are probably important programs that there will be no one to rewrite. However, all these issues can be resolved – at least through virtual operating systems. But what is certain is that new types of viruses will appear, and we will be able to see this quite soon.
I promised the most quick guide". Here it is:
- Create a GPT partition table on the disk
- Create a FAT32 partition of a couple of hundred megabytes
- Download any UEFI bootloader from the Internet
(we need the bootloader itself, it's one binary file!) - Rename and place this file on the created partition at /EFI/Boot/bootx64.efi
- We create a text config, put it where the bootloader expects to see it
(the configuration and location of the config depend on the specific implementation of the bootloader, this information is available on the Internet) - After reboot we see the bootloader menu
(If Windows 8 or 10 is installed on the disk, this guide is most likely reduced to points 3 - 5.)
TL;DR you don’t need to specify the path to the bootloader in new UEFI boot records - you need to place the bootloader file in the standard “default path”, where UEFI will find it, and instead of the UEFI boot menu, use the bootloader menu, which is much easier and safer to configure
What not to do
There are, in fact, several ways to configure UEFI boot. I will start by describing other options - so that it is clear how (and why) not to do it. If you came for guidance, scroll to the very bottom.
No need to go into NVRAM and touch efivars
The most “popular” procedure for installing a bootloader into a system is as follows: the OS installer creates a special partition, on it a directory structure and places the bootloader files. After that, using a special utility (efibootmgr in Linux, bcdedit in Windows), it interacts with the UEFI chip’s firmware, adding a boot record to it. This entry specifies the path to the bootloader file (starting from the root of the file system) and, if necessary, parameters. After this, the option to load the OS appears in the computer's boot menu. For Linux, it is possible to do without a bootloader altogether. The boot record specifies the path directly to the kernel along with all the parameters. The kernel must be compiled with the EFISTUB option (which has long been a standard for most distributions), in which case it contains an "EFI executable" header that allows the firmware to run it without an external boot loader.
When the system starts, when the user selects the boot entry he needs, the UEFI firmware first looks for a special EFI partition on the disk registered in this entry and accesses file system on this partition (required FAT or FAT32), and launches the bootloader. The bootloader reads its config from the settings file and either loads the OS or provides a boot menu. Don't notice anything? Yes, we have two boot menus - one at the UEFI chip firmware level, the other at the bootloader level. In reality, users may not even be aware of the existence of the second one - if there is only one item in the menu, the Windows boot loader starts loading it without any questions asked. You can see the screen with this menu if you install a second copy of Windows or simply reinstall it crookedly.
Typically, to manage boot records, manuals on the Internet suggest interacting with the UEFI firmware. There are as many as five main options on how to do this: efibootmgr under Linux, bcdedit on Windows, some kind of software on Macs, the bcfg command of the uefi shell utility (runs from under UEFI, “on bare metal” and without an OS, since compiled in that very special format) and for especially high-quality firmware - using UEFI graphic tools (in popular parlance, “in BIOS settings").
For all the “multi-books” written above, you could easily miss this idea: the user, in order to change the settings of the software part (for example, add an OS startup parameter), is forced to rewrite the flash memory of the chip on the board. Are there any pitfalls here? Oh yeah! Windows is sometimes capable of making a brick out of a laptop, and Linux too, and in different ways. The quality of firmware often leaves much to be desired - UEFI standards are either implemented crookedly or not implemented at all. Logically, the firmware must survive the complete deletion of all efivars variables without consequences, not store critical data in them and independently restore the default values - simply because the user has access to them, and the likelihood of their complete deletion is far from zero. In the process of experimenting, I personally repeatedly (fortunately, reversibly) “bricked” my Lenovo - all items disappeared from the boot menu, including the “go to settings” option.
Working with UEFI boot records is also not easy. For example, the efibootmgr utility does not have an "edit existing entry" option. If you want to change a kernel parameter a little, you delete the entire entry and add it again, already changed. In this case the line contains double and single quotes, as well as forward and backslashes in a not particularly obvious order. When I finally got this magic to work, I saved it in the form of bash scripts, which are still lying around in my root file system:
efibootmgr -c -L "Archlinux (debug)" -l "\EFI\archlinux\vmlinuz-linux" -u "root=/dev/mapper/vg1-lvroot rw initrd=\EFI\archlinux\initramfs-linux.img systemd .log_level=debug systemd.log_target=kmsg log_buf_len=1M enforcing=0"
No need to use GRUB
This is a damn mastodon, 90% of its functionality is intended for MBR drives. To configure, you need to edit a number of files, and then run the config generation command. The result is a huge sheet that is incomprehensible to a normal person. It contains a mountain of executable files. It is set by a command that you can’t just take out of your head - you must definitely look into the documentation
grub-install --target=x86_64-efi --efi-directory=esp_mount --bootloader-id=grub
For comparison, the simplest UEFI-bootloader, which is part of the systemd package, is installed with the command
bootctl install --path=/boot
This command does exactly two things: it copies the bootloader executable file to the EFI partition and adds its boot entry to the firmware. And the config for it takes exactly SEVEN lines.
"The Brief Guide" - a little more detail
The boot menu must be implemented at the bootloader level- editing text configs is much easier and safer.
We don’t need a boot record - the fact is that when you set the BIOS settings to boot from a disk, the UEFI firmware first looks for an EFI partition on it, and then tries to execute the file at a strictly fixed address on this partition: /EFI/Boot/BOOTX64.EFI
What is an "EFI partition"? In theory, it should be of a special type "EFI System" (ef00). On practice, The first partition on a GPT disk that is formatted in FAT32 and has enough space is suitable to place the bootloader and supporting files (if any).
Point 3: "Download any UEFI bootloader from the Internet". What does it mean? A bootloader is simply an executable file of a certain format, which comes with a config. For example, if you have a package with systemd installed on hand, the bootloader file can be found at /usr/lib/systemd/boot/efi/systemd-bootx64.efi, rename it bootx64.efi and copy it to /EFI/Boot / on the EFI partition. Don't have systemd at hand? Download the archive from the Archlinux website. Or from the Ubuntu repository. Or Debian. Do you have a Windows system at hand? Take the Windows bootloader from there, it will also work)) If you can set it up, I honestly haven’t tried it.
Point 4: "Set up config". Like regular program When the bootloader starts, it expects to find configuration files in certain paths. This information is usually easy to find on the Internet. For the systemd-boot boot loader, we need to create a “loader” directory in the root of the EFI partition, and in it a “loader.conf” file with three lines (I’ll give my own):
default archlinux timeout 10 editor 1
The editor parameter is responsible for the ability to edit the boot menu item before launch.
Next to loader.conf you need to create an entries directory - one file in it will be responsible for one boot entry in the boot menu. I have one arch.conf file there with the following content:
title Arch Linux linux /efi/archlinux/vmlinuz-linux initrd /efi/archlinux/initramfs-linux.img options root=/dev/mapper/vg1-lvroot rw initrd=\EFI\archlinux\intel-ucode.img
I didn’t mention it, but it’s pretty obvious - the kernel and initramfs must be on the same file system as the bootloader, that is, on the EFI partition. The paths to them in the configs are counted from the root of this file system.
Other bootloaders
systemd-boot is very simple and provides a spartan looking black and white menu. There are more beautiful options if the soul asks for beauty.
rEFind is a very beautiful downloader. can be found here as a deb package. I use it on my laptop. Can create a boot menu automatically, without a config - simply by scanning files.
Allows you to set the native screen resolution, has mouse support on the loading screen, and different themes. The default theme is terrible, the xml config is unreadable, I couldn’t configure it.
Various unobvious consequences
You can easily try this scheme at work. Take a USB flash drive, format it into a GPT partition table, create a FAT partition and copy the bootloader there. The computer will be able to start from it.
If you just copy the boot partition to such a flash drive installed linux- the system will calmly boot from the flash drive without seeing the difference.


