Windows 10 programs and features. Launching uninstallation of a program from the Start menu
The system can be expanded third party programs, and then delete them. Some applications can be put into startup, given priority, or blocked from installation. You can also designate the location where all programs will be installed by default.
Managing installed programs
operating room Windows system 10, although it differs from previous versions in greater functionality, it also contains familiar tools and services.
Control Panel in Windows 10
In Windows 10, as in earlier versions, there is standard program, through which you can uninstall and manage third-party applications.
Uninstalling an application
To remove programs from your computer, you can use the uninstall file, which is usually located in the folder with the installed program. But this file is not always provided by the developer, so you can perform this action through the “Control Panel”. While in the “Remove Programs” subsection, select one of the applications and click on the “Delete” button, after which the removal wizard will open, follow its instructions to remove unnecessary programs from your computer.
 Using the "Delete" button you can uninstall programs
 Video: how to remove a program on Windows 10
Prioritization
By giving priority to a program, you can set the percentage of computer performance that will be given to it relative to other programs. For example, if you have two browsers running simultaneously, then the one with higher priority will consume more resources and, accordingly, work faster.

Activating program startup
By adding an application to startup, you will ensure that it will start on its own every time you turn on the computer. This is convenient if you use some kind of program every time you interact with a computer. The disadvantage of this method is the load on the computer: startup programs slow down the system startup and subsequently overload it.

Prohibition on installation of programs
Deny installation specific program standard Windows methods will not work. The only way to limit access to program installation is to create a new account without administrator rights. Since almost all applications are installed as an administrator, since they make changes to the main partition hard drive, an ordinary user will not be able to use them.
If you need full control over the new account, then you can create it with the status “For a child”. In this type of account, all actions are sent to the administrator account, from which you can set additional restrictions, including on the use of certain applications.
- While in your computer settings, go to the “Accounts” block.
 In "Windows Settings" go to the "Accounts" section
 - Select the “Family and other users” sub-item and click on the “Add family member” button.
 Click the “Add Family Member” button
 - In the next step, indicate that you are creating an account for your child.
 We indicate that the account is for a child, click “Next”
 - Fill in all the required data and confirm the action.
 Fill in the fields “Last name”, “First name”, e-mail, click “Next”
 - Go to the official website Microsoft, log in and proceed to editing family settings.
 Log in to the Microsoft website and go to family settings
 - In the “Applications and Games” block you can set a ban on some programs. You can only block applications that have already been launched at least once.
 Block access to some applications if necessary
Video: Parental controls in Windows 10
Installing incompatible programs

Video: Working with Compatibility Mode
Changing the location of installed programs
To change the default location for new applications to be installed, follow these steps:

The system does not allow you to install the application
Sometimes when you try to install an application, you may see a message stating that the program may be dangerous for the system, and you cannot continue the process. In this case, there are two options: the program being installed is really dangerous, check it with an antivirus to make sure it is safe, or, if you are confident in the reliability of the program, disable Windows Defender - the built-in antivirus that prevents you from installing. Remember that this may lead to adverse consequences.
 Sometimes the system can block a program that it considers unwanted
 To temporarily disable Defender, open the task manager, find Windows process Defender and complete it. This will pause the defender for 10-15 minutes, then it will start again. During this time you will have time to install the program.
 Terminating the Windows Defender process
 There may be another reason why the system does not allow you to install the application: the installation file does not have a registered license that guarantees its safety. This should also cause you concern: safe programs, most likely would have received a certificate. At your own risk, you can bypass the system ban by disabling the UAC (User Account Control) check. Please note that to do this you need to be logged in as an administrator.

Why do apps take a long time to install and how to fix it
The reasons why a particular program takes a long time to install can be different:
- the installation file is damaged or is intended for a different system capacity;
- the computer or some of its components are overloaded with an abundance of running processes, programs or tasks in progress, so very little productivity is allocated to the installation;
- the hard drive is full and the installed program cannot find a place for itself;
- the hard drive is divided into incorrectly located cells;
- if the problem occurs with large applications, then the process may be slowed down by the antivirus, since during installation it simultaneously scans all files added to the system.
So the main reason long installations- weak, overloaded or broken computer components or unoptimized installation files.
In most cases, deleting will help. unnecessary programs from startup, as stated earlier. Removing unnecessary programs and defragmenting the disk can also help speed up your computer. You should also disable your antivirus during installation so that it does not slow down your work.
Programs in Windows 10 can be installed, uninstalled, added to startup and given priority. If the system does not allow you to install or launch the application, then disable the built-in antivirus and certificate checking. When working with programs, remember to monitor the load they place on your computer.
Windows 10, in terms of managing the installation/removal of programs, is, in principle, not much different from previous builds, but there are still some nuances: for example, an updated uninstaller tool has been added, which now launches with lightning speed through “Add or Remove Programs.”
...however, questions immediately arise: where is the installation and removal of Windows 10 programs? which one is the best quick way get into this control panel component.?. and, of course, the most important question that worries the minds of dozens of users is how to properly delete Windows programs 10, so that everything is clean and without errors after the uninstallation has completed (when the program is removed).
Let's look at it... and explain it side by side:
Text by points:
Where is the Add/Remove Programs section in Windows 10?
notes for:
in Windows 10, as in other systems, there is a built-in “search” on the taskbar Windows components- in order to find any instrument in the richest composition of dozens, simply type the name of the required element in the search field. If the name is entered correctly, then in 99% of cases it will be found. All you have to do is click on the link you found and go where you need to go...
You should also be aware of the fact that most programs installed on your computer create their own folder in “All Applications” - in this folder there is a shortcut that moves to the Windows desktop for quick launch program, and also in this folder, along with a shortcut, there is a so-called uninstall file like uninstall.exe - if you click on this file, the uninstallation process will start - that is, the removal of a specific program!
However, if working with files is still a difficult task for you, then we will consider standard deletion variations installed programs in the tens system:
In Windows 10, the “Add or Remove Programs” tool itself must be looked for in “Programs and Features” - that is, this tool remains in its usual previous place of management as in previous systems.
...and you can open it in the following simple way:
In the search - on the taskbar - type the phrase “Control Panel”, the system will immediately display the result - all we have to do is select the required item.
But there is a nuance here: pay attention to the “View” settings item (circled in brown) - if, for example, you, like me, have the option to display the “Categories” control panel set, then in the “Programs” option select “Uninstall a program”.
...if “Icons” is set, then in this case we select “Programs and Features”...

We desperately click on the required items...
...in the program and component settings item, everything is simple: to remove some program that is unnecessary for you and me - 1 - find it in the list... press the right mouse button and click on “Delete”, or you can quickly click on the top section of the menu , as shown in the screenshot below, Delete/edit...

If you uninstall the program, a warning window will open - you agree to the uninstallation.
The automatic removal process will start...
uninstalling programs through Settings in Windows 10
In the updated top ten, you can change system parameters using the built-in “Settings” tool of the same name. To get to the parameters, click “Start” and, accordingly, “Settings”. In these very parameters, just like in the components... it is possible to easily remove programs installed on the computer.

how to quickly open Programs and Features - the easiest way
How to quickly open the uninstall programs section?
It’s simple: open it in “Applications and Features” of Windows 10 - I’ll give you a couple of ways:
Let's grab the mouse - right button - click on the "Start" button (I will report: it is possible to use Windows hotkeys - in this case the so-called combination WinIX - Win + X -
Users who were using Windows XP before upgrading to Windows 10 are accustomed to uninstalling programs using the Add or Remove Programs tool. But, Windows 10 does not have a tool with exactly the same name, which sometimes confuses users. In this article we will talk about which tools replace Add or Remove Programs in Windows 10 and where they are located.
Installing and removing programs in the Control Panel of Windows 10
Windows 10 Control Panel has a tool for installing and uninstalling programs. In order to access this instrument need first . The easiest way to do this is to use the new Start button menu. Right-click on the “Start” button or press the combination Windows-X keys and in the window that opens, select “Control Panel”.
After opening the “Control Panel”, click on the “Uninstall programs” link.

You can also use the search in the Start menu to access this tool. To do this, open Start and type search query"Programs and components".

One way or another, as a result, the “Uninstall or change a program” window will open in front of you with a list of all installed programs.

In order to remove one of the programs, you need to right-click on it and click on the “Delete” button that appears.

If you can't find the desired program, then you can use the search. In the upper right corner of the window there is a search form with which you can find the programs you need.
Add or remove programs from the Settings menu in Windows 10
Windows 10 also has a new tool for installing and uninstalling programs. It is accessible from the Options menu. In order to open it, you need to follow the path “Start - Settings - System - Apps and Features” or you can open the “Start” menu and enter “Applications and Features” into the search.

As a result, you will see a list of installed programs. At the top of the list will be search string For search required applications, as well as drop-down menus for sorting the list of programs.

In order to delete a program here you need to select it with the mouse, and then click on the “Delete” button.

After clicking the “Delete” button, a warning will appear informing you that the program and all its data will be deleted. In order to continue, you need to click on the “Delete” button again.
Uninstall programs in Windows 10 directly from the Start menu
Also in Windows 10, you can uninstall programs directly from the Start menu. To do this, you need to find the program in the list of programs or use the search. After which you just need to right-click on the program and select the “Delete” menu item.

If this is an application from the Microsoft App Store, it will be removed immediately. If this is a program that you installed manually, then when you try to remove it directly from the start menu, the “Uninstall or change a program” window from the “Control Panel” will open in front of you.
If you download any program or file from a browser or other program, by default, unless you change the download folder, all items are downloaded to the Downloads program. Apps you download through the Windows Store on Windows 10 or 8.1 are downloaded to a different folder.
In general, folders with application data are located in shared folder WindowsApps.
To find it we follow the path Local disk From:/ProgramFiles/.
You most likely will not see this folder in the general list, because... it is hidden. To do this, click on the tab at the top of the screen View, and check the box next to the item Hidden elements . After this, your folder should appear.

In addition, in most cases it is not possible to immediately enter the folder due to security settings. Therefore, it is necessary to edit them a little.
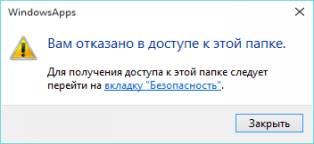
To do this, when the window appears You do not have permission to access this folder click on the button Continue, and when the window appears You are denied access to this folder, click on the link "Security" tab.

In the window that opens, select the tab Safety and click on the button Additionally.

Now in the window that opens Extra options security for WindowsApps click on the button Continue.


In the window that appears, in the field Enter the names of the selected objects you need to enter the name of the account to which you want to grant access, i.e. the one in which you are currently located, most often this is the name of the computer owner, “Administrators”, “Admin”, or the make and model of the computer and click on the Check names button. In this case, if the name is found, it will be displayed in underlined form and all you have to do is click on the button OK. If the name was entered incorrectly, you will get an error that the name was not found and the operation will not work.

If everything is in order, in the window we also click OK, and OK click in the window Properties. After that, go to the properties of this folder again, in the tab Safety, press again Additionally. In chapter Permission Elements Double-click on your account name.
Now, in the window that opens, check the box next to the item Full access And Apply these permissions to objects and containers only within that container and press OK.

In the window Windows Apps Advanced Security Settings and then in the window Windows Apps Properties also click OK.
Now you can try to open this folder again. In some cases, you may see the window appear again You do not have permission to access this folder, then just click on the button Continue, the second error should not appear this time.
Now you will see a list of folders in which they are installed standard applications Windows 10
In this article I want to consider in detail the features of the section - Installing and removing programs in Windows 10.
The new, tenth edition of Windows, in addition to the standard program installer, has several additional services. Store now available Microsoft applications, where you can find a huge number of interesting utilities that every person needs.
For more experienced users, a function has been added to download software via command line. More details about this later in this article.
First of all, I want to tell you how to open a section- Installation and removal of programms.
You can open the required menu in several ways:
Installing programs on Windows 10.
- Regular installation of any programs.
The installation wizard built into the system is also present in Windows 10. The only thing you need is to open the installation file (installation file) or run the disk, then follow simple instructions. Installation proceeds like in any other Windows.
- Microsoft Store.
Before you start, you must log in using your account. Microsoft entry. If you don't have account, then you need to create it; registration is intuitive and takes no more than 7 minutes. Then we go to the taskbar, where we select the “Store” icon. Use of the service is only available with an active Internet connection.
This specialized service contains a large amount of software stored on remote server. Many useful utilities free.

There is a built-in search. Finding what you need doesn’t take much time, it’s simple enter keyword in the store search box (top right). New and popular utilities are included in a separate TOP chart. The list can be found at home page store
The developers have introduced the ability to install utilities directly from “repositories” (storages) using the command line. Many people are put off by the fact that this method does not imply any graphic design.
But the fact remains that installing content directly from storage is the fastest, most reliable way.
The OneGet service allows you to install software with just one command – “Install-Package”. This requires:

For example, if you need Opera browser, then enter instead of *application_name* the name of this browser itself. After completing all the manipulations, the required software will be downloaded and then installed on Personal Computer, it looks like this:

- Normal removal.
Uninstallation is standard. To do this, right-click on the “Start” icon. In the list that opens, select Settings, then in the upper right corner, in the search bar, type “Programs and Features.”


Windows 10 has a tablet mode, the uninstallation algorithm in which is as follows:
- Go to “Start”.
- Find the “Settings” icon.
- Next we move on to the “System” section.
- A menu will open where we find the line “Applications and features”.
- We select the required software, after which the “Delete” button appears.

Installing and removing programs in Windows 10 includes both old proven methods and innovations that will appeal to only beginners and experienced users. Microsoft continues to take care of its customers by providing excellent quality software.
If you have questions about this topic, feel free to write in the comments, I will try to answer as quickly as possible. Sincerely, .


