Virtual sound card. Virtual audio cable VAC.
This guide will show you how to set up live calls. In order for your listeners to call you, they need to install Skype and have a microphone connected.
To receive calls, you need to set up a microphone, set up Sam Broadcaster as described in, connect a microphone and headphones (so that the sound of the conversation does not enter the microphone and does not create an echo) and follow the instructions below.
1. Required Software.
In order to organize a radio with the ability to receive calls to the studio, you need the following software:
- Skype- directly for receiving calls from listeners.
- Free
- Sam Broadcaster- for mixing and sending audio to the server.
- Paid
- VAC (Virtual Audio Cables - Virtual Audio Cable Driver) for the correct distribution of sound streams, avoids the purchase and installation of additional sound card and wire connections.
- Paid
2. VAC (Virtual Audio Cables) setup.
The VAC consists of two modules, the "Virtual Audio Cables" program and the small "Audio Repeater" program. We'll need both. First of all, launch the VAC "Control Panel" and set the number of cables to 3, as shown in the figure (you need to enter the number at the top left and click "Set"):
These cables are, in fact, emulations of additional audio interfaces on your computer.
Next, launch 4 Audio Repeater "and, and configure as follows:
- Repeater 1: Wave in: Your sound card (we use SigmaTel Audio) Wave out: Virtual Cable 1
- Repeater 2: Wave in: Virtual Cable 2 Wave out: Your sound card (we use SigmaTel Audio)
- Repeater 3: Wave in: Virtual Cable 1 Wave out: Virtual Cable 3
- Repeater 4: Wave in: Virtual Cable 2 Wave out: Virtual Cable 3
After setting up in each Repeater, we press "Start", you should get something like the following picture:
Click to enlarge.
In the new window, set 3 parameters:
- Voice FX Destination- Encoders (Record to pipeline, skip output)
- Record Driver- Direct sound recorder
- Record soundcard device- Virtual Cable 3
Now in the "Voice FX" window, press "Mic Off", "Lock Talk" and connect the Encoder to the server, as shown in . Everything, now what you say into the microphone, and your interlocutor on Skype - goes on the air. Please note that the live broadcast heard by listeners will be slightly behind your transmitter as the Internet Radio is buffered!
5. Optional.
In case of problems - please check if your settings are correct. Also, check the volume status in Windows settings- the microphone must be turned on (very often it is turned off by the volume control).
The idea of creating a virtual audio cable arose shortly after the appearance of programs for creating and processing digital sound - virtual audio signal generators, musical tone synthesizers, rhythm machines, equalizers, compressors / expanders, effects processors, etc. At first, each of these programs was standalone: it received a sound signal directly from the input of a sound adapter or from a sound file and output the result to the output of the adapter or to another sound file. This approach made it possible to use programs on any computer with a sound adapter, but had three main drawbacks:
- Lack of versatility. Several programs could not be connected in a chain, as is done in the studio or even at home, in the case of block equipment (player, preamplifier, equalizer, power amplifier, etc.). Thus, each program was a "monoblock" with a certain set of functions, which was quite difficult to expand.
- Loss of quality when working in real time. Recording the results of work from the output of a sound adapter when the program was running in real time inevitably entailed a loss in the quality of the original digital sound when it was converted to analog form. To keep the signal quality unchanged, an adapter with digital interface along with a digital tape recorder (about $ 1,000).
- Limitation of efficiency when working in recording mode. Some programs allowed you to write the results in sound file on the disc, and then no loss of quality occurred. However, in this case, the ability to quickly control the sound parameters was lost, and it was possible to listen to the created fragment only after the completion of its recording to disk.
The Virtual Audio Cable program allows you to almost completely solve all these problems by organizing a computer version of a conventional audio connecting cable in the system, which connects units of audio equipment - household or studio - to each other. We can say that it emulates a set of sound adapters, each of which has an input and output tightly connected from the inside.
Purpose of the program
- Connecting multiple sound programs in a chain so that each next program receives sound directly from the previous one, without any intermediate devices or operations.
- Transmission of digital audio unaltered, without any loss of sound quality.
- Keeping unchanged digital form an audio signal created by programs that only allow you to play the signal in real time on a sound adapter.
- Mixing audio signals from different programs connected to one end of the cable.
- Reproduction of an audio signal transmitted over a cable for transmission to several programs at the same time.
The device and operation of the program
The VAC virtual audio cable is a Windows audio (Wave) driver that creates two audio devices (ports) in the system: Virtual Cable n In and Virtual Cable n Out, where n is the cable number starting from 1. Any port can be connected to any number of applications (clients); this possibility in foreign documents is called multi-client feature. Sound signals output by applications to the Out port are mixed into a single signal, which is then transmitted to all applications that extract sound from the In port. Applications only need to know how to work with standard Windows Wave devices - and nothing more.
In Windows 9x/Me, VAC creates a DirectSound output port for each cable, accessible through the appropriate interfaces, and operating in parallel with the regular output port (Wave Out). Due to the imperfection of the implementation of the DirectSound subsystem in Windows, there is no way to correctly prevent the emulation of Wave devices by the subsystem, and therefore the list of DirectSound devices simultaneously contains both "native" VAC devices and emulated ones. Of course, when working, you should choose "native" ports that have a suffix (DirectSound).
VAC mixes sound signals with saturation (saturation), also called clipping (clipping - cutting), which avoids noticeable distortion as a result of exceeding the maximum amplitude of the received signal.
Mixing and transmission of audio data are performed strictly uniformly inside the VAC, according to events (interruptions) from the system timer, so that each virtual device works like a real one, providing a given audio stream rate. For each interrupt, a block of a certain size is transmitted, depending on the interval between timer interrupts (latency). The minimum interval - 1 millisecond - provides the smoothest transmission of the stream, however, on "weak" computers, it can lead to excessive overhead.
Drawing an analogy with the "iron" audio devices, it must be recalled that each of them has inputs and outputs that are interconnected by interconnect cables. Ordinary audio cables are generally symmetrical, although some will only allow connection in one direction when the cable also has an input and output. The output of the device is connected to the input of the cable, and the output of the cable is connected to the input of the next device, and so on.
Similarly, each audio processing program that interacts with the audio adapter can have an input and an output. By selecting a recording device (Wave In), the input of the program is connected to the ADC output of the desired sound adapter, and by selecting a playback device (Wave Out), its output is connected to the DAC input of the same or another adapter. There is a certain confusion in terms here, since in Windows multimedia devices are not classified by I/O, but by I/O ports. It is clear that the input port (In) is actually the output of the device facing the inside of the system, and the output port (Out) is the same input facing the inside of the system. Sound fed, for example, to an external line input adapter (Line In), the ADC is converted to digital form and transmitted by the adapter to the internal input port, and the digital sound transmitted by the program to the internal output port is converted to analog form in the DAC, and then output to the external output (Line Out or Speaker Out) .
Since VAC is a digital cable, it transmits audio data to its output in exactly the format (combination of sampling rate, sample depth and number of channels) in which they were received from the sound source. This means that while one end of the cable (port In or Out) is open in some format, the other can only be open in exactly the same format. VAC does not perform format conversions during transmission.
In order to be able to connect not only programs, but also sound adapters to the cable, the VAC package includes the Audio Repeater program (sound repeater). It does the same as the VAC driver, but in reverse - it passes the audio stream from one Wave In device to another Wave Out device. A repeater is useful for monitoring a signal on a cable or for
"distribution" of the signal from the sound adapter to several processing programs. The repeater is usually connected between the cable and the audio adapter - from the input or output end of the cable.
Thus, with the help of VAC, it is possible to chain several conventional audio programs in a chain, transferring sound from one to another in digital form, without conversion, while not losing sound quality at all. The only problem here is the delays that inevitably arise due to the buffering of audio data in each of the programs. This does not affect the sound quality in any way, but if there are more than two or three programs in the chain, it makes it difficult to control the sound in real time.
When one end of the cable is free (has no program attached), it behaves like a normal wire. Sound output to the Out port is lost, and absolute silence is introduced from the In port.
Extraction, installation and removal
VAC is currently distributed by NTONYX (http://www.ntonyx.com/). Demo versions are available at http://www.ntonyx.com/vac.html (VAC 2.05) and http://www.ntonyx.com/vac111.html (VAC 1.11). Version 2.05 - modern, with DirectSound support, improved real-time algorithms, versions for Windows 95/98/Me and NT 4/2000. Version 1.11 - obsolete, only for Windows 3.x/95, no DirectSound support.
Subsequent versions of VAC will be distributed by another company, which I will announce after reaching an agreement with it on the site of my programs (http://www.spider.nrcde.ru/music/software.html).
Demo versions provide all VAC features, limited only by the number of independent cables (one) and the interval between timer interrupts - 100 ms. This is sufficient for most applications of the program.
Documentation for VAC is made only in English - mainly due to the almost complete absence of buyers in Russia full version. For the same reason, the VAC market is focused mainly on foreign users.
To install VAC, you must first unpack the distribution archive into any empty directory. Installation in progress standard means systems from the control panel:
- in Windows 95/98/Me/2000 - using the Add Hardware Wizard. Should be abandoned automatic search new equipment, select the class of sound devices in the list, click the "Install from disk" button, specify the directory where the program distribution package is located, and then follow the instructions of the system;
- in Windows NT 4 - using the Multimedia panel. In the "Devices" tab, click the "Add" button, select "Install from disk" in the list, specify the path to the distribution directory and follow the instructions of the system. Usage example
Assume that the system has one virtual cable with Virtual Cable 1 In and Virtual Cable 1 Out ports. It is necessary to record the result of the work of some program that does not offer the ability to select a sound device, but outputs sound exclusively to a standard system device (Wave Mapper).
Open the Control Panel, there is the Multimedia panel. In the Audio tab, select the playback device Virtual Cable 1 Out. After that, the volume control icon from the taskbar disappears - you don’t need to be scared, since VAC does not have its own mixer.
Run any program digital recording(Sound Forge, Cool Edit, Gold Wave, WaveLab) and select Virtual Cable 1 In from the list of recording devices. If the format of the digital sound of the program whose result we need is known in advance (for example, 44100/16/stereo), we immediately set it in the recording program. Otherwise, the “playing” program is launched and the required format is selected in the recording program from among the standard ones. As soon as the recording is turned on, the format is chosen correctly.
Finally, turn on the recording, start the "playing" program from the beginning, record the fragment, turn off the recording. If during the recording process you need to listen to the sound passing through the cable - start Audio Repeater, select the Virtual Cable 1 In input device, and the real sound adapter as the output device, set the format, press Start. The repeater takes a copy of the audio stream from the cable output and sends it to the "iron" adapter without affecting the recording process.
Upon completion of work, it is recommended to return the status of a standard system device to the real adapter in the Multimedia panel, otherwise all sounds sent via the cable will be lost, since nothing is connected to the cable output.
Future plans
The VAC 3 line will be released soon - with new, more reliable algorithms for transmitting audio data, eliminating block losses due to insufficient buffer size in connected applications. This will minimize propagation delays (latencies), which today are often 100 ms or more.
In addition, the VAC 3 will be provided with a visual setup program that displays the current audio stream format for each cable. Also in the next versions it is planned to introduce volume control and format conversion.
Information about the next versions will be posted on the site of my programs (
Here I will try to describe not the setup process, but its purpose, that is, I will analyze the main parameters and values. So let's get started.
The VAC has two different kind repeaters: MME(Multimedia Extension) and KS(Kernel Streaming). The first is programmatically obtained sound, the second refers directly to the OS kernel. The second method is of course better, however, with any settings, it gives me an error, I still could not start the repeater through KS.
Therefore, the article will consider the MME repeater.
In the last article, an example was considered .bat file a to automatically start the repeater. Below is the content .bat file for the repeater that I use every day.
@chcp 1251 start /min "audiorepeater" "%programfiles%\Virtual Audio Cable\audiorepeater.exe" /Input: "Line 3 (Virtual Audio Cable)" /Output: "Speakers (Razer Megalodon)" /SamplingRate:48000 /Buffers :7 /BufferMs:50 /Channels:8 /ChanCfg:"7.1 surround" /Priority:"Realtime" /Autostart
Options that can be included in .bat file are similar to the options that are in the repeater window. I will just focus on some of them for a more detailed explanation.
- /min- the repeater immediately starts minimized to tray.
- /AutoStart- the repeater starts working immediately after starting. Can be paired with /min.
- /WindowsName- sets a non-standard name of the repeater window.
- /CloseInstance- a specific option designed to close working windows, including repeaters. Works with tag /windowname. This tag specifies an alternative name for the repeater window, and the /CloseInstance tag closes this window.
Here is an example of work:
Start script
@chcp 1251 start /min "audiorepeater" "%programfiles%\Virtual Audio Cable\audiorepeater.exe" /Input:"Line 1 (Virtual Audio Cable)" /Output:"Speakers (Realtek High Definiti" /SamplingRate:48000 /BufferMs :200 /Buffers:5 /Priority:"High" /WindowName:"Sys and Game Audio" /AutoStart Exit
Finish script
@chcp 1251 start /min "audiorepeater" "%programfiles%\Virtual Audio Cable\audiorepeater.exe" /CloseInstance:"Sys and Game Audio" Exit
- /priority- sets the process priority for processing. Normal priority is usually enough. If you need, you can set it higher, but this will slow down the speed of other processes. real time can be set only if you have a powerful CPU.
- /Channels- sets the desired number of audio channels. Set only with non-standard /ChanCfg .
- /ChanCfg- Using this parameter, you can specify a non-standard speaker configuration. For example, for a device with 7.1 sound, you should specify this:
- /Buffers- sets the number of parts that will be used to transfer the fragment specified via /BufferMs. In fact, the more parts there are, the smoother the transmission should be. In practice, a value of 7-8 parts is enough. If there are fewer of them - the audio may disappear, if there are more - the audio will lag behind. It is not recommended to install more than 15-20 parts.
- /BufferMs- sets the audio buffer size in milliseconds. It is recommended to set values in 200-300 ms, for a more stable data transfer, but 50 ms is enough for me.
Options are case sensitive. Specific options, such as /Priority , should be entered as they are written in the program window.
Under the choice of WaveIn and WaveOut devices, you can notice such options as Overflows and Underflows. Overflows increases when the program (repeater) does not have enough free space (buffers) to write data. Underflows increases in the opposite case: when the repeater does not have time to play incoming information streams. These options result in insufficient buffers, low buffers, slow CPU, and so on.
The optimal parameters for a fast PC are 7-8 buffers of 50 ms each, I use this configuration myself and have no problems.
control panel
You can also set some general parameters for each cable. You can do this in the Control Panel program. For it to work correctly, it must be run as an administrator.
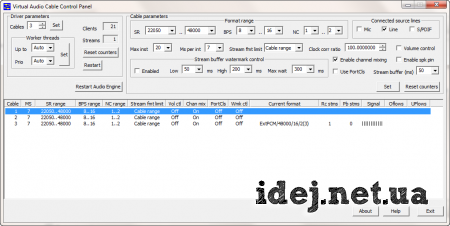
- Cables- total number of cables created. After applying, you need to restart the driver.
Format range (SR, BPS, NC)- setting ranges sampling rate, bits per sample and number of channels for cable.
Max inst- maximum number of connections. Uses at least 1 connection for the audio engine to work. The remaining connections can be used by client applications.
Ms per int- this means the frequency with which the connection with the audio device will occur (commonly referred to as latency). The more operations per second, the lower the waiting time, the more the system is loaded. Regular audio cards require 5-15ms to process.
Stream fmt limit- audio streaming format via cable
volume control- if enabled, allows you to change the volume of the cable and repeater (I did not understand the essence of this function).
Clock corr ratio- speed correction, in percent. If the value is 100%, no adjustment is made. If the value is more than 100%, the playback speed will be faster, less than 100%, the playback speed will be slower. For example, if the value is 100.25, the speed will be increased by 0.25%; if 99.98, slower by 0.02%. You can make adjustments with an accuracy of 0.0000001%.
You can change the parameter even while the cable is running, changes take effect instantly.
stream buffer- controls the size of the audio buffer. " Auto" - means the minimum possible value allowed by the driver.
All other information and command descriptions are in the application's help.
Do you have any questions? Do you want to complete the article? Did you notice an error? Let me know below, I'll be sure to hear from you!
If this article helped you, then write about it in the comments. And don't forget to share the article with your friends on social networks;)
P.S.
The article is a copyright, so if you copy it, do not forget to insert an active link to the author's website, that is, to this one :)
Share the article on in social networks- support the site!Sandbox
drags the whole team November 14, 2012 at 10:02 pmAn example of using a virtual sound card, or saving on Traktor Audio
Hey habr! This article will show you how to save some (maybe a lot) money on expensive sound cards by using the Virtual Audio Cable virtual sound card. There was already a similar article, but here the question is considered in a simpler way, and with step-by-step instructions.
Once I was asked to help with the organization of a disco, but I did not professionally DJ, and for this reason I have almost no “cool” DJ equipment. (Notebook and Sennheiser HD203 monitors do not count). However, I am fond of sound and familiar with the basics. The problem is that you need to output 2 audio channels from the laptop: 1 - for headphones (listen to the song before mixing), 2 - directly to the speakers (must be playing something). It becomes obvious that two sound cards are indispensable. It would seem that we are buying cheap USB card with exit and entrance for $5, and that's it. But no, the fact is that you can connect to Traktor Scratch PRO 2 (in my humble opinion, the most convenient program for mixing tracks and other mockery of music in real time) only one sound card. Native Instruments, on this account, offers to buy us, for example, Traktor Audio 2. Actually, an ordinary sound card with two outputs, worth $ 100. Of course, you can find a cheaper alternative, but somehow too expensive for one disco ...
Fortunately, there is external USB sound card Behringer UCA200, which was supplied with the mixing console, where there is 1 stereo input and output (RCA). Using a soldering iron, wire and several plugs, the sound card is connected to the mixer, the same story with a laptop. Of course, it was possible to plug the headphones directly into the laptop, but the mixer will give them additional amplification (and with a crazy volume around, it will not hurt), and then it all depends on the quality of the noise isolation in the headphones, fortunately, it is on the level. From a hard point of view, everything is connected and working, it remains only to make Traktor friends with sound cards. This is where the Virtual Audio Cable is needed. I settled on version 4.10.
Install Virtual Audio Cable. You don’t need to change anything in the Windows settings, except that you return your sound card to “default”, because. during installation, the program exposes the main itself. (control panel - change sound card parameters) Everything is configured quite simply:
Launch Control panel and add another channel. (We need two). Then we open 2 copies Audio Repeater (MME). In these two windows, we direct channel 1 - to one of the two sound cards, channel 2 - to the other sound card. Click Start. 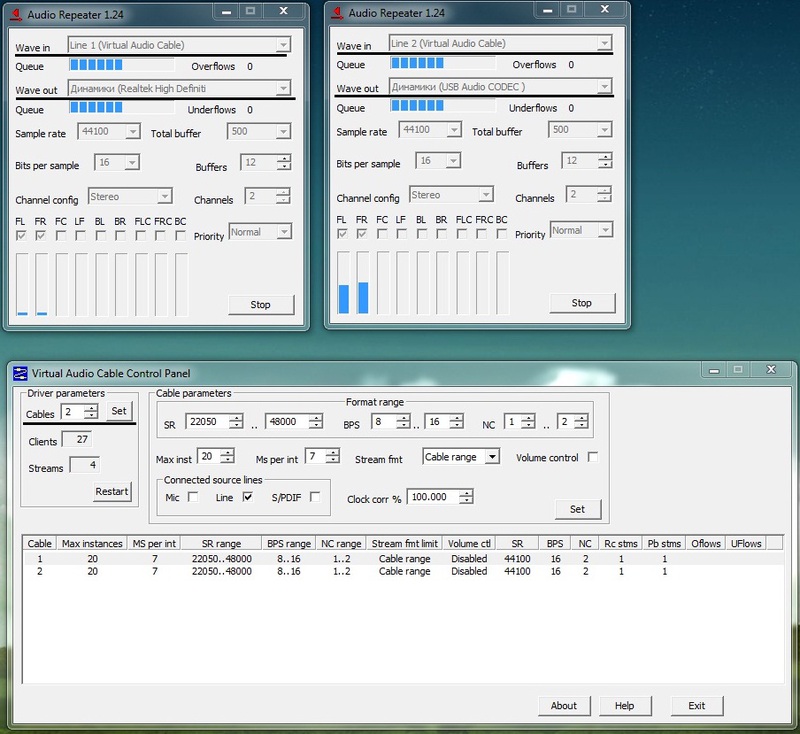
The rest of the parameters are optional.
Now, we need to set up Traktor. Open Audio Setup, and set the Audio Device to "Virtual Audio Cable". 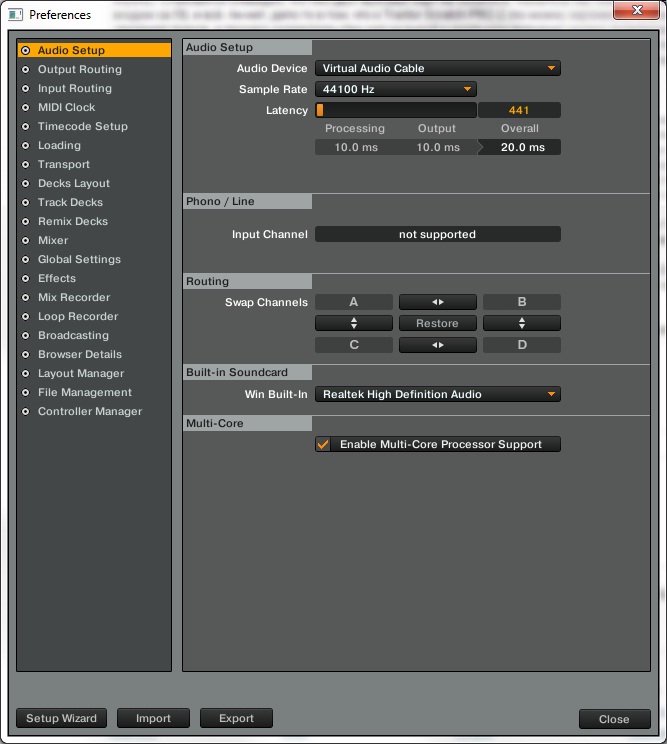
Do not forget to set the real laptop sound card to Win Built-In.
Next is the Output Routing tab: 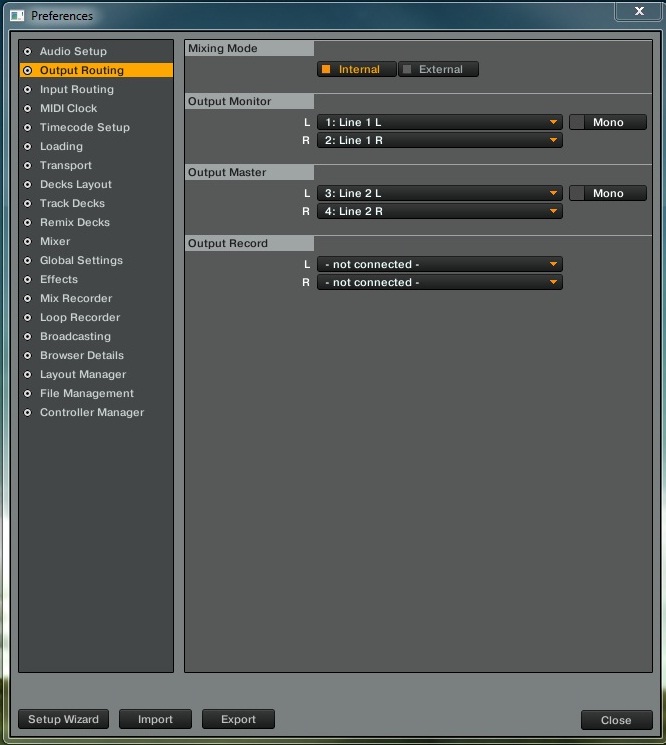
Where Output Monitor is your headphones, Output Master is the main bus. Close the settings, and if everything is done correctly, you will get something like this picture:
Where the track from Deck A plays into the hall (crossfader is pushed to the left) and the track from Deck B plays exclusively into your headphones. (We turn the mix knob to 0 so as not to hear the track from deck A in the headphones, and turn the knob to the right as desired).
Well, on the mixer, everyone does as he pleases. It turns out that two channels are occupied, one is sent to the main mix to the hall, and the other to the sub or solo to the headphone bus, but, again, who has which remote control.
Everything works fine, on Windows 7 32-bit.
Software used:
- Native Instruments Traktor Scratch PRO 2.5.1
- Virtual Audio Cable 4.10
Used iron:
- Lenovo g580
- Sennheiser HD203
- Behrinher UCA200
- Behringer XENYX 1832FX
- Speakers, amps and other audio equipment have nothing to do with the topic
Tags: traktor, music, sound card, Virtual audio cable,
I needed a virtual sound card so that I could record video with sound from other programs. Turning on the stereo mixer is usually enough, but my sound card does not support this. From free analogues I could only find Vacard (Virtual Audio Card driver) Beta 0.9d / 08 March 2005. As you can see, it hasn't been updated for a long time, and, unfortunately, it doesn't work in Windows 7. There are several paid products, of which I liked Virtual Audio Cable, about which I want to say a few words.
What is Virtual Audio Cable?
The program is a set of virtual devices (sound card, microphone, S/PDIF device) that can be connected to each other with a virtual cable. This allows you to connect the audio output of one Windows application to the audio input of another Windows application. This is exactly the same as various devices(CD player, equalizer, amplifier, FM receiver, etc.) can be connected by cables.
The idea of creating a virtual audio cable arose shortly after the appearance of programs for creating and processing digital sound - virtual audio signal generators, musical tone synthesizers, rhythm machines, equalizers, compressors / expanders, effects processors, etc. At first, each of these programs was standalone: it received a sound signal directly from the input of a sound adapter or from a sound file and output the result to the output of the adapter or to another sound file. This approach made it possible to use programs on any computer with a sound adapter, but had three main drawbacks:
- Lack of versatility. Several programs could not be connected in a chain, as is done in the studio or even at home, in the case of block equipment (player, preamplifier, equalizer, power amplifier, etc.). Thus, each program was a "monoblock" with a certain set of functions, which was quite difficult to expand.
- Loss of quality when working in real time. Recording the results of work from the output of a sound adapter when the program was running in real time inevitably entailed a loss in the quality of the original digital sound when it was converted to analog form. To keep the signal quality unchanged, an adapter with a digital interface was required, along with a digital tape recorder (price of about $ 1,000).
- Limitation of efficiency when working in recording mode. Some programs allowed you to write the results to an audio file on disk, and then no quality loss occurred. However, in this case, the ability to quickly control the sound parameters was lost, and it was possible to listen to the created fragment only after the completion of its recording to disk.
What is it for?
The technical purpose of the program is as follows:
- The connection of several sound programs in a chain so that each successive program receives sound directly from the previous one, without any intermediate devices or operations.
- Transmission of digital audio unaltered, without any loss of sound quality.
- Saving in an unchanged digital form the sound signal created by programs that only allow you to play the signal in real time on the sound adapter.
- Mixing audio signals from different programs connected to one end of the cable.
- Reproduction of an audio signal transmitted over a cable for transmission to several programs at the same time.
This, in particular, allows:
- record videos from sites with sound;
- record the work of programs with sound;
- make a program "silence" or "quiet" while others are running;
- record a chat in Skype;
- chat with music
- record performance under karaoke;
- copy sound from protected media;
- mix audio tracks;
- record sound from applications that do not support recording sound to a file (for example, from games);
- connect multiple audio input devices to applications that do not have this feature.
How it works
VAC virtual audio cable is an audio (Wave) windows driver, which creates two sound devices (ports) in the system: Virtual Cable n In and Virtual Cable n Out, where n is the cable number starting from 1. Any number of applications (clients) can be connected to each of the ports; this possibility in foreign documents is called multi-client feature. Sound signals output by applications to the Out port are mixed into a single signal, which is then transmitted to all applications that extract sound from the In port. Applications only need to know how to work with standard Windows Wave devices - and nothing more.
VAC mixes audio signals with saturation (saturation), also called clipping (clipping - cutting), which avoids noticeable distortion as a result of exceeding the maximum amplitude of the received signal.
Mixing and transmission of audio data are performed strictly uniformly inside the VAC, according to events (interruptions) from the system timer, so that each virtual device works like a real one, providing a given audio stream rate. For each interrupt, a block of a certain size is transmitted, depending on the interval between timer interrupts (latency). The minimum interval - 1 millisecond - provides the smoothest transmission of the stream, however, on "weak" computers, it can lead to excessive overhead.
Drawing an analogy with "iron" sound devices, it is necessary to recall that each of them has inputs and outputs that are interconnected by interconnect cables. Ordinary audio cables are generally symmetrical, although some will only allow connection in one direction when the cable also has an input and output. The output of the device is connected to the input of the cable, and the output of the cable is connected to the input of the next device, and so on.
Similarly, each audio processing program that interacts with the audio adapter can have an input and an output. By selecting a recording device (Wave In), the input of the program is connected to the ADC output of the desired sound adapter, and by selecting a playback device (Wave Out), its output is connected to the DAC input of the same or another adapter. There is a certain confusion in terms here, since in Windows multimedia devices are not classified by I/O, but by I/O ports. It is clear that the input port (In) is actually the output of the device facing the inside of the system, and the output port (Out) is the same input facing the inside of the system. The sound supplied, for example, to the external line input of the adapter (Line In), is converted by the ADC into digital form and transmitted by the adapter to the internal input port, and the digital sound transmitted by the program to the internal output port is converted to an analog form in the DAC, after which it is output to an external output (Line Out or Speaker Out).
Since VAC is a digital cable, it transmits audio data to its output in exactly the format (combination of sampling rate, sample depth and number of channels) in which they were received from the sound source. This means that while one end of the cable (port In or Out) is open in some format, the other can only be open in exactly the same format. VAC does not perform format conversions during transmission.
In order to be able to connect not only programs, but also sound adapters to the cable, the VAC package includes the Audio Repeater program (sound repeater). It does the same as the VAC driver, but in reverse - it passes the audio stream from one Wave In device to another Wave Out device. A repeater is useful for monitoring a signal transmitted over a cable, or for "spreading" the signal from an audio adapter to multiple processing programs. The repeater is usually connected between the cable and the audio adapter - from the input or output end of the cable.
Thus, with the help of VAC, it is possible to chain several conventional audio programs in a chain, transferring sound from one to another in digital form, without conversion, while not losing sound quality at all. The only problem here is the delays that inevitably arise due to the buffering of audio data in each of the programs. This does not affect the sound quality in any way, but if there are more than two or three programs in the chain, it makes it difficult to control the sound in real time.
When one end of the cable is free (has no program attached), it behaves like a normal wire. Sound output to the Out port is lost, and absolute silence is introduced from the In port.