Windows 7 touch screen. All-in-one touch screens - types, settings, malfunctions
In this topic we will talk about how to install Windows 7 on a touchscreen laptop.
Installing the Windows 7 operating system 350 rub.
A large number of users cannot get used to the new interface of new operating systems Windows family. Many people want to install Windows 8 for themselves after purchasing a laptop. old version, since the familiar interface and convenience are above all else for many. But not all laptops can install Windows 7; the developers intentionally block this feature in the BIOS; also, if you decide to install Windows 7 on a laptop with a touch screen, then you need to check everything carefully before doing so. So to speak, make sure that after installing the operating system you can easily and simply find and install, for example, on touch screen, because without a special driver it will not work as expected.

Creating a backup of your computer drivers before installing Windows
To start the procedure, we will need to make a backup of the drivers, in case they are compatible with our Windows 7. We make a copy of the drivers using Sam Drivers, it is included in the Driver Pack.
Launch Driver Pack and go to the backup section. Now you need to make a copy of your drivers, this will also make it easier to install Windows 7 on your laptop. Save a copy of the driver to a separate disk or removable flash drive.
If you do not want to use third party programs, then you can download this driver from the manufacturer’s website, it may not be there for Windows 7, but you can try downloading it from Windows 8, they are usually backwards compatible. You will be offered a choice of downloading a driver for x86 or x64; both versions are different and compatible only with a certain bit depth of the system.
Installing the OS on a laptop with a touchpad
Windows can be installed either from a disk or a flash drive. The system image is recorded using special programs, in our case we used UltraISO. We write the image to the drive and at the end of the process we reboot the system. Let's go to our Computer BIOS and in the settings we set the boot from our drive, but if you can change the boot priority, then you don’t need to do anything in the BIOS.
After downloading the system installation file, you will be offered several options, select full installation, since in our case the system update will not affect either. As soon as it comes hard choice disk where the installation will be performed, pay attention to partitions less than 300 MB, they can be deleted, and you can also delete the partition with the previous operating system. Next, you need to create a new one, create and format it.
After confirming the next button, the installation process will begin, wait for completion and reboot the laptop. We go into the BIOS again and set the boot priority to now be from the disk, but if you use other functions, you can skip this step. After booting from the disk, you will continue with the installation and final configuration of the system.
Installing the necessary drivers on a laptop
Once the installation is complete and you are on the desktop, use the Driver Pack Solution utility to install device drivers.

Also, if you have any difficulties installing the operating room windows systems yourself, then our craftsmen will be happy to do this work.
Expert visit and diagnostics0 rub.
The touch screen has long successfully entered the life of almost every inhabitant on the planet. Of course, the primary role in this fact is given to smartphones and tablets, but other areas, with more highly specialized equipment, are not far behind. modern trends. One such area is industry. The most popular devices in the industrial segment equipped with a touch screen are, of course, panel computers and monitors. Most often, questions about the operation of the touchscreen arise precisely when using it on these devices - how to connect? How to setup? How to calibrate? Etc. We’ll talk to you about this in a little more detail later.
How to connect?
In panel computers, as a rule, the touch screen controller is automatically detected by the operating system and does not require the installation of additional drivers. The only additional thing that may be required is calibration, but this is only if the touch screen does not work correctly. See below for details on calibration. The monitor connection diagram is slightly different. Each industrial monitor equipped with a touch screen always comes with an additional USB cable or COM. With this cable, you connect the monitor to the computer from which the video signal will be output. Further, the connection algorithm is similar to the option with a panel computer.
Let's look at an example of connecting a P6217WPC-24VDC-U monitor to a built-in computer eBOX670-883-FL-DC.


How to setup?
Configuration means identifying the touch screen controller in the system and then making it work successfully. As mentioned above, operating system automatically recognizes the touchscreen, but what if this does not happen? The first thing you will definitely need is drivers. In order to find or obtain the necessary drivers, you have several options:
- The drivers are present on the disk that came with the device.
- If the disk is lost, you can download drivers from the panel computer or monitor manufacturer's website, or, if you know exactly what touchscreen controller is installed in your equipment, for example AMT PenMount, you always have the opportunity to download drivers from the controller manufacturer's website.
- Contact the service technical support IPC2U by writing in the online chat or sending an email to .
How to download from the manufacturer's website?
Each manufacturer has its own website design, so a single algorithm of actions in this case will not be appropriate. But, the location of the drivers is standardized for everyone, so you can always find the drivers in the “Downloads” section. The first thing you need to do is go to your product page on the manufacturer’s website and then look for the “Downloads” tab.

Panel computer page on the manufacturer’s website using the example of the GOT-3177T-834 model from Axiomtek
After you navigate or expand the tab, you will see a list of all drivers available for download for of this device. A touch screen driver is always easy to identify by its name. It must include the word "Touch". Sometimes all drivers are in one large archive. It is quite possible that you will also immediately be asked to choose which OS you need a driver for. Select the one you need and the download process begins.


The situation is a little different when you want to download drivers from the controller manufacturer's website. Most often, manufacturers of industrial panel computers and monitors use controllers from two companies, the above-mentioned AMT PenMount and EETI. Drivers on the websites of these manufacturers are also located in the “Downloads” tab. You can go to it immediately from home page.

PenMount
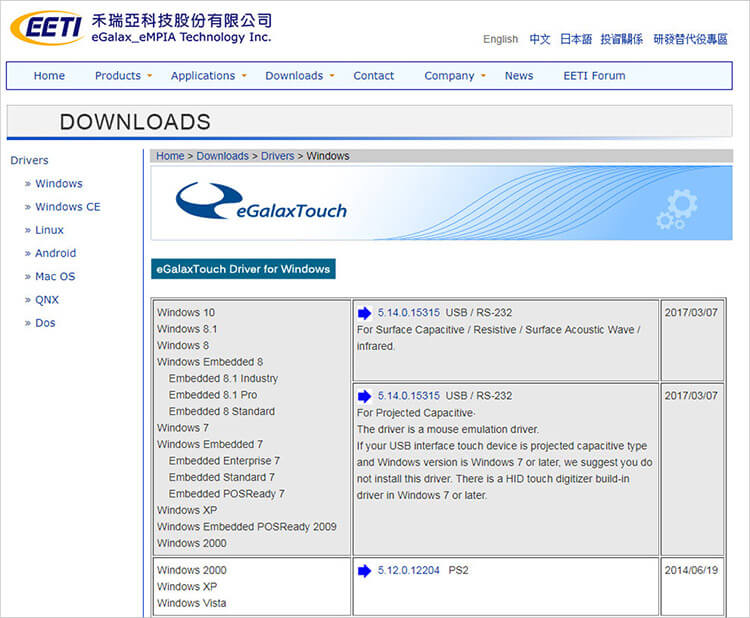
“Downloads” section on the website of the AMT EETI controller manufacturer
How to calibrate the touch screen?
You have installed the drivers, the touch screen works, but you want to put the cursor in the upper left corner, but it moves to the lower right, what should you do? For such cases, there is only one single solution - touchscreen calibration. Most often, the calibration utility can be found in the same archive along with the drivers. Next, we will consider the option of calibrating the touch screen using the example of one of the most popular models of the APPC-1740T panel computer from Nexcom.
During the calibration process, you need to click on the cursor points on the screen, following the instructions, i.e. clicked on the cursor, held it, released it, moved to the next point. All this will take you literally a couple of minutes. Once completed, the calibration window will automatically close. Next, you can check whether the touchscreen is working correctly or not. If yes, congratulations, you have set up your touch screen! If not, contact IPC2U technical support.
Now that the first beta version of the future operating system has been available to the general public for some time, it’s time to talk about the new touchscreen Windows features 7 - Windows Touch or Multi-touch, as Microsoft itself calls it. Today we will tell you how you can enable it. However, before we do this, let's clarify some detail.
It is worth clearly understanding that enabling Multi-touch, and therefore using it, and getting some benefits from its use, is not possible on all computers. The computer, like the operating system, must support multi-touch, and there are not many such computers at the moment. Among them:
HP TouchSmart All-in-One PCs (IQ500 and IQ800 series):
HP TouchSmart tx2 Tablet PC:

And Dell Latitude XT Tablet PC:

And, if you are the happy owner of one of the above computers running Windows 7, then you can easily proceed directly to enabling multi-touch. And to do this, you just need to download and install the latest multi-touch drivers, which will allow the use of multiple touch points on the screen. Drivers can be obtained here:
- For HP TouchSmart All-in-One computers: the driver is available through Windows Update. After Windows installations 7 Beta, click on the Start button and select Windows menu Update. Next, click on the Check for Updates link on the left, which will find the driver for you. The driver is currently optional, so you will need to manually select it to install it.
- For tablet computers Dell Latitude XT and HP TouchSmart tx2 Tablet PC: drivers available on the N-Trig website. N-Trig is a company that produces digitizers for these computers. Please note that the drivers are currently in beta and are not yet supported by Dell or HP.
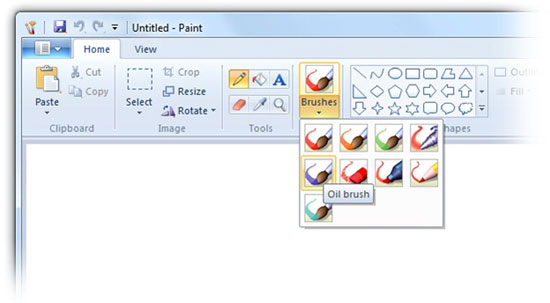
Installed? That's basically all you had to do. Now you need to make sure that multi-touch works. This can be done by launching, for example, a new graphics editor Paint, latest version which contains some great new brushes designed for Multi-touch capabilities. By clicking on one of them in the Brushes gallery (we prefer the Oil Brush), you can try painting with your fingers. By the way, here you can easily determine how many fingers can work on your computer at the same time - some computers support only two fingers, and some four or more.
Once you've had your fill of drawing, go to your browser Internet Explorer 8. The latter supports touch scrolling, allowing you to scroll pages with your fingers from anywhere on the page. Just touch anywhere on the page and slide up or down - it's much easier than trying to touch the scroll bar. You can also use something called “flicks” to jump back and forth between pages—try sliding to the right to go back (as you would when going back to the previous page of a book).
You can also use touch when navigating the taskbar. The new Jump Lists on the taskbar are optimized for touch, so instead of right-clicking an icon, try sliding your finger up to literally pull the menu up.

Also optimized for touch and entertainment center Windows Media Center. The latter's sensory work can be viewed below:
And finally, a little advice. To make icons and controls a little larger and therefore easier to touch, you can set Windows to display everything large. To do this, go to the Start menu, type display and then open the Display Control Panel (which should be at the top of the Start menu). Here, choose the Medium (which is what we use) or the Larger size, and you will notice that it will be easier for your fingers to work.


