Installing an SSD and a second HDD. How I swapped SSD in MacBook Pro for an inexpensive, but capacious and fast New hard drive in MacBook
Replacement hard disk became relevant after the release of HDD with a large memory capacity. Users can independently change HDD on a Macbook Pro using our instructions. Similarly, you can replace the HDD and SSD disk.
Preparing to replace the hard drive on your MacBook Pro
Before you start changing the hard drive, you need to copy all the information that is contained on the laptop. To do this, you should select any external drive with the required volume. It is recommended to clone the system partition to it. You can make a clone using the "Disk Utility", which is located in the "body" operating system.
How to image an existing disk:
- Restart your PC and hold down the Command and R keys at the same time while booting until the Apple symbol appears.
- Click on "Continue" and in the "View" section select "Show all devices".
- Mark the disk partition (or disk) that macOS is on.
- Click on "Create Backup".
- Next, you need to use the prompts of the program.
Algorithm for replacing a disk on a MacBook Pro
After the user has copied all the necessary information, you need to start replacing the disk. To do this, you need to do a few simple steps:
- Disconnect the device from the power supply and remove the battery.
- The Mac should be placed upside down. It is best to place it on a soft material to avoid damaging the lid.
- Use a Philips 0 screwdriver to remove the case. The bolts will be reluctant to loosen. When taking out the bolts, it is advised to place them on a flat surface similar to the location on a Mac.
- The body should be lifted gently and lightly. It will be difficult to film.

- The hard drive will be located to the right of the center of the laptop. It is located in a special niche and is secured with a plastic bar. It must be unscrewed with a Philips screwdriver 0.

- After these steps, you need to gently pull on the strap and pull out the HDD.
 Photo: Removing the hard drive
 - There are 4 bolts on the side faces of the HDD, which can be unscrewed using a Torx 6 screwdriver (it will be extremely problematic to do this with a simple screwdriver). Then, you need to screw these bolts onto new disc.

Hard Mac disk Book is quite fragile, so its breakage is a common reason for contacting service centers. The winchester can fail if the laptop falls or is hit, or if there is a short circuit in the network.
The main "symptoms" of a hard drive failure are as follows:
1. The operating system does not load (a question mark appears on the screen);
2. The laptop refuses to turn on;
3. Malfunctions of the operating system (the appearance of strange characters, errors when opening files, etc.);
4. Strange noises, creaks, clicks during laptop operation.
The user may want to change a working hard drive - in the event that he wants to increase the volume of the hard disk and the speed of the system. In any case, you need to keep in mind that the procedure for replacing it is quite complicated, and it is better not to tackle it yourself.
How is the hard drive replaced?
1) The technician removes the laptop battery and unscrews the screws holding the cover of the RAM compartment.
3) It is necessary to detach the panel with the keyboard. The difficulty lies in the fact that it is held by latches on the inside, and if you act inaccurately, you can damage the fasteners, bend or scratch the panel. Usually a thin screwdriver is used to remove the keyboard.
4) The next step is to disconnect the ribbon cable from the motherboard.
5) Finally, you can remove the old hard drive. To do this, the wizard disconnects the cable that supplies power to the hard drive and goes to the SATA connector, and unscrews the bracket holding it.
6) Having installed a new hard drive, the specialist assembles it. Since the MacBook's case is very thin, it is easy to bend, so only a technician who knows the architecture of Apple laptops can carry out all the procedures without damaging it.
The advantage of contacting service center Macsave is also the opportunity to order original parts that are best compatible with your laptop model.
So it will not be superfluous disk space. There is always something to fill it with.
Apple offers custom configurations for its laptops and desktops with increased RAM / HDD / SSD, but it charges twice as much for the components as they cost if you bought them yourself. In addition, in Russian and Ukrainian realities, ordering a custom configuration results in a "pretty penny" in addition to the increased cost of "branded" hardware. Although, it is the same branded as bought from any well-known company that sells computer components. Is it better tested and contains latest version Firmare, which is important in the case of SSDs, but more on that later.
In any case, if in the USA the HDD upgrade costs $ 100, in Russia or Ukraine it will cost all $ 150, or even $ 200 as part of an order for an individual PC configuration. The conclusion is simple - in the case of a MacBook or MacBook Pro it is much cheaper to change the equipment yourself. Unfortunately, this is not the case with the MacBook Air. In it, the RAM is soldered into motherboard, and SSD of this format is difficult to find on sale for reasonable money, plus a special and rare screwdriver for parsing requires a special and rare - Pentalobe (5-petal flower). Today I would like to talk about replacing a drive in a MacBook Pro, go through a little RAM upgrade and ways to quickly transfer personal data from an old HDD / SSD to a new one.
A clone is better than a backup
The test subject is a 2011 15-inch MacBook Pro. "Lion" has already settled on it, aka OS X, but I have not yet switched to using it, Snow Leopard is enough, plus this is a temporary laptop for me, provided by a good friend until the last generation ordered arrives. That is, it is undesirable to somehow change the composition of the software on its HDD, so that, if necessary, you can quickly return everything to its original form. Thus, we will start modernizing the drive, one might say, from the end - with the transfer of personal data. This will save you a lot of time.
On the Windows platform, there are third-party utilities for full cloning of the system and other partitions, although in Windows 7 this function was already built into the system. In Mac OS X, the standard "Disk Utility" was able to do this from the very first releases. Moreover, everything is implemented very simply, even a beginner will understand. The only problem may arise when connecting a 2.5-inch embedded drive to the laptop via USB. There are several options for its solution. I used the external HDD pocket, shown in the photo above, and the branded hard drive inherited from the old MacBok Pro, and decided to work with it instead of the temporary laptop drive. An external pocket is a relatively inexpensive thing and is useful in the household for storing media content on capacious hard drives, instead of optical disks. At a price per gigabyte, HDDs are already approaching DVDs. You can also rip up an old USB stick and use its stuffing. On the other hand, some devices of this kind are easily disassembled, and nothing will have to be broken. The latter method is not very convenient, but it is possible and, in principle, it will still be easier than the standard procedure for transferring data when changing internal storage which we'll talk about later.

A standard external USB drive of sufficient capacity is used - a clone of the system partition is made on it, then the HDD is changed in the laptop, the device is assembled and turned on with the Alt (Option) button pressed, after which a choice of volume for loading will appear. Naturally, an external drive is indicated. After the system boots from it, the reverse cloning operation is performed using the Disk Utility. In addition, all this can be done if you have a Mac OS X boot disk. If you boot from it, you will also be able to launch Disk Utility (located in the utilities section, in the top menu) and carry out all the same operations as in the environment OS X.

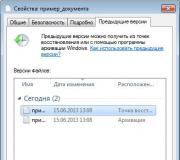
Take a look at the screenshot above. It clearly indicates what needs to be done to completely clone the system partition. In particular, you should launch "Disk Utility", select any drive and go to the "Recover" section. The current system partition is dragged into the "Source" field using the Drag-and-drop method - a clone will be made from it, a new drive is dragged into the "Destination" field if it was connected via USB, or any external HDD, but remember that all data on it will be deleted. That is, it is worth taking care of their preservation in advance. It is imperative to check the item "Clear destination", which involves not just deleting data (if any), but formatting the partition in the desired format(Mac OS Extended (Journaled)). After everything is selected, the "Restore" button is pressed. In my case, about 100 GB of data was rewritten in a little over an hour, although initially the system indicated that it would take all three hours.
Naturally, all these operations are similarly performed with SSD, if the user decided to install just this type of drive instead of HDD. By the way, the right decision - the increase in performance is huge and much more noticeable than the increase in RAM from 4 to 8 GB. The only caveat is that you may need to update the SSD firmware to support the TRIM command. It was originally present in Windows 7, and appeared in Mac OS X starting with the 10.6.8 release. A very useful command for solid state drives to avoid significant performance degradation when the device is full and long-term use... In general, before installing an SSD, I would advise you to first read the thematic forums and decide on the model. Intel offers some of the best options on the market.

It's easy to build up RAM
Well, the drive is ready, it's time to disassemble the laptop. I recommend putting it upside down on something soft - a microfiber cloth or on a neoprene cover, as in my case. To remove the cover, you need a Philips 0 screwdriver. The bolts are unscrewed with some effort, since they contain a seal (blue blots on the thread). As they are removed, it is advisable to place them on the table in the same way as they are located in a laptop, since there are several parts that differ in length.

The bottom cover may not budge the first time - it sits very tightly and precisely. Brute force it is not necessary to use, it is enough to gently pull it up from the side of the display hinge. As a result, the following picture will open to the eye:


In the 13-inch model, everything is very similar, except that there is only one fan. There is access to the HDD and to the RAM too. Before crawling into the inside of the computer, it is necessary to remove the static charge from the body so as not to damage the delicate electronic components... You can touch a metal part inside the laptop, such as the chassis optical drive or touch the metal faucet in the bathroom or kitchen. If you want to change the memory, just spread the antennae along the edges of the slot, the RAM strips will rise by themselves and it will be easy to remove them. Install the new ones neatly and tightly: insert the strip at an angle into the slot (the slope is the same as when removing the part), slightly push forward so that it enters it, then lower the RAM down until it clicks. Pay attention that the latches end up directly opposite the corresponding notches in the memory strips. I personally came across a situation where a person simply did not insert RAM into the connector, but was able to lower it to a horizontal position. I actually put the planks on top. The result is expected, the PC did not start without RAM. Although it was in the Mac mini, but the design of the connectors and fasteners for random access memory there is identical to that in a laptop.

I will add that Apple previously recommended disconnecting the battery when replacing components, although this was at a time when laptops were equipped with a removable battery (models produced up to 2008 inclusive). You can still disconnect the power connector now, as I did when I changed the HDD and RAM in 2009 in my new 13-inch Proshka at that time, but, as practice has shown, this is unnecessary. And in official instructions there is no indication on this. Good friend is a technician at an official reseller of Apple technology, and without disconnecting the battery, dozens of memory sticks and drives were replaced, there were no problems, the main thing is not to forget to completely turn off the laptop before that, and not put it into sleep mode, and also remove the static charge.

With a drive, a little more hassle
Now let's move on to the HDD. It is not screwed to the laptop tightly, but lies in a special seat. To remove the drive, unscrew the plastic tab at the edge of the drive (on the side of the optical drive). A Philips 0 screwdriver is also used.


After that, you need to pull the strap and carefully remove the drive, disconnect the connector - it can be removed easily.

Four bolts with a Torx 6 head are screwed in on the sides of the HDD. You should take care of finding such a screwdriver or a nozzle in advance, since it will not work to dig them out with a small flat or cross-type, the bolts sit tightly. We unscrew them from the old drive, fasten them to the new one, everything is simple.


The plastic strap can be re-glued to a new HDD or SSD - it can easily handle a dozen of such operations without losing its adhesive properties.

After that, we plug the connector into place, place the HDD in its seat and screw on the plastic strap. Well, now, everything is ready:


As they say, it's better to see it live than read it 100 times, respectively, I suggest watching a video of the whole process, filmed by a foreign colleague with the nickname JaymarkTech:
Pay attention to the bottom cover, dust can collect on it and should be removed.

If the system partition was cloned to a new drive in advance, then you can turn on the laptop and enjoy the update. Otherwise, you will have to use boot disk Mac OS X and a Time Machine backup (or the USB storage option described above). The procedure is simple, but it takes more time than cloning the system partition through the "Disk Utility".
Boot from the installation system disk, run Disk Utility, partition the drive if you wish, or use one partition and format it in Mac OS Extended (Journaled) format. Then you can start Mac installation OS X. Then it is advisable to install all system updates through the "Software Update" function and you can roll up a Time Machine backup. In the case of OS X Lion, loading (similarly, through the held down Alt button) is performed from a previously created on any flash drive hidden section... For this there is a proprietary free program Lion Recovery Disk Assistant. Then the system is installed from Mac App Store, that is, you need an Internet connection to download about 3.5 GB of data. As a result, planned recovery follows from backup as described above. But, nevertheless, it's easier to pre-clone a disk than to tinker with manually installing the OS and transferring data from a Time Machine backup.
That, in fact, is all. There is nothing difficult in this - try it, and you, dear readers, will definitely succeed.
This page provides a step-by-step guide that details how to replace your old MacBook Pro hard drive with a new one.
First you need to prepare the necessary tools: a small "Phillips" screwdriver and a size 6 star screwdriver. When choosing a hard drive in the cabin, check that it has a sata interface and a 2.5 form factor.
Step-by-step instructions "Replacing the hard drive in MacBook Pro"
Preparatory stage
The first step is to turn off the laptop, unplug the MagSafe, and remove the battery. The battery needs to be removed not only because the laptop needs to be de-energized, but also because the screws in the battery compartment need to be removed.
At stage 1, you need to unscrew the 3 screws holding the cover of the MacBook RAM slot with a Phillips screwdriver. The plank is easy to remove - set it aside.
At the 3rd stage, the most entertaining procedure lies ahead - unscrewing the screws in the outer part of the case. There are 18 of them in total: 4 - at the bottom, 4 - at the end on the right, 4 - at the end on the left, and 2 - near the display hinge.
Now it has come to the most difficult stage. After you have removed all the screws and screws, the keyboard cover can be detached. But problems can arise. On the opposite side of the display, the cover is held by several latches. Try to move the cover, if it does not work, pry it off with a thin flat screwdriver.
Be extremely careful at this stage, as there is a high risk of breaking the latches, bending the aluminum bottom, or warping the plastic of the cover.
As soon as the lid comes off, do not rush to swing it away from the practically disassembled MacBook. The fact is that the cover with motherboard connects the thin ribbon wiring to be disconnected. It is very simple to do this: you need to lift the cover with the keyboard up, as far as the length of the cable allows. You will immediately see it and understand how to disconnect the wire.
At the 6th stage, you will have to disconnect the old hard drive. It is located at the bottom left. First, carefully unscrew and remove the thin bar securing the hard drive, pressing the screw for the silicone "ears" to the computer case. After the bar has been removed, you can remove the screw by disconnecting it from the sata from above. The silicone "ears" must be unscrewed from the old disc and screwed onto the new one. The screw seems to hang on them, and during a fall or impact, the rubber suspension softens the mechanical force.
Finally, you need to install the new disk by doing everything in reverse order.
As you can see, the procedure for replacing a hard drive in a MacBook Pro can be done at home! If you do not succeed or do not have the skills and time, contact our service center, you can familiarize yourself with the price list.