Shared inbox. Help.
This section is for creating new folders in e-mail mail, for distribution of letters. Folders help you organize your mail by distributing letters by topic or other parameters. Folders also allow you to block access to certain emails by locking the folder with a password.
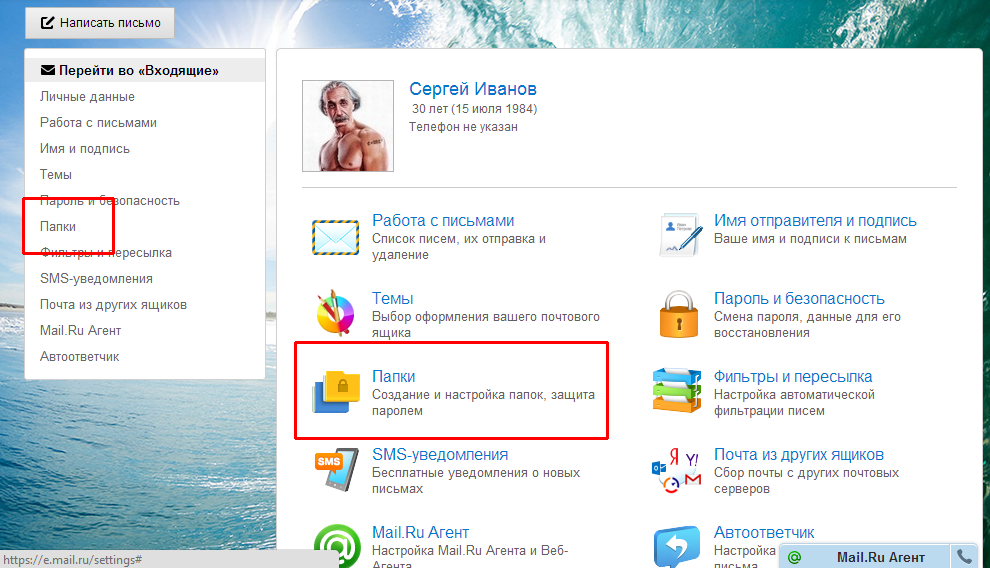
Go to settings - button in the upper right corner, next to the “Exit” button or click the “More” button and select “Settings”.
Select the “Folders” section either in the list on the left or on the right with an icon in the form of a yellow folder with a lock drawn on it.
The page contains a list of existing folders. At the top of the list is the “Add Folder” button; by clicking this button, you can accordingly create new folder for letters. For example, let’s create a “Personal” folder and click “Add Folder”.

In the first field, write down the name of the new folder (any name is possible, but I’ll create “Personal”). In the second line we select the nesting level, that is, it’s like in operating system, either this folder will be visible and it will be equal to the others, or it will be located inside another folder. To make it more clear, I’ll create a folder nested in the existing “Inbox” folder. I open the “First level folder” field and select the “Inbox” folder.

Now select the folder availability. "Not available for mail programs(POP3)" - this means that if you check this box, you will not be able to open this folder from email programs such as Bat, Microsoft Outlook etc. In this case, letters from the folder can only be opened in Mail.
You can create a password if someone else has access to your mail. To create a password, check the “Folder is password protected” box.
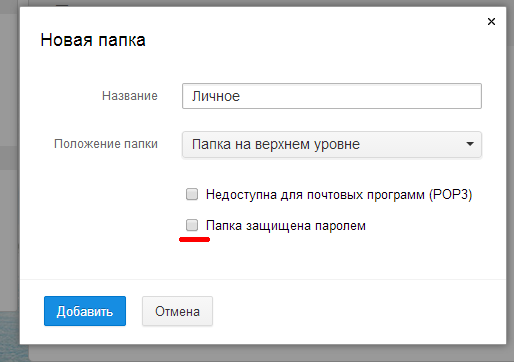
Additional lines appear to be filled in - we enter the password for the folder twice (you can see how to create a password in the “registration in mail” section), after the password we enter a secret question, the question is not selected, but is invented independently. The following is the answer to this question. The answer and the question do not have to be logically interconnected, the main thing is that you can later remember this answer. The answer is intended for password recovery; I do not advise you to write just anything, as one day you will definitely forget your password.
In the bottom line, enter your email password Mailbox, that is, from the box in which you are now. If you don’t remember your password, go to the “password recovery” section. After filling in all the data, click the “Add” button.

Now a new folder called “Personal” has appeared in the list of folders. If you point at a new folder, two buttons appear on the right - settings, and - delete folder. In the folder settings, you can rename the folder, make it inaccessible to email programs, and close it with a password. In general, this is all that we specify when creating a new folder.
When you open Outlook for the first time, the folder opens Inbox, which contains messages received by email. To return to this folder while working in Outlook and view new emails that have arrived at your address, follow these steps.
1. In the Outlook folder panel, expand the Outlook Shortcuts group.
2. Click the Inbox icon.
3. To contact the server and exchange mail messages with it, click on the button Send/receive toolbars. After this, you may have to wait a few minutes while your computer and the provider's server exchange information. At the end of the communication session, the headers of new messages will appear in the list of the Inbox folder. Unread letters are marked with a sealed envelope icon, and read letters are marked with an open envelope icon. The date the letter was received is displayed to the right of the subject name.
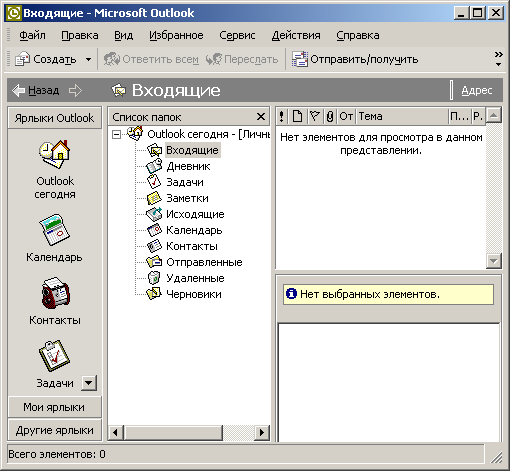
Rice. 21.11. Inbox
Emails with attached files are marked with a paper clip icon (Fig. 21.11).
5. If you want to display the contents of the letter in separate window, double-click on the same heading.
6. To extract an attached file from a message, right-click on the file icon and select from context menu team Save as.
7. In the dialog box that appears, open that folder hard drive in which you want to save the attached file, enter the name under which you want to save this file and click on the button Save. Outlook will automatically decode the information and save it as the specified file.
Note The context menu for icons of attached files contains several commands. With their help, you can copy a file and open it in the tool window quick view, open the file in the application that generated it, print the information, or view the properties of the attached file.
8. Outlook automatically tracks those emails that have been read and marks them with the appropriate icon. If you want to read the text more carefully in the future, it makes sense to leave the letter unread. To do this, right-click on the email header and select the command in the context menu Mark as unread.
Since version 0.8, Thunderbird has the ability to store mail received in different POP mailboxes in a shared Inbox folder, in Local folders. You can choose whether you want all or just some of your POP mailboxes to use the shared inbox. Each account that does not use a public Inbox has its own set of folders, including its own Inbox that appears in the folder tree. Accounts that use a shared Inbox do not have their own folders in the folder tree; instead, all you'll see is a single set of folders in Local Folders.
When creating a new account
When you create a new POP account in Thunderbird, the Account Wizard will ask if you want to use the shared Inbox for this account. If you agree, please make sure to check this box. If you do not agree, make sure the checkbox is unchecked.
Changing your account's Public Inbox setting
To change your account's Public Inbox setting, you must follow three simple steps.
Change the inbox you use
Open “Tools->Account Settings->Server Settings”, click on the “Advanced” button.
To tell an account to use Public Inbox, select " a shared folder Inbox (located in Local Folders) and click on the “Ok” button.
Attention: if the account already has messages in the Inbox or other folders, you should copy or move these messages to Local Folders before How to set up your account to use the Public Inbox. If you don't copy or move messages to Local Folders and tell the account to use the Public Inbox, the account will disappear from the folder panel and you won't see your messages until you return everything to the way it was.
To tell an account not to use the Public Inbox, select Inbox for this account or Inbox from another account and click OK.
Check the settings of other folders and filters
Once you've changed your account's settings for which Inbox it should use, see if there are a few things you need to change:
Open "Tools -> Account Options -> Copies and Folders" and look at the folders used for Sent Items, Drafts and Templates. Make sure messages for each are saved in the correct folders.
If you are using an anti-spam filter for this account, open "Tools -> Anti-spam Filter..." and make sure that the folder selected for spam is the one you want to use.
If you have set any filters, go to Tools -> Message Filters and make sure they will work correctly under the new Inbox settings. This is especially important if you have changed your account so that it will use the Public Inbox: if you have filters that sort messages V any of the account folders, you must disable/remove these filters or change the destination folders.
Quit and restart Thunderbird
Important: Quit Thunderbird and restart it before downloading mail for any account for which you have changed the Inbox/Public Inbox settings. If you don't go out and overload mail client, messages may continue to be downloaded to the "old" locations. (for example, to a separate Inbox folder, instead of the Public Inbox folder).
Other information
Accounts that use the Public Inbox are sometimes called subaccounts, and it is possible to create subaccounts that do not use the Public Inbox in Local Inboxes. For example, if you have three Gmail accounts, you can configure two of them to store mail along with another Gmail account's mail, but not in Local folders.
To do this, follow the above procedure for setting up your Inbox, but instead of selecting "Public Inbox (located in Local Folders)", select "Inbox from Another Account" and select the account you want to use from the drop-down list.
- For subordinate accounts, if you go to Tools -> Account Options... -> [account name] Server Options, you will see the Local Directory option does not indicate to the real directory in the profile in which the mail is stored. This is normal and necessary, since certain files of subordinate accounts should be stored separately from general files containing mail. (For example, each POP3 account has its own "popstate.dat" file that keeps track of which messages have been downloaded from the server. Account-specific message filters are also stored in a separate folder for each account.)
When you open Gmail, the most recent conversations appear in your inbox. When you return to the Gmail app after using other apps, the last screen you were on appears.
Opening Gmail
Conversations with new messages appear at the very top of your inbox. All your messages appear in your Inbox unless you delete, archive, or filter them.
If you made the Priority folder your default inbox in the web version of Gmail, you'll be able to view that folder and make it your default inbox in the Gmail app on your phone. See section.
Your current Google account appears in the upper right corner of your inbox. If you use multiple accounts, you should click the current account to switch accounts, as shown in . Adding accounts and working with them is described in the section.
Topics of threads with new messages are highlighted with bold lines. To read a message in a thread, click on the topic of the thread. For more information, see the section.
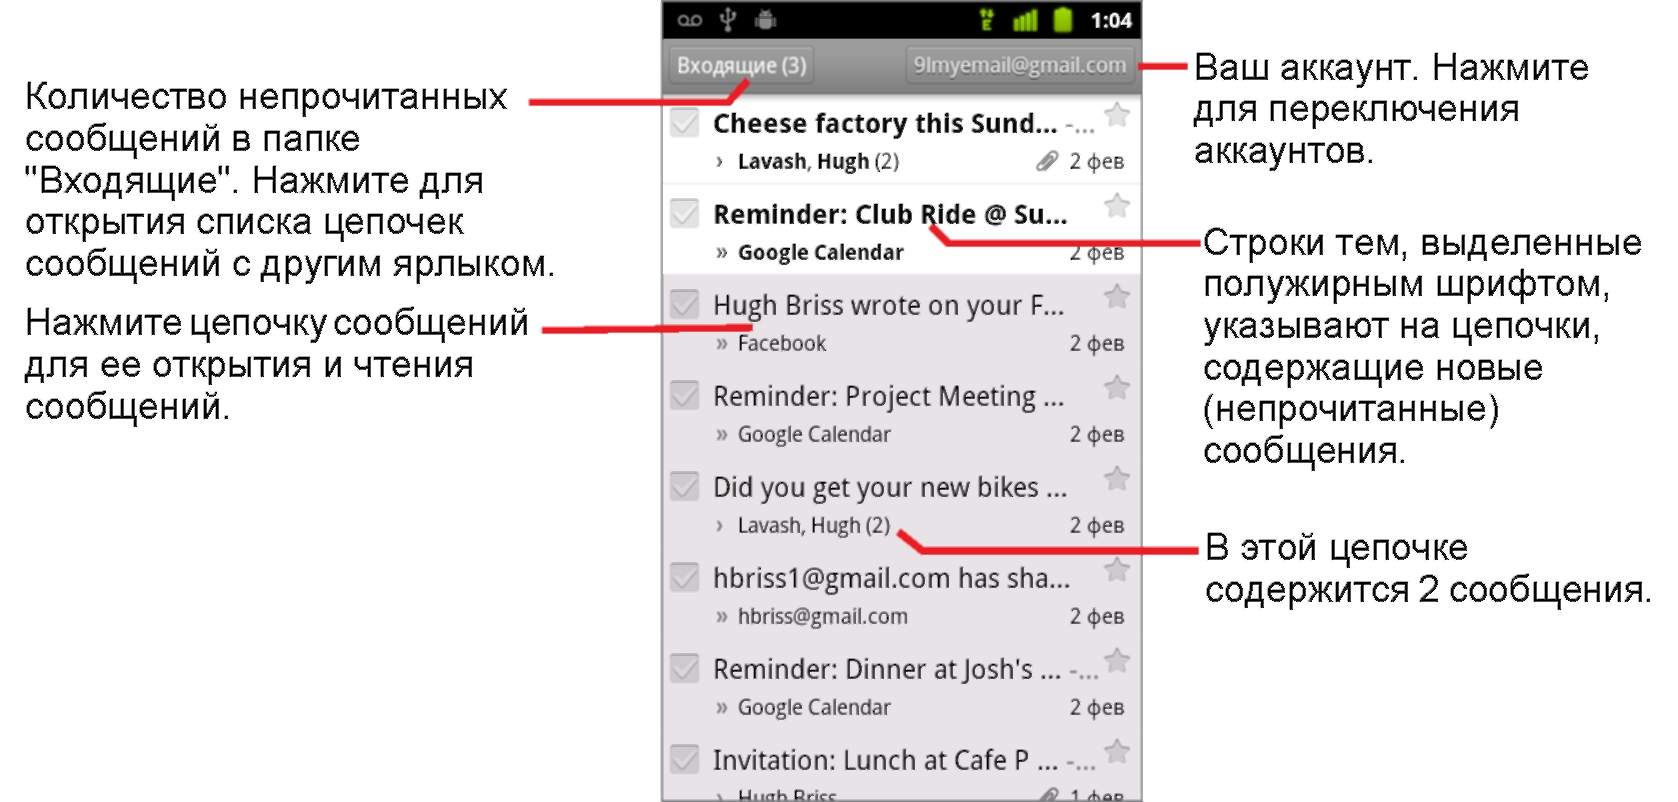
” indicates messages sent directly to you.
> indicates messages of which a copy has been sent to you.
Other messages have been sent to you as a group member.
If you use the Priority folder, messages in threads may also indicate whether they have been flagged Gmail application or by you as important (see section):
Important messages are marked with a yellow icon:
Indicates important messages sent directly to you.
Indicates important messages of which a copy has been sent to you.
Indicates important messages you have received as a group member.
Open your inbox when using Gmail
If you have set your default inbox to Priority, this folder will open instead of your Inbox (see ).
Switching accounts
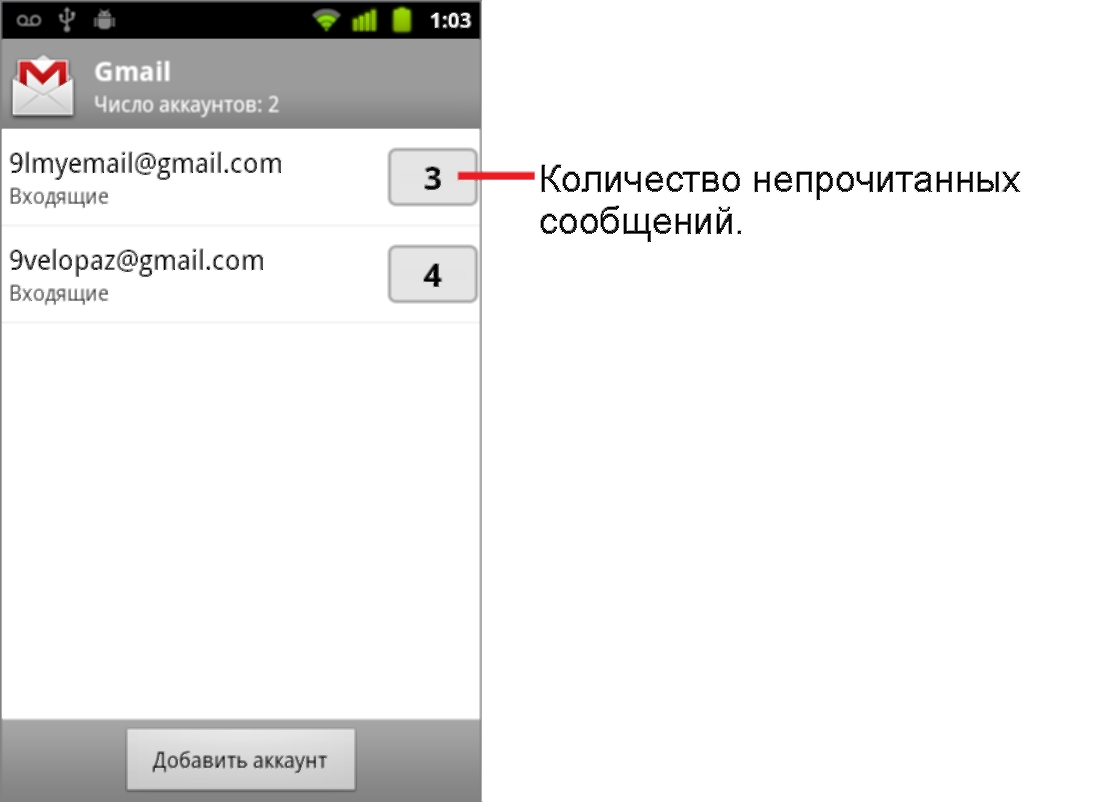
Gmail displays threads, messages, and settings from only one Google account at one time. If you use multiple accounts, you can open the Accounts screen to view the number unread messages in each account, as well as to switch between accounts.
Adding and setting up accounts is described in the section "Accounts".
1. In your inbox, tap your current account in the top right corner of the screen, or tap Menu, and then Accounts.
Each account is displayed along with the number of unread messages in the Inbox or Priority folder, depending on the default inbox. In addition, the default inbox for each account is displayed (see section).
2. Tap the account containing the message you would like to read.
The Inbox or Priority folder for a specific account opens depending on which folder has been set as the default inbox.
Use Gmail offline
If you are not connected to mobile network or Wi-Fi networks(for example, you switched to Airplane mode), you can use Gmail to read messages stored on your phone (see section) and also to compose new messages.
Messages you send are stored on your phone as Outbox until your connection is restored. After this, messages will be sent automatically. You can view messages labeled "Outbox" (see section).
IN mailbox The following standard folders are available:
- Outbox. Emails that were not sent because the Internet connection was lost. When the connection is restored, the emails will be sent automatically.
- Archive . Folder for storing old letters.
Note. If there are no letters in the Archive, the folder is not displayed. To move a letter to this folder, right-click on it and select Archive.
Inbox. All new emails (except for spam and emails that end up in other folders using automatic email sorting).
Sent. All emails you sent.
Deleted. All emails that you deleted manually or using automatic sorting letters.
Spam. Emails that have been identified as spam.
Drafts. Letter drafts and templates.
Standard folders are not edited or deleted.
Personal folders
To add a personal folder, click New Folder. You can add multiple personal folders - they will all appear as subfolders in the Inbox.
On the menu Settings → Folders and labels you can edit personal folders:
- create subfolders inside the Inbox folder;
- rename, clean up or delete folders;
- mark all emails in a folder as read;
- create rules for automatic sorting of letters.
Note. You can create up to 1017 personal folders with a maximum nesting of 32 folders.
Sort the list of personal folders
Personal folders in the list can be moved and rearranged. To do this, drag the desired folder to a new location in the folder list.
If you can't drag a folder, check that the option is enabled Allow drag and drop of emails and folders.
By default, personal folders are sorted alphabetically. If you move at least one folder, alphabet order it will not be possible to restore automatically. But you can manually drag the folder to its original location. New folders will then be shown at the bottom of the list, rather than in alphabetical order.


