RTC module DS1307 connection to Arduino. Tiny RTC I2C Modules – clock, precision generator, memory chip Tiny rtc i2c connection
Calculation of real time in seconds, minutes, hours, dates of the month, months, days of the week and years, taking into account the highness of the current year up to 2100.
56 bytes of non-volatile RAM for data storage
2-wire serial interface
Programmable square pulse generator. Can output 1 Hz, 4.096 kHz, 8.192 kHz and 32.768 kHz.
Automatic detection of shutdown of the main power source and connection of the backup one
24-hour and 12-hour mode
Consumption no more than 500 nA when powered by a backup battery at a temperature of 25C°
The microcircuit is available in eight-pin DIP and SOIC packages. The pinout is the same for everyone. Below I will provide lines from the datasheet to complete the picture.
Documentation for the chip (datasheet)
Pin assignment:
. X1, X2- Serve to connect a 32.768 kHz quartz resonator
. Vbat- Input for any standard three-volt lithium battery or other power source. For normal operation DS1307 requires the battery voltage to be in the range of 2.0 ... 3.5 V. Lithium battery with a capacity of 48 mAh or more will support the DS1307 in the absence of power
for more than 10 years at a temperature of 25°C.
. GND- general minus
. Vcc- This is a +5V input. When the supply voltage is above 1.25 * VBAT, the device is fully enabled and data can be read and written. When a 3V battery is connected to the device and Vcc is lower than 1.25 * VBAT, reading and writing are prohibited, but the timing function continues to work. Once Vcc drops below VBAT, the RAM and RTC switch to battery power VBAT.
. SQW/OUT- Output signal with rectangular pulses.
. SCL- (Serial Clock Input - serial clock input) - used to synchronize data over the serial interface.
. S.D.A.- (Serial Data Input/Output) - input/output pin for a two-wire serial interface.
Working with SQW/OUT Pin.
First, let's look at the register structure of the DS1307.
Register structure of the DS1307 chip

We are interested in the “Control register” located at address 0x7, because it determines the operation of the SQW/OUT pin.
If the SQWE bit = 1, then the formation of rectangular pulses begins, if SQWE = 0, then the output output will contain the value of the OUT bit.
The RS0 and RS1 bits are responsible for the pulse frequency, namely:
| RS0 | RS1 | Frequency |
|---|---|---|
| 0 | 0 | 1 Hz |
| 0 | 1 | 4.096 kHz |
| 1 | 0 | 8.192 kHz |
| 1 | 1 | 32.768 kHz |
Here's an example:
If we need to start generating rectangular pulses with a frequency of 1 Hz, then we need to send byte 00010000 or 0x10 in the hexadecimal number system to the 0x7 register of the microcircuit, which has the address 0x68.
Using the library Wire.h, this can be done like this:
Wire.beginTransmission(0x68); Wire.write(0x7); Wire.write(0x10); Wire.endTransmission();Connection to Arduino:
The pins responsible for the I2C interface on Arduino boards based on different controllers vary.

Required libraries:
for working with DS1307: http://www.pjrc.com/teensy/td_libs_DS1307RTC.html
for working with time: http://www.pjrc.com/teensy/td_libs_Time.html
Setting the time
. Manually in code
The time is set manually in the program code and uploaded to the Arduino board. This method not the most accurate because Compilation and loading times may vary.
Example program code
#include

//output time via ":".print(":");
if (digits
.print("0"); .print(digits); ). Installation from
"Port Monitor"
More accurate time setting option. The time is set via the “port monitor” as the controller operates.
Open the monitor, enter data into
in the required format#include
int day = time.substring(0, 2).toInt();
int month = time.substring(3, 5).toInt();
int year = time.substring(6, 8).toInt();
int hours = time.substring(9, 11).toInt();
int minutes = time.substring(12, 14).toInt();
int seconds = time.substring(15, 17).toInt(); :
TimeElementste; te.Second = seconds; te.Minute = minutes;
te.Hour = hours;
te.Day = day ;
te.Month = month ;
te.Year = year + 30; //the year in the library is counted from 1970. We want from 2000 time_t timeVal = makeTime(te); RTC .set(timeVal); setTime(timeVal); )
DS1307 is a small module designed for counting time. Assembled on the basis of the DS1307ZN chip and powered by a lithium battery (LIR2032), which allows it to work autonomously for a long time. Also on the module is a 32 KB non-volatile EEPROM memory (AT24C32). The AT24C32 microcircuit and DS1307ZN are connected by a common bus using the I2C interface. Technical specifications Supply voltage: 5V

Data exchange with other devices is carried out via the I2C interface from the SCL and SDA pins. Capacitors C1 and C2 are necessary to reduce noise along the power line. To ensure the proper level of the SCL and SDA signals, resistors R2 and R3 are installed (pulled up to the power supply). To check the functionality of the module, an SQ signal of a rectangular shape with a frequency of 1 Hz is supplied to pin 7 of the DS1307Z chip. Elements R4, R5, R6, VD1 are necessary to recharge the lithium battery. Also, the board has a seat (U1) for installing a DS18B20 temperature sensor (if necessary, you can solder it in), you can read the readings from the DS pin, which is connected to the power supply, through a resistor R1 with a resistance of 3.3 kOhm. Schematic diagram and the purpose of the contacts can be seen in the figures below.

There are two groups of contacts on the board, with a pitch of 2.54 mm, for convenient connection to the breadboard, I will use pin connectors, they need to be soldered.

First group of contacts:
DS: DS18B20 output (1-wire)
VCC: “+” module power supply
GND: “-” module power supply
Second group of contacts:
SQ: 1 MHz input
DS: DS18B20 output (1-wire)
SCL: Serial CLock
SDA: data line (Serial Dфta)
VCC: “+” module power supply
GND: "-" module power supply
BAT:
Charging the battery
As described, your module can charge the battery, this is implemented using components R4, R5, R6 and diode D1. But, this scheme has the disadvantage that the battery discharges through resistors R4 and R6 (as user ALEXEY noted, not at all large). Since the module consumes little current, you can remove the power circuit; to do this, remove R4, R5, R6 and VD1, replace R6 with a jumper (after removing the components, you can use a regular CR2032 battery).

Connecting DS1307 to Arduino
Required parts:
Arduino UNO R3 x 1 pc.
DuPont wire, 2.54 mm, 20 cm x 1 pc.
USB 2.0 A-B cable x 1 pc.
Real time clock RTC DS1307 x 1 pc.
Connection:
To connect the DS1307 real time clock, you need to solder the pin connectors into the first group of pins. Next, we connect the wires SCL (DS1307) to pin 4 (Arduino UNO) and SDA (DS1307) to pin 5 (Arduino UNO), all that remains is to connect the VCC to +5V and GND to GND. By the way, the I2C interface outputs are different in different Arduino boards; the purpose of each can be seen below.

Setting the DS1307 time
First of all, you need to download and install the “DS1307RTC” and “TimeLib” library in the Arduino IDE development environment, then you need to set the time, open the example from the DS1307RTC library “File” -> “Examples” -> “DS1307RTC” -> “SetTime” or copy the code below.
![]()
uint8_t monthIndex;

if (sscanf(str, "%s %d %d", Month, &Day, &Year) != 3) return false;
for (monthIndex = 0; monthIndex
= 12) return false;
![]()
Loading this code into the Arduino controller, open “Port Monitoring”


Real-time clock is a module that stores the current date and does not reset it when the power is turned off thanks to the built-in battery. You may have heard about a watch based on the DS1307 chip. This chip has extremely low clock accuracy. A delay of one hour per day is too much. I recommend using a module based on a high-precision DS3231 chip, which is equipped with a thermometer to adjust the clock rate depending on the temperature. The clock accuracy of this chip is at a good level wristwatch and is 2ppm at temperature environment 0°-40°. At the same time, the module is compatible with all libraries written for the module based on the DS1307 chip. The article talks about connecting the module to Arduino and interacting with them using the Time library. You can buy such a module from a seller I have verified.
Real time clock connection
The clock is connected using the I2C protocol with just two wires. It is necessary to additionally tighten the terminals to which the clock is connected to the power rail using 2 KΩ resistors. The clock outputs look like this:

The 32K and SQW pins can be ignored. Their purpose is not discussed in this article. SCL and SDA are the I2C interface pins. They need to be connected to the controller. VCC and GND are +5V and ground respectively.
SCL and SDA on different boards located on different pins:
| Uno, Nano | A4 (SDA), A5 (SCL) |
| Mega2560 | 20 (SDA), 21 (SCL) |
| Leonardo | 2 (SDA), 3 (SCL) |
The SDA pin of the clock is connected to the SDA pin of the controller. SDL clock, respectively, to SDL controller. After connecting the wires, you should get the following picture:

The most convenient way to work with the real-time clock module is using the library. The most convenient one in this regard is called: Time ( English time).
The library is a “wrapper” for another popular library for working with the clock module: DS1307RTC. Despite the fact that the library was developed for the DS1307 chip, it works perfectly with the DS3231, since the communication protocols are compatible.
Download both libraries.
After downloading, place the contents of the archives in the libraries folder, which is located in the folder with the Arduino development environment. Launch the Arduino IDE and open standard example libraries: Examples->Time->TimeRTC
Or just copy this code:
#include
#include #include #include void setup() ( Serial. begin(9600); while (! Serial ) ; // wait until Arduino Serial Monitor opens setSyncProvider(RTC.get); // the function to get the time from the RTC if (timeStatus() != timeSet) Serial. println("Unable to sync with the RTC"); else Serial. println("RTC has set the system time"); void loop() if (timeStatus() == timeSet) ( digitalClockDisplay(); ) else ( Serial. println( "The time has not been set. Please run the Time") ; Serial. println( "TimeRTCSet example, or DS1307RTC SetTime example.") ; Serial. println(); delay(4000); delay(1000); void digitalClockDisplay() ( // digital clock display of the time Serial. print(hour()); printDigits(minute()); printDigits(second()); Serial. print (" " ) ; Serial. print(day()); Serial. print (" " ) ; Serial. print(month()); Serial. print (" " ) ; Serial. print(year()); Serial. println(); void printDigits(int digits) ( // utility function for digital clock display: prints preceding colon and leading 0 Serial. print(":"); if (digits< 10 ) Serial. print("0"); Serial. print(digits); |
After loading the sketch into the board, launch the port monitor (Tools->port monitor). You will see messages from the library. The displayed time will be incorrect, or the library will complain that the clock is not configured. To set the clock, load an example from the DS1307RTC “SetTime” library into the board (Examples->DS1307RTC->SetTime). Load this example into your board. After downloading, the watch will be set to sketch compilation time. The delay between compilation and full download will be very short, which will be enough for a finely tuned clock. But if you disconnect and reconnect the board's power, even after several hours, the clock time will still be reset to the time of compilation and will be incorrect. Therefore, use this example only for setup, after setup, turn off the clock or upload another sketch to the board.
LCD display– a frequent guest in Arduino projects. But in complex circuits we may have the problem of a lack of Arduino ports due to the need to connect a shield that has many, many pins. The solution in this situation could be I2C/IIC An adapter that connects an almost standard Arduino 1602 shield to Uno, Nano or Mega boards using only 4 pins. In this article we will look at how you can connect an LCD screen with an I2C interface, what libraries you can use, write a short example sketch and look at common errors.
Liquid Crystal Display LCD 1602 is good choice to output character strings in various projects. It is inexpensive, there are various modifications with different backlight colors, you can easily download ready-made libraries for Arduino sketches. But the main disadvantage of this screen is the fact that the display has 16 digital pins, of which a minimum of 6 are required. Therefore, using this LCD screen without i2c adds serious restrictions for Arduino Uno or Nano boards. If there are not enough contacts, then you will have to buy an Arduino Mega board or save contacts, including by connecting the display via i2c.
Brief description of LCD 1602 pins
Let's take a closer look at the LCD1602 pins:
Each of the pins has its own purpose:
- Ground GND;
- Power supply 5 V;
- Setting monitor contrast;
- Command, data;
- Writing and reading data;
- Enable;
7-14. Data lines;
- Plus backlight;
- Minus the backlight.
Display Specifications:
- Character display type, it is possible to load symbols;
- LED lights;
- Controller HD44780;
- Supply voltage 5V;
- Format 16x2 characters;
- Operating temperature range from -20C to +70C, storage temperature range from -30C to +80C;
- Viewing angle 180 degrees.
Connection diagram of LCD to Arduino board without i2C
The standard diagram for connecting a monitor directly to an Arduino microcontroller without I2C is as follows.

Due to the large number of connected contacts, there may not be enough space to connect the necessary elements. Using I2C reduces the number of wires to 4 and occupied pins to 2.
Where to buy LCD screens and shields for Arduino
LCD screen 1602 (and version 2004) is quite popular, so you can easily find it both in domestic online stores and on foreign sites. Here are some links to the most available options:
 LCD1602+I2C Blue Screen Module, Arduino Compatible LCD1602+I2C Blue Screen Module, Arduino Compatible
|   A simple LCD1602 display (green backlight) cheaper than 80 rubles A simple LCD1602 display (green backlight) cheaper than 80 rubles
|   Large LCD2004 screen with I2C HD44780 for Arduino (blue and green backlight) Large LCD2004 screen with I2C HD44780 for Arduino (blue and green backlight)
|
  1602 display with IIC adapter and blue backlight 1602 display with IIC adapter and blue backlight
|   Another version of LCD1602 with a soldered I2C module Another version of LCD1602 with a soldered I2C module
|   Port IIC/I2C/TWI/SPI adapter module for 1602 shield, compatible with Arduino Port IIC/I2C/TWI/SPI adapter module for 1602 shield, compatible with Arduino
|
  RGB backlit display! LCD 16×2 + keypad +Buzzer Shield for Arduino RGB backlit display! LCD 16×2 + keypad +Buzzer Shield for Arduino
|   Shield for Arduino with buttons and screen LCD1602 LCD 1602 Shield for Arduino with buttons and screen LCD1602 LCD 1602
|   LCD display for 3D printer (Smart Controller for RAMPS 1.4, Text LCD 20×4), SD and MicroSD card reader module LCD display for 3D printer (Smart Controller for RAMPS 1.4, Text LCD 20×4), SD and MicroSD card reader module
|
Description of the I2C protocol
Before discussing connecting the display to Arduino via an i2c adapter, let's briefly talk about the i2C protocol itself.
I2C/IIC(Inter-Integrated Circuit) is a protocol originally created for interconnecting integrated circuits within electronic device. The development belongs to Philips. The i2c protocol is based on the use of an 8-bit bus, which is needed to communicate blocks in control electronics, and an addressing system, thanks to which you can communicate over the same wires with several devices. We simply transfer data to one or another device, adding the identifier of the desired element to the data packets.
The most simple circuit I2C can contain one master device (most often an Arduino microcontroller) and several slaves (for example, an LCD display). Each device has an address in the range from 7 to 127. There should not be two devices with the same address in the same circuit.
The Arduino board supports i2c in hardware. You can use pins A4 and A5 to connect devices using this protocol.
There are several advantages to I2C operation:
- Operation requires only 2 lines - SDA (data line) and SCL (sync line).
- Connecting a large number of leading devices.
- Reduced development time.
- Only one microcontroller is required to control the entire set of devices.
- The possible number of microcircuits connected to one bus is limited only by the maximum capacity.
- High degree of data security due to a special surge suppression filter built into the circuits.
- A simple procedure for diagnosing emerging failures and quickly debugging faults.
- The bus is already integrated into the Arduino itself, so there is no need to develop an additional bus interface.
Flaws:
- There is a capacitive limit on the line - 400 pF.
- Difficult to program an I2C controller if there are several different devices on the bus.
- With a large number of devices, it becomes difficult to isolate a fault if one of them erroneously goes low.
i2c module for LCD 1602 Arduino
 The fastest and convenient way Using an i2c display in Arduino means purchasing a ready-made screen with built-in protocol support. But there are not very many of these screens and they are not cheap. But the variety standard screens A huge number have already been released. Therefore, the most affordable and popular option today is to purchase and use a separate I2C module - an adapter, which looks like this:
On one side of the module we see i2c pins - ground, power and 2 for data transfer. On the other adapter we see external power connectors. And, of course, the board has many pins with which the module is soldered to the standard screen pins.


i2c outputs are used to connect to the Arduino board. If necessary, we connect external power for backlighting. With the built-in trimmer we can set custom contrast values J
On the market you can find LCD 1602 modules with already soldered adapters; their use is simplified as much as possible. If you purchased a separate adapter, you will need to first solder it to the module.
Connecting the LCD screen to Arduino via I2C
To connect, you need the Arduino board itself, a display, a breadboard, connecting wires and a potentiometer.
If you are using a special separate i2c adapter, you must first solder it to the screen module. It's hard to make a mistake there, you can follow this scheme.
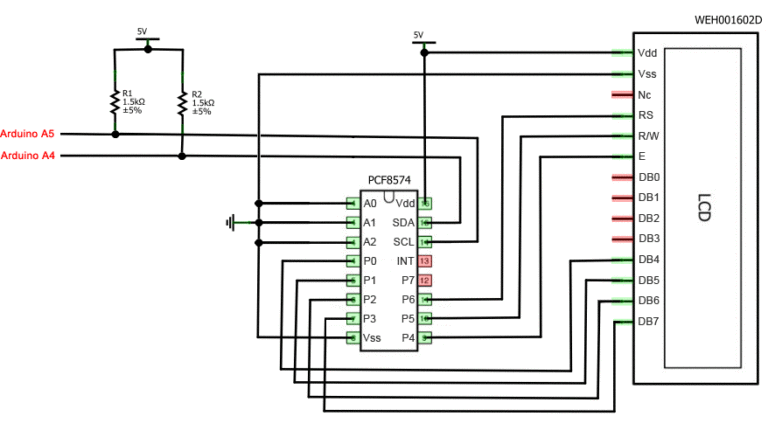

An LCD monitor with i2c support is connected to the board using four wires - two wires for data, two wires for power.
- The GND pin connects to GND on the board.
- The VCC pin is at 5V.
- SCL connects to pin A5.
- SDA is connected to pin A.
And it's all! No webs of wires, which are very easy to get tangled in. At the same time, we can simply entrust all the complexity of implementing the i2C protocol to libraries.
Libraries for working with i2c LCD display
To interact with Arduino and LCD 1602 via the I2C bus, you will need at least two libraries:
- The Wire.h library for working with I2C is already available in standard program Arduino IDE.
- The LiquidCrystal_I2C.h library, which includes a wide variety of commands for controlling the monitor via the I2C bus and allows you to make the sketch simpler and shorter. You need to additionally install the library After connecting the display, you need to additionally install the LiquidCrystal_I2C.h library
After connecting all the necessary libraries to the sketch, we create an object and can use all its functions. For testing, let's load the following standard example sketch.
#include
Description of functions and methods of the LiquidCrystal_I2C library:
- home() and clear() - the first function allows you to return the cursor to the beginning of the screen, the second does the same, but at the same time deletes everything that was on the monitor before.
- write(ch) – allows you to print a single character ch to the screen.
- cursor() and noCursor() – shows/hides the cursor on the screen.
- blink() and noBlink() – the cursor blinks/does not blink (if its display was enabled before).
- display() and noDisplay() – allows you to connect/disable the display.
- scrollDisplayLeft() and scrollDisplayRight() – scrolls the screen one character left/right.
- autoscroll() and noAutoscroll() – allows you to enable/disable autoscroll mode. In this mode, each new character is written in the same place, displacing what was previously written on the screen.
- leftToRight() and rightToLeft() – Setting the direction of the displayed text – left to right or right to left.
- createChar(ch, bitmap) – creates a character with code ch (0 – 7), using an array of bitmap bitmaps to create black and white points.
Alternative library for working with i2c display
In some cases, errors may occur when using the specified library with devices equipped with PCF8574 controllers. In this case, the LiquidCrystal_PCF8574.h library can be suggested as an alternative. It extends LiquidCrystal_I2C, so there should be no problems using it.
Problems connecting i2c lcd display
If after uploading the sketch you do not see any message on the display, try the following steps.
First, you can increase or decrease the monitor's contrast. Often characters are simply not visible due to the contrast and backlight mode.
If this does not help, then check whether the contacts are connected correctly and whether the backlight power is connected. If you used a separate i2c adapter, then check again the quality of the soldering of the contacts.
Another common reason for missing text on the screen may be an incorrect i2c address. First try changing the device address in the sketch from 0x27 0x20 or to 0x3F. U different manufacturers different default addresses can be protected. If this does not help, you can run the i2c scanner sketch, which scans all connected devices and determines their address using brute force. An example of an i2c scanner sketch.
If the screen still does not work, try unsoldering the adapter and connecting the LCD as usual.
Conclusion
In this article, we looked at the main issues of using an LCD screen in complex Arduino projects, when we need to save free pins on the board. A simple and inexpensive i2c adapter will allow you to connect a 1602 LCD screen, taking up only 2 analog pins. In many situations this can be very important. The price for convenience is the need to use an additional module - a converter and library. In our opinion, not at all high price for its convenience and we highly recommend using this feature in projects.
In many Arduino projects, it is required to monitor and record the time of occurrence of certain events. Real time clock module equipped with extra batteries, allows you to store the current date without depending on the availability of power on the device itself. In this article we will talk about the most common RTC modules DS1307, DS1302, DS3231 that can be used with Arduino board.
The clock module is a small board containing, as a rule, one of the DS1307, DS1302, DS3231 microcircuits. In addition, on the board you can practically find a battery installation mechanism. Such boards are often used to track time, date, day of the week and other chronometric parameters. The modules operate on autonomous power - batteries, accumulators, and continue to count even if the power to the Arduino is turned off. The most common watch models are DS1302, DS1307, DS3231. They are based on an RTC (real time clock) module connected to Arduino.
Clocks count in units that are convenient for the average person - minutes, hours, days of the week and others, in contrast to conventional counters and clock generators that read “ticks”. Arduino has a special millis function(), which can also read different time intervals. But the main disadvantage of this function is that it resets to zero when the timer is turned on. With its help you can only read time; it is impossible to set the date or day of the week. Real-time clock modules are used to solve this problem.
The electronic circuit includes a microcircuit, a power supply, a quartz resonator and resistors. The quartz resonator operates at a frequency of 32768 Hz, which is convenient for a conventional binary counter. The DS3231 circuit has built-in quartz and thermal stabilization, which allows for highly accurate values.
Comparison of popular RTC modules DS1302, DS1307, DS3231
In this table we have provided a list of the most popular modules and their main characteristics.
| Name | Frequency | Accuracy | Supported protocols |
| DS1307 | 1 Hz, 4.096 kHz, 8.192 kHz, 32.768 kHz | Depends on the quartz - usually the value reaches 2.5 seconds per day, it is impossible to achieve accuracy higher than 1 second per day. Also, accuracy depends on temperature. | I2C |
| DS1302 | 32.768 kHz | 5 seconds a day | I2C, SPI |
| DS3231 | Two outputs - the first at 32.768 kHz, the second programmable from 1 Hz to 8.192 kHz | ±2 ppm at temperatures from 0C to 40C. ±3.5 ppm at temperatures from -40C to 85C. Temperature measurement accuracy – ±3С | I2C |
Module DS1307
DS1307 is a module that is used for timing. It is assembled on the basis of the DS1307ZN chip, power comes from a lithium battery for implementation battery life over a long period of time. The battery on the board is mounted on the reverse side. The module has an AT24C32 chip - this is a 32 KB non-volatile EEPROM memory. Both microcircuits are connected by an I2C bus. DS1307 has low power consumption and contains a clock and calendar for the year 2100.
The module has the following parameters:
- Power supply – 5V;
- Operating temperature range from -40C to 85C;
- 56 bytes of memory;
- Lithium battery LIR2032;
- Implements 12 and 24 hour modes;
- I2C interface support.
The module is justified in cases where data is read quite rarely, at intervals of a week or more. This allows you to save on power, since uninterrupted use will require more voltage, even with a battery. The presence of memory allows you to register various parameters(for example, temperature measurement) and read the received information from the module.
Interaction with other devices and exchange of information with them is carried out using the I2C interface from the SCL and SDA pins. The circuit contains resistors that allow you to provide the required signal level. The board also has a special place for mounting the DS18B20 temperature sensor. The contacts are distributed into 2 groups, pitch 2.54 mm. The first group of contacts contains the following pins:
- DS – output for sensor DS18B20;
- SCL – clock line;
- SDA – data line;
- VCC – 5V;
The second group of contacts contains:
- SQ – 1 MHz;
- BAT – input for lithium battery.
To connect to the Arduino board, you need the board itself (in this case we are considering Arduino Uno), an RTC DS1307 real-time clock module, wires and a USB cable.
To connect the controller to Arduino, 4 pins are used - VCC, ground, SCL, SDA.. VCC from the clock is connected to 5V on the Arduino, ground from the clock is connected to ground from the Arduino, SDA - A4, SCL - A5.
To start working with the clock module, you need to install the DS1307RTC, TimeLib and Wire libraries. You can also use RTCLib for work.
Checking the RTC module
When you run the first code, the program will read data from the module once per second. First, you can see how the program behaves if you remove the battery from the module and replace it with another while the Arduino board is not connected to the computer. You need to wait a few seconds and remove the battery, eventually the watch will reboot. Then you need to select an example from the Examples→RTClib→ds1307 menu. It is important to set the transmission speed correctly to 57600 bps.
When you open the Serial Monitor window, the following lines should appear:
The time will show 0:0:0. This is because the watch loses power and will stop counting time. For this reason, the battery must not be removed while the module is operating.
To set the time on the module, you need to find the line in the sketch
RTC.adjust(DateTime(__DATE__, __TIME__));
This line will contain data from the computer that is used to flash the real-time clock module. For correct operation You must first check that the date and time on the computer are correct, and only then start flashing the clock module. After setup, the monitor will display the following data:
The setup is done correctly and there is no need to additionally reconfigure the real-time clock.
Time reading. Once the module is configured, time requests can be sent. This is done using the now() function, which returns a DateTime object that contains time and date information. There are a number of libraries that are used to read time. For example, RTC.year() and RTC.hour() - they separately obtain information about the year and hour. When working with them, a problem may arise: for example, a request to display the time will be made at 1:19:59. Before showing the time 1:20:00, the clock will display the time 1:19:00, meaning, in essence, one minute will be lost. Therefore, it is advisable to use these libraries in cases where reading occurs infrequently - once every few days. There are other functions for calling time, but if you need to reduce or avoid errors, it is better to use now() and extract the necessary readings from it.
Example project with i2C clock module and display
The project is a regular clock; the exact time will be displayed on the indicator, and the colon between the numbers will blink at intervals of once every second. To implement the project you will need an Arduino Uno board, digital indicator, a real-time clock (in this case, the above-described ds1307 module), a shield for connection (in this case, Troyka Shield is used), a battery for the clock and wires.
The project uses a simple four-digit indicator on a TM1637 chip. The device has a two-wire interface and provides 8 levels of monitor brightness. Used only to display time in hours:minutes format. The indicator is easy to use and easy to connect. It is beneficial to use for projects where minute or hourly data verification is not required. To get more complete information LCD monitors are used to indicate time and date.
The clock module is connected to the SCL/SDA pins, which belong to the I2C bus. You also need to connect ground and power. It is connected to Arduino in the same way as described above: SDA – A4, SCL – A5, ground from the module to ground from Arduino, VCC -5V.
The indicator is connected simply - its CLK and DIO pins are connected to any digital pins on the board.
Sketch. To write code, use the setup function, which allows you to initialize the clock and indicator and record the compilation time. Printing the time to the screen will be done using loop.
#include
After this, the sketch needs to be loaded and the time will be shown on the monitor.
The program could be slightly modernized. When the power is turned off, the sketch written above will cause the display to show the time that was set during compilation after turning it on. In the setup function, each time the time that has passed from 00:00:00 to the start of compilation will be calculated. This hash will be compared to what is stored in the EEPROM, which is retained when power is removed.
To write and read time to or from non-volatile memory, you need to add the EEPROMWriteInt and EEPROMReadInt functions. They are needed to check whether the hash matches/mismatches the hash recorded in the EEPROM.
The project can be improved. If you use an LCD monitor, you can make a project that displays the date and time on the screen. The connection of all elements is shown in the figure.
As a result, the code will need to specify a new library (for liquid crystal screens this is LiquidCrystal), and add lines to the loop() function to obtain the date.
The operating algorithm is as follows:
- Connecting all components;
- Check - the time and date on the monitor screen should change every second. If the time on the screen is incorrect, you need to add the RTC.write (tmElements_t tm) function to the sketch. Problems with incorrect times are due to the fact that the clock module resets the date and time to 00:00:00 01/01/2000 when turned off.
- The write function allows you to get the date and time from the computer, after which the correct parameters will be indicated on the screen.
Conclusion
Clock modules are used in many projects. They are needed for data recording systems, when creating timers and control devices that operate according to a given schedule, in household appliances. With widely available and cheap modules, you can create projects such as an alarm clock or a sensor data logger, recording information to an SD card or showing the time on a display screen. In this article, we looked at typical usage scenarios and connection options for the most popular types of modules.


