Pinout bluetooth module. Arduino Tutorials: Smartphone Device Control for Dummies
For wireless exchange of information between different devices over short distances, you can use Bluetooth technology. For these purposes, the Chinese industry produces various Bluetooth modules, among which the HC-05 and HC-06 models are widely popular. At one time, I bought an HC-06 on Aliexpress, on which I will conduct further experiments, as well as connect it to my Chinese counterpart Arduino.
The Bluetooth module itself. As such, it can be used in various devices, where it is soldered directly to the board. The module has 34 outputs, including: outputs for connecting to a computer via UART, audio transmission using the PCM method (pulse code modulation), analog input and output, contacts for connecting to a USB connector, SPI interface, and general purpose ports. In fact, not all of these outputs are available for use, access to audio transmission outputs (5-8), analog input and output (9, 10), as well as to the group of contacts for connecting to USB (15, 20) is blocked.
HC-06 is based on BC417 chip (BlueCore4-External device), Bluetooth V2.0 specification. On board there is also a 26 MHz quartz and 8 MB flash memory. Power is supplied from 3.3V.

For your designs, it is most convenient to use a module with a breadboard, on which the necessary contacts for connections are displayed, and there is also a voltage regulator that allows you to power from 5 volts.
When buying such modules, you may encounter their various markings. In fact, this is the same device, differing in firmware, which determines the module mode (master / slave).

The difference between HC-05 and HC-06 is that HC-05 can be used as a slave (master) or master (slave). These modes are set using AT commands. A button on the module board switches it to the AT command input mode. The master mode allows the module to detect such a device itself and organize communication with it. The HC-06 module can only work in one fixed slave mode.
There are also models HC-03 and HC-04, but they are produced for industrial purposes.
Designation of pins on the HC-06 board.

STATE- checking the status of the module. On this contact, the signal is duplicated, which displays the LED built into the board. If it blinks very quickly, then the module is active. In the communication mode, the current is 30-40 mA. When the module establishes a connection with another device, the LED just lights up. In data transfer mode, the current is 8 mA.
RX- receiving data.
TX- data transfer.
GND- connected to ground.
+5V- power supply +5 Volts
EN- enable/disable the module. If a logical 1 (5 volts) is applied to this contact, the module will turn off, if a logical 0 is applied or not connected to this contact, the module will work.
By default, the HC-06 has a name to be discovered by other devices " HC-06”, with the pin code “ 1234 ».
To change these data, you need to connect the module to a computer and enter AT commands using the terminal program. This can be done with USB adapter to COM with TTL levels. For these purposes, an adapter for PL2303HX, CH340G, or another similar one is suitable. Your computer should already have a driver installed by now. USB adapter a.
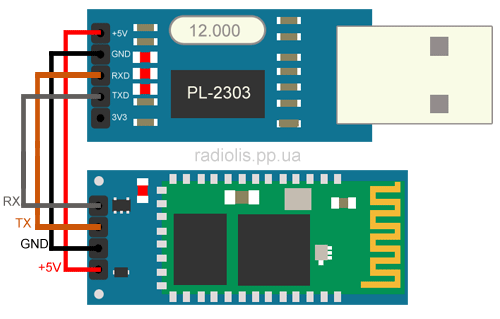
Contacts are connected as follows:
| HC-06 | USB to COM adapter |
| +5V | +5V |
| GND | GND |
| RX | TX |
| TX | RX |
When this assembly is connected to a computer, the red LED on the Bluetooth module board will begin to blink rapidly. To enter AT commands, you can use any terminal program, I use the Arduino IDE for this purpose.
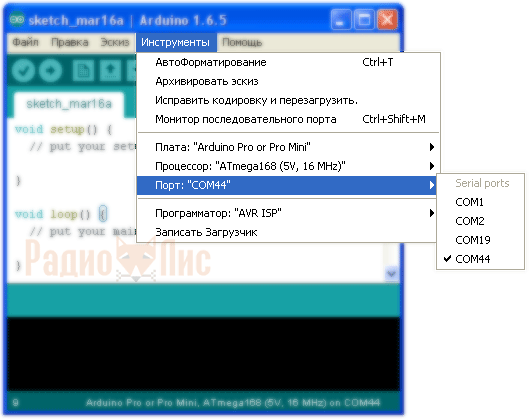
In the settings, select the number of the virtual COM port on which the USB adapter is connected, in my case it is COM44. Open the window " Serial Monitor».
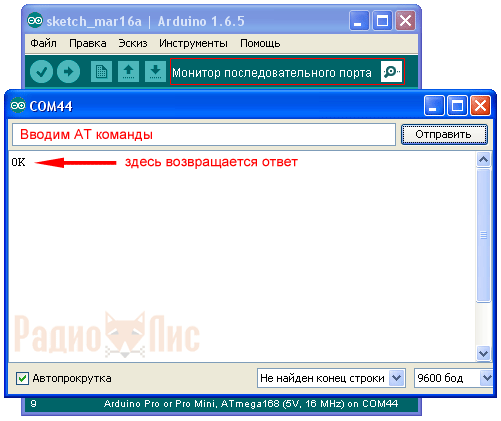
Enter in capital letters the command " AT", if the device connected successfully, the response should return " OK". The default baud rate is 9600 baud.
To check the firmware version, enter the command " AT+VERSION", in my case the response returned " OKlinvorV1.8».
Team " AT+NAMEyyy", where uuu- an arbitrary set of characters in Latin, we can change the name by which our bluetooth device module will be found (by default HC-06). In my example, I entered " AT+NAMEfox”, the response is returned OKsetname.
Team " AT+PINxxxx", where xxxx- an arbitrary set of numbers, you can change the pin code (by default 1234). The response is " OKsetPIN».
Team " AT+BAUDx", where x– value from 1 to 9, you can change the baud rate (by default 9600).
1 - 1200
2 - 2400
3 - 4800
4 - 9600
5 - 19200
6 - 38400
7 - 57600
8 - 115200
9 - 230400
Let's say if we run the command " AT+BAUD8”, where 8 is the speed of 115200 baud, the response will return “ OK115200».
Connecting HC-06 to Arduino.
Example 1 Let's upload a sketch to the Arduino, with the help of which we will turn on and off the LED, wired on the 13th pin of the Arduino, via the Bluetooth module.
| intdata; int LED = 13; void setup() { Serial.begin(9600); pinMode(LED, OUTPUT); digitalWrite(LED, HIGH); } void loop() { if(Serial.available()) { data = Serial.read(); if (data == "1") { digitalWrite(LED, HIGH); } if (data == "0") { digitalWrite(LED, LOW); } } } |

If you do not have this LED on the board, connect it to pin 13 according to the diagram, resistor values can be taken from 220 Ohm to 1kOhm.

Power off the Arduino and connect the HC-06. Contact TX connect the module to the contact RX Arduino (pin 0 on the UNO board), and the pin RX, to contact TX(pin 1). Contacts +5V and GND, are connected to the corresponding Arduino pins.

Assembled structure. After powering up the Arduino, the LED on the HC-06 should blink quickly.
Arduino control via HC-06, using a computer.
I will show an example on Windows XP. Any USB Bluetooth adapter must be connected to the computer and drivers installed on it.

In my case, I used this adapter.

When it is connected to a PC, a corresponding icon appears in the tray (near the clock).

Right-click on this icon and select " Add Bluetooth Device».

Put the switch " Device installed and ready to be discovered» and press « Further».

Our Bluetooth module will be displayed in the list of discovered devices, with the new name that I changed earlier. Select it and click " Further».

In the next window, enter the pin code to connect to the module by selecting the item " Use the access key from the documentation:». The default is "1234" but I changed it to "9999". Press " Further».

The Bluetooth module has successfully contacted the computer, which can be found in the corresponding window. It should be noted that when a connection is established between two Bluetooth devices, two new virtual COM ports will be created on the computer (will be displayed in the device manager), one for outgoing data, the other for incoming data. We need a port for outgoing data, in my case it is COM45.
Reopen some terminal program, I'll use the Arduino IDE. In the settings, select the outgoing port (I have COM45), open " Serial monitor", enter the commands " 1 " and " 0 ". When command "1" the LED lights up, when "0" goes out.
Control Arduino via HC-06 with Smartphone.
Probably all modern smartphones already have built-in Bluetooth. It remains only to install the terminal program. In my case I used Lumia 640DS, with installed Windows mobile 10. I use "" as the terminal program. On Android smartphones, everything is the same, you can use “ Bluetooth Terminal».
For smartphone owners Apple will not work with Bluetooth modules HC-05 and HC-06 (Bluetooth V2.0), they will have to use adapters with BLE technology (Bluetooth low energy), Bluetooth 4.0 specification. A prominent representative is the HM-10 module.

Pairing HC-06 with smartphone bluetooth.
1. In " Parameters"smartphone, select the item" Devices».
2. Next " Bluetooth and other devices».
3. Turn on the bluetooth of the smartphone with the slider and click on " plus squared» to search for and add a new Bluetooth device, in our case HC-06.
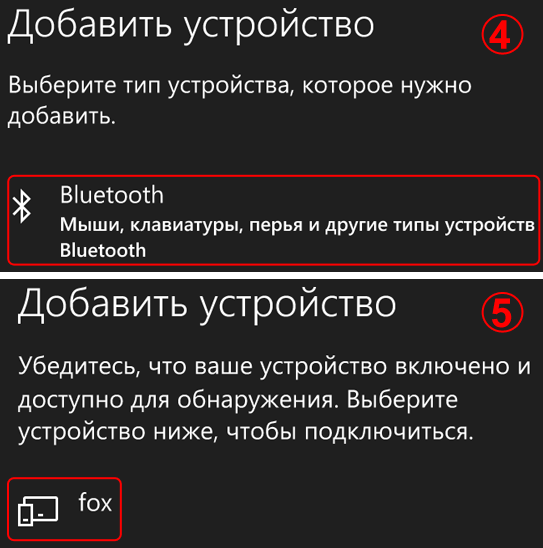
4. In the section " Add device» choose «».
5. The smartphone will search for Bluetooth devices in the area and display their names. In my example, the HC-06 module was found, which I renamed to " Fox».
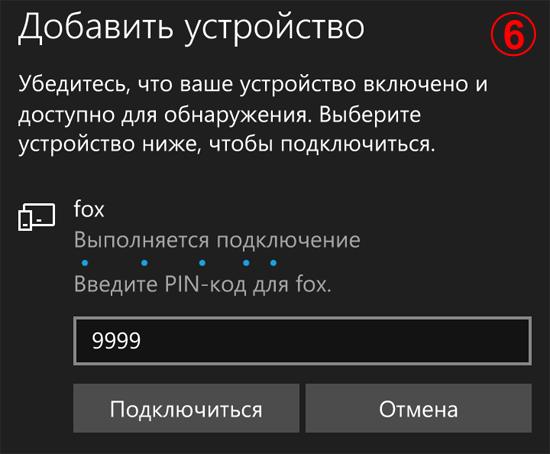
6. Enter the pin code of the device to which we are connecting, press the button " connect».
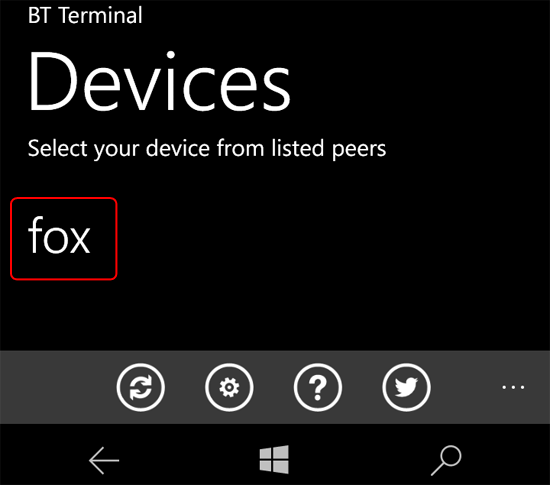
Install and run the terminal program "". The HC-06 module connected to the smartphone is displayed in the list, select it.
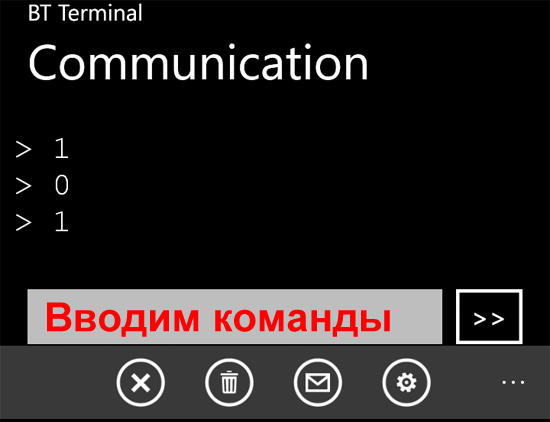
A field for entering commands and a button for submitting will appear. Enter alternately " 1 " and " 0 "and watch the LED on pin 13, which will turn on or off.
Example 2. Let's connect three LEDs to the Arduino and try to control them through the HC-06 Bluetooth module.

I connected the LEDs to pins 9, 11 and 13, if you use other pins, you need to specify them in the sketch.
| intdata; int LED1 = 9; int LED2 = 11; int LED3 = 13; void setup() { Serial.begin(9600); pinMode(LED1, OUTPUT); pinMode(LED2, OUTPUT); pinMode(LED3, OUTPUT); digitalWrite(LED1, HIGH); digitalWrite(LED2, HIGH); digitalWrite(LED3, HIGH); } void loop() { if(Serial.available()) { data = Serial.read(); if (data == "1") { digitalWrite(LED1, HIGH); } if (data == "2") { digitalWrite(LED1, LOW); } if (data == "3") { digitalWrite(LED2, HIGH); } if (data == "4") { digitalWrite(LED2, LOW); } if (data == "5") { digitalWrite(LED3, HIGH); } if (data == "6") { digitalWrite(LED3, LOW); } } } |
When uploading the sketch, the HC-06 module must be disconnected from the Arduino, because both the computer and the bluetooth work via UART. Arduino cannot work with several devices on one UART.
We launch the terminal program and try the sketch in action. The meaning of LED control is as follows, there are three LEDs, each of which can be either on or off. It turns out 6 teams. Teams are numbers from 1 to 6 ( 1, 3, 5 - light 1, 2 and 3 LEDs. 2, 4, 6 - to repay). Numbers can be entered one at a time or in combinations. For example: 145 - light the first, extinguish the 2nd, light the 3rd.
Example 3. Let's connect the relay module from the article "" to the Arduino and try to control a powerful load via Bluetooth. In fact, we get a "smart outlet". Various loads (light bulbs, pumps, fans) can be connected to the relay modules and controlled from a distance.

Sketch for this example will appear in the near future.
Very often in your projects there is a need for remote control or data transfer from your phone gadgets.
One of the most popular and widespread methods of data exchange via Bluetooth .
Today we will analyze simple examples how to connect bluetooth module to Arduino and configure remote control from the phone.
We will need:
- Set of wires FATHER-MAMA
- HC-06 Bluetooth
Connect Bluetooth the module to the Arduino microcontroller is most conveniently using the PAPA-MAMA wiring.
| Arduino | Bluetooth |
|---|---|
| Pin 1 (TX) | RXD |
| Pin 0 (RX) | TXD |
| GND | GND |
| 5V | VCC |
Be careful, you need to connect TX -> RXD ,RX -> TXD .
Now you need to write a test program code:
When uploading the sketch, it is necessary that the Bluetooth module is disconnected from the arduino microcontroller. Otherwise, the sketch will not be recorded, because the connection with Bluetooth module occurs on the same RX and TX port as USB.
intval; int LED = 13; void setup() ( Serial.begin(9600); pinMode(LED, OUTPUT); digitalWrite(LED, HIGH); ) void loop() ( if (Serial.available()) ( val = Serial.read(); / / At the character "1" turn on the LED if (val == "1") ( digitalWrite(LED, HIGH); ) // At the character "0" turn off the LED if (val == "0") ( digitalWrite(LED, LOW ); ) ) )
After the sketch is recorded and Bluetooth the module is connected to the Arduino, you can proceed to the next step.
Bluetooth connection to phone
It is advisable to use not USB as a power source for arduino, but an external 9 V power supply.
- Turn on Bluetooth on your phone and look for new devices
- We find in the list of disorders " HC-06" and connect to it.
- The phone will ask for a pin code. you need to enter " 1234 " or " 0000 "
- Hooray. The device is connected.
Now you need to download the bluetooth terminal on your phone. We will look at the example of the Android platform.


You can install different bluetooth terminals, as a rule they differ only in different designs, the functionality does not change from this. You can also find a terminal for ios products.
After we have installed the terminal, we launch it, select our bluetooth module HC-06 and connect to it.
It's time to try the project in action. We write the number "0" in the terminal and send. The L LED next to pin 13 on the arduino board should turn off. Now we will send the number "1" through the terminal and the LED L should light up.
Work demo:
Homework:
- Change the sketch so that the LED turns on and off with the same command for example "G".
- Add a sketch and teach it how to convert text data coming through bluetooth into digital data and implement a dimer, turn on the LED using PWM, to a given brightness from 0 to 254 coming through bluetooth.
Today we will get acquainted with an inexpensive module for wireless data transmission over Bluetooth.
Bluetooth A manufacturing specification for wireless personal area networks that enables data to be transferred wirelessly between many devices.
Our module is named HC-05. This is one of the representatives of the line of similar modules HC-03 - HC-09.
These modules allow you to transfer data wirelessly, without thinking about how the Bluetooth protocol works in general, about its fields and other subtleties. These modules are correct settings provide data transfer in such a way that the programmer writing the code writes the algorithm as if it were working with a wired UART interface. Therefore, writing code becomes as convenient as possible, and therefore this line of modules has gained such great popularity among novice programmers and not only.
Here we are, let's also not lag behind them and take a little rest from network protocols and study such a module. There were also a lot of requests of a personal nature, as well as in public chats, so that I do not bypass such modules and write any lessons using them.
The modules have the following main characteristics:
- bluetooth chip - BC417143 production CSR company,
- data transfer protocol - Bluetooth 2.0+EDR,
- class 2, which corresponds to data transmission within a radius of up to 10 m,
- Serial Port Profile support ( SPP), which ensures compatibility with all devices that support this profile,
- non-volatile flash memory 8 MB,
- radio channel with a frequency of 2.4 - 2.4835 MHz,
- USB Host 1.1/2.0 interface,
- UART interface with adjustable baud rate.
Also, along with these characteristics, it is worth noting that the module has a lot of legs on board, which allows it to be used in a wider spectrum. Let's see the module pinout
We see GPIO, SPI, USB, PCM pins here.
True, for now we will work only with the USART interface, with the help of which we will not only transfer some useful data, but also configure our module.
First of all, we will do this because the modules will be of the same type (I have 4 of them already!), in which the HC-05 module is soldered onto another board, on which only 6 contacts are routed outwards. These are all of them I have approximately (top view and bottom view)


The purpose of the legs is marked on the bottom of the board, we will deal with them when we connect the module.
Secondly, we will not work with the rest of the numerous contacts because not every firmware allows you to do this.
In general, the choice fell on the HC-05 also because this module is perfectly configured for both master and slave operation.
The module is configured for further work with data using AT commands. We, I think, are all more or less familiar with what kind of commands these are, we got to know them a little when we worked with the Wi-Fi module. Of course, these commands are different for all devices, and therefore I will attach a document with a complete list of commands at the bottom of the page. Also on the Internet it is not surprising to find resources where the description of these commands is translated into Russian, and there are even some examples of their use. We will not be engaged in a complete translation of commands here, we will study only those commands that we will have to use. So far, their list will not be so wide, but later we will return to these modules, I hope, more than once, and then we will already expand our horizons in the knowledge of this module. In the meantime, we will only take a brief tour of the module. Of course, we will try it in work, not without it.
In the meantime, let's connect our module to a TTL-USB adapter, which in turn we will connect to a PC.
We connect as follows
TTL-USB adapter HC-05 module
VCC VCC
GND GND
TXD RXD
RXD TXD
In practice it will look something like this

Let's connect the adapter to the computer, I won't tell you how to work with adapters of this kind, we are constantly working with them anyway. Let's start the terminal program, I will use the CoolTerm program, since it has more flexible settings for transmitting data from the keyboard, and for entering commands, we need to ensure that each line ends with a line feed and carriage return code during transmission.
Let's go to the program settings and configure the port first

This speed of 38400 was chosen because the module works at this speed in the AT-command receiving mode.
Now select the item on the left receive and switch one button there, and turn on the other

The first button is for ending the transmitted commands with line feed and carriage return characters, and the second is for us to see our entered commands also after entering in the terminal window of the reception.
Save the settings and try to connect. If everything is successful, then it disconnects, since now our module is in data transfer mode, and if it has not been configured yet, then most likely we do not even know its address, its settings. About finding a module in this mode indicates fast blinking of the blue LED Therefore, we need to somehow transfer the module to the state of transmitting AT commands.
To do this, for now, we will disconnect the adapter from the USB port and connect the wire to the leg of the HC-05 module key. It may have a different name for someone, but I think you won’t confuse it. Connect the wire like this and like this

Connect this wire to the power plus (with the VCC pin)

And, without releasing the contact, connect the adapter to the port Computer USB and after a while (after a second or two) disconnect our KEY pin from the VCC pin by removing the wire. The module will have to switch to the mode of receiving AT commands, which will be indicated by a very slow speed blinking LED.
Let's go to the terminal program, connect to the port and try to send a command AT, to which the module should answer us OK
The module answered, so everything is correct.
In order not to get confused with the settings that were once made by someone, let's collect all the settings by entering the command " AT+ORGL". The settings will need to be reset to the following options:
- Device type: 0
- Inquire code: 0x009e8b33
- Module work mode: Slave Mode
- Connection mode: Connect to the Bluetooth device specified
- Serial parameter: Baud rate: 38400 bits/s; Stop bit: 1 bit; Parity bit: None.
- Passkey: "1234"
- Device name: “H-C-2010-06-01”
Only the settings will not be applied immediately. You need to reload the module. It is convenient to do this by entering the command " AT+RESET“, in response to which the module will reboot and switch back to the data transfer mode and will not be able to receive commands yet. In order for it to accept them, we will do the same steps as above in order for the module to switch back to the mode of receiving AT commands. There is another way, but for now we will not use it.
Now let's check some parameters of our module.
To find out the firmware version, enter the command " AT+VERSION?", to which the module will have to answer something like this
![]()
If the firmware is not lower than this version, then we can be sure that this module with such firmware is able to work in the master mode.
We find out the address of the device using the command " AT+ADDR?«
![]()
At this address, we will determine our device on the master device. As a master device, we will take the most ordinary smartphone, but this is a little later. We still need to play well with the teams.
Let's also request the device name with the command " AT+NAME?“, to which many modules, including mine, react only if there is a high level on the KEY leg, that is, when the wire is connected. So let's do it
![]()
Let's try to change this name again, since it is not very convenient, for this we will enter the command "AT + NAME: Desired_name". This command can be entered without a high level on the KEY leg
Let's check that the name has changed, just do not forget about the high level on the KEY leg
The name is well applied.
Check the password with the command " AT+PSWD?«
In the same way as the name, you can change the password.
Now we find out the type of device (slave or master) using the command " AT+ROLE?«
0 means slave. The type can also be changed at any time. But we do not need this yet, since we will work with the device as a slave.
Reset the paired devices with the command " AT+RMAAD«
Now let's find out the USART interface settings with the command " AT+UART?«
![]()
These settings mean: 38400 kbps, 1 stop bit and no parity.
This table contains possible options USART settings

Let's change, for example, the baud rate with the command " AT+UART=115200,0,0«
![]()
Only these settings will take effect after the module is rebooted and will be relevant only for the data transfer mode, for the mode of transmitting AT commands to the module, the settings will remain the same with a speed of 38400.
Let's reload the module with the command " AT+RESET“, after which the module will switch to the data transfer mode.
Set the port in the terminal program to given speed and connect with him

Let's try to enter a command, to which our module will not react, since the mode is not the same
But let's not despair. It turns out that in order to send commands to the module, it is not necessary to put it into this mode. You can enable support for transmitting AT commands in data transfer mode. For a short time (less than a second is enough), let's touch the wire that is connected to the KEY contact of the module's positive bus and the module will switch to the AT command support mode. True, we cannot determine this by the nature of the LED blinking, it will blink just as quickly. Also, in the command support mode, the master device will not be able to connect with us. But nevertheless, we do not need to constantly remove the wire from the USB connector and reconfigure the port in the terminal program. It's already good. Let's do this action and make sure that the module will also accept commands, as in the command receiving mode

To remove this support and for the module to be able to connect, it is enough to reload it with the command " AT+RESET". So let's do it
Fine! We already know something. Basically, we have configured the module to transmit data in master mode.
Now the smartphone, which we have today will act as a master device. Anyone with an android will do, as long as some terminal program under Bluetooth gets up. I installed this one. I found it comfortable

Firstly, it is free, does not require a connection to be created in advance, and also has several buttons with strings that we have previously saved.
Download and install the program and run it. Press the SCAN button and our module should be displayed in the list of found devices

Let's choose this device and get into the pair creation dialog, in which you will need to enter a password (we have "1234") and agree by clicking the "OK" button

Would you like to organize a wireless on / off light in the house? If yes, then for such a project you can use Arduino, bluetooth module HC-06, relays and knowledge of the basics of circuitry.
In this article, we will cover the basics of how the HC-06 bluetooth module interacts with the Arduino. Consider examples of transmitting and receiving data via bluetooth using the example of turning on / off the LED.
To implement more serious automated systems like a "smart home", these basics will come in handy.
Getting started with the HC-06 is easy enough. All you need to know is the location of the pins to connect. There are six pins on the HC-06: wakeup, VCC, GND, TXD, RXD and State. At the stage, we use 4 pins: VCC, GND, TXD and RXD.

The following shows exactly how the Bluetooth module is connected to the Arduino.

The HC-06 acts as a serial port through which you transmit and receive data. That is, using the serial monitor window in the Arduino IDE or the Bluetooth app on your computer or phone, you can control and manage your project. For example, Teraterm can be used as a terminal. Before uploading the sketch to the Arduino, disable the HC-06 module. Since the module exchanges data using tx / rx contacts, the sketch cannot be loaded. After downloading the sketch, you can connect the bluetooth module.
Echo sketch for Arduino and HC-06
This sketch allows you to send a string to the Arduino via bluetooth and get the response displayed on the serial monitor.
Note. If you are using an Arduino Mega, change the code line while(Serial.available()); to while(Serial.available()>0);. Otherwise, the sketch will not work.
LED sketch for Arduino and HC-06
This program allows you to turn on / off the LED by sending commands to the Arduino via Bluetooth.
Interaction of HC-06 with computer
The video below shows how to connect the HC-06 to personal computer go to another bluetooth enabled device.
Note. In the video downloaded, the program you are using as serial monitor (Teraterm in this particular case) connects to the INCOMING (incoming) com port. It is not right. It is necessary to use OUTGOING (outgoing) com port.
After connecting the HC-06, open Teraterm or other suitable terminal. Select the serial port that is responsible for communicating with the HC-06 (more detailed explanations on this are in the video).
After successfully connecting the HC-06, you can send data to and from the Arduino. If you have uploaded the second sketch, you will be able to turn on/off the LED by sending the characters "n" and "f" respectively.
Echo Example
LED example
The scope of the HC-06 is essentially limitless. You can control any robotic systems and processes. We hope that the above basics of working with the HC-06 bluetooth module will be useful to you in projects on Arduino.
Leave your comments, questions and share your personal experience below. In the discussion, new ideas and projects are often born!
You need to remotely control your Arduino board, communicate with others bluetooth devices? Bluetooth modules HC-05, HC06 will help to cope with this task.
In the first part of the article, we will talk about how to establish a wireless connection between the Arduino and the computer, and in the second part, how to establish a connection between the Arduino and the Android phone. .
This article will be an integral part in the further assembly of a remotely controlled car.

Components to repeat (buy from China):
Modules HC-05/06 are bare bluetooth with additional strapping.
Namely: they are installed on a substrate on which a stabilizer from 5 to 3.3 Volts is located, an LED indicating the state of the module (connection formed or not), and capacitors on the power lines. The board also has a mosfet transistor (Q1), which, if necessary, can break the bluetooth power circuit, thereby turning it off, but this will not be used in our review.

From the front side, the module looks like this
Connecting to Arduino
| Bluetooth HC-05/06 | Arduino |
| VCC | +5V |
| GND | GND |
| TX | RX |
| RX | TX |
When power is applied to the module, the built-in LED starts blinking.
1) With a computer (OS WIN7)
2) With a phone (ANDROID operating system)
In both cases, we will need to execute 2 actions: perform pairing of the module and device, manage through any terminal.
Part 1. Connecting to a Computer (WIN7)
If your computer does not have built-in bluetooth, then you can use. It is not difficult to find it in communication salons or on radio markets.
After installing the drivers for the bluetooth, you can get to work.
. Action 1
Go to the control panel, click on the bluetooth icon and select "Show Bluetooth devices"

After a while, the computer will search and you will see your module (Your module may have a different name).

Select the second option - "Enter the pairing code of the device"

For HC-06 this code is 1234

It all ends with such a picture.

And after him another

First stage of setup completed
In case you forget which COM port your bluetooth is defined on, you can always see it by doing the following:
Actions


P.S. Or look in device manager
. Action 2
Any terminal can be used to transfer data. I used the simple and free "Termite".
As an example, we will change the state of the LED "LED 13" built into the Arduino board. It will turn on when the character "W" is received, and turn off when "S". The sketch below needs to be uploaded to the Arduino board. When pouring into the board, you must disconnect the power from the bluetooth module, reconnect after pouring.
example program code:
int value; int LED = 13; void setup () { Serial.begin(9600); pinMode(LED, OUTPUT); ) void loop() ( if ( Serial.available()) ( val = Serial.read(); // At the symbol "W" turn on the LED if (val == "W" ) ( digitalWrite (LED, HIGH ); ) // At the symbol "S" turn off the LED if (val == "S" ) ( digitalWrite (LED, LOW ); ) ) ) Open the program " Termite"
In the settings, select our port, speed (9600).


Also, the module can be checked without Arduino by simply shorting the TX and RX pins. Termite send characters are marked in blue, received in green. Those. if we sent with shorted outputs and we received the same thing, it means that the module is working properly. The photo below demonstrates this.

Part 2: Pair with Phone (Android)
The phone will be taken as a test subject. samsung galaxy Ace 2 on Android operating system.
. Action 1
Connecting with phone

. Action 2
As a terminal, we will again choose a simple and free, but already "Bluetooth Terminal"

P.S. If you cannot connect, turn off the bluetooth power and connect again.