Programs for extracting drivers from the Windows system. Types of driver installations How to remove drivers from the system
If you decide to reinstall Windows, then for its further normal operation you will need to install all the necessary drivers so that there is sound, games start, and other functions work normally. Therefore, in order not to complicate your life, it is easier to make a copy of the drivers from existing system Windows. This will save you from the lengthy process of searching, downloading and installing them again. To do this, this article will consider a set of free programs for extracting drivers from windows systems.
Programs for saving a copy of drivers from Windows
1. Driver Extractor is a small and free program that can save a copy of all drivers installed on the system in a short time.
Official website driver-extractor.rusc.ru

The program does not have a lot of bells and whistles and a variety of functions, this can be seen from its visual interface, which means it is intended only for extracting the drivers we need. It’s convenient that everything here is divided into categories.
Among the advantages, we can note its small size and direct purpose; among the disadvantages, there is no Russian language, although it is not particularly needed here, and there is no function (I personally did not find it) for restoring firewood to the system. That is, you will need to manually specify the path to each driver, which is not very convenient if you have to restore quite a few, but if there are 3-6, then this is tolerable.
All latest operating systems starting from xp are supported.
3.DriverMax
Official website innovative-sol.com

This free program has a very beautiful user interface. Initially, this program comes as a firewood updater, but the backup and restore function is also present, which made it possible to include the program in this list. Interface in English, support for everyone latest windows.
4.Double Driver

Visually the program differs from the previous ones, but functionally there are practically no differences. The main purpose of this program is to copy and restore drivers. This software is freely distributed and works on almost all versions of Windows. It works surprisingly very quickly, the entire copying process took less than a minute.
The program can save to the archive if necessary. There is no Russian language, but as I wrote above, it is not needed.
Download Double Driver (Yandex disk)
So the choice is yours, I would personally recommend using the programs from point 2 or 4. In my opinion, these are the two most convenient programs for extracting and restoring drivers from Windows. I tried to choose free options, so that there are no problems with activation or registration and so on, and of course there are many paid alternatives, but I think why pay if you don’t have to do it.

Everyone who has independently installed operating systems or at least added or changed individual hardware components knows what drivers are. Before reinstalling the operating system, you need to make sure that drivers for all hardware are available, but what to do in a situation where such drivers are not available? It’s good if you can find the necessary drivers on the Internet, but for some hardware components, especially for “brand name” equipment, this is often impossible. In such cases they will help special programs, intended for extraction from the system installed drivers.
Driver Extractor 1.0
The main purpose of the DriverExtractor program is to prepare for reinstalling the operating system. The main task is to extract the drivers installed on the system. The program shows a list of installed drivers, its interface resembles a manager Windows devices(shown in the screenshot above), which is quite convenient.
The Only present devices flag existing devices) is used to display only those present in the list this moment devices (after physically removing a device, its driver remains in the system). The Only non-Microsoft drivers flag is used to display device drivers from all companies except Microsoft, because Microsoft drivers are included in the operating system installation program and, as a rule, there is no need to extract them.
To display a list of device driver files, double-click on it with the left mouse button or select List driver files from the File menu. To save the specified files, you need to click the Save button and select a directory to save in, in which the program will create a directory with the name of the device and save the shown files there. The program completely recreates the device driver, including the INF file required for installation.

Another item from the File menu - Make SnapShot (Create a snapshot) is designed to create a snapshot of the drivers installed in the system for currently available devices. The cast is a normal text file with a simple structure and is saved in a file with the extension "SN". Calling a list from a snapshot is possible through the SnapWindow item.

The Utilities program menu is designed to quickly open the Windows device manager and a dialogue about installing a new hardware.

As mentioned at the beginning, the main purpose of the program is to prepare for reinstalling Windows, and for this, in addition to drivers, you may need information about serial number and passwords stored in the system.

The program provides information about both. In addition, when you click on the Show them all button, all the passwords hidden under asterisks using the internal tools of the Windows 9x line of operating systems become visible (with Windows NT/2000/XP the situation is more complicated).
The author of the program is Russian programmer Alexey Aleksandrovich Mokrov, who also wrote the famous program for recovery deleted files Back2Life.
Driver Extractor 1.0 (size 200Kb): link
My Drivers 2.11
The My Drivers program is designed for the same purposes as the previous program - detecting, extracting installed drivers and their subsequent restoration after reinstalling the system.The program also has the ability to search for the latest drivers for installed hardware.
To display all drivers installed on your computer (except Microsoft drivers), click the Fast Collect button.

To see all drivers without exception, click the Collect All button.

When displayed, drivers are displayed in alphabetical order According to their descriptions, no other sorting is provided, which is somewhat inconvenient. To extract the desired driver, select it with the left mouse button and click the Make button; to extract all drivers, click the Make All button.
Compared to the Driver Extractor program, extracting drivers takes much longer, because... To do this, it searches for all the files included in the driver, while the Driver Extractor program extracts the driver files at once.
Additional features of the program: creating a self-installing version of the driver in the form of an EXE file, creating a package of all installed drivers in one self-installing EXE file, and writing each device driver to a separate CAB file.

All these features, as well as the already familiar options for extracting the selected driver from the system (or all at once), are available through the Make menu.

However, unregistered users of the program are in for a surprise: the self-installing version of the drivers does not work without entering the correct program registration code.

Additional feature What the program provides using the Plug-in menu is saving Favorites and Outlook settings (the user manual also states saving Outlook Express settings, but the program does not work with Outlook Express).

You can use the unregistered version of the program for 15 days. The registration fee is $29.
Driver Detective 2.0

Driver Detective 2.0 is a program that deals not only with drivers. With its help, you can view the versions of DRV, DLL and VXD files located in a given directory (by default - the Windows system directory). The files of these extensions are drivers. You can view file versions yourself by calling the file properties from the Explorer context menu, but this can be done much more conveniently with the Driver Detective program. Driver Detective 2.0 is distributed free of charge.

On the program website you can purchase more new version- Driver Detective 3.1, costing $30. With its help, you can find and download new versions of drivers for your installed hardware.
Download Driver Detective 2.0 (size 1.95Mb): link
Some drivers only come in .zip format and do not have an .exe installation file. They are as easy to install as regular drivers. Now we will tell you how to install the driver for their archive printer
Notes:
- there is no need to connect the printer until it is specified in this manual;
- These instructions apply to all operating systems Windows, starting from XP and ending with the “ten”.
First of all, the downloaded driver needs to be unpacked. It can be done free program 7-Zip (you can download it from the official website http://7-zip.org.ua/ru/), or the paid program WinRar. You can also unpack archives with basic using Windows(if the archive is in zip format) or if the archive is self-extracting (usually it is, exe format).
Example 1. If we take the Xerox Phaser 3010 as an example, you will download an archive of drivers (in exe format), which are simply packed into one file. You need to launch the downloaded archive (clicking 2 times with the left mouse button) and a window will open where you need to indicate where to unpack the drivers.
Example 2. If we download the driver in zip format, then we need to use archivers to extract the drivers. To do this, you can install one of the above archivers and then right-click on the archive. IN context menu select: “Extract all” or “Extract to current folder” or “Extract to (folder name will be written here)”.
So, the unpacked file, if you haven’t changed anything, will be located in the same folder as the downloaded archive. If you are offered a path where to unpack the drivers, be sure to pay attention to this path so that you don’t have to search for drivers all over your computer later.
After unpacking, make sure that the archive does not contain any files in the “.exe” format (for example, “Install.exe” or “Setup.exe”). If such a file was detected, then the installation needs to be carried out in standard mode (run the file and use the installer’s prompts), if not, we move further according to this guide.
Go to “Control Panel” - “Hardware and Sound” - “Devices and Printers”. In the top menu, click “Add a printer.”

After this, a window will appear with a device search indicator. Without waiting for the results, click “The printer you need is not in the list.”

After that, select the very bottom item – “Add a local or network printer...” and click “Next”.

In the port selection menu, we also simply click “Next” - the settings in this window are not important.

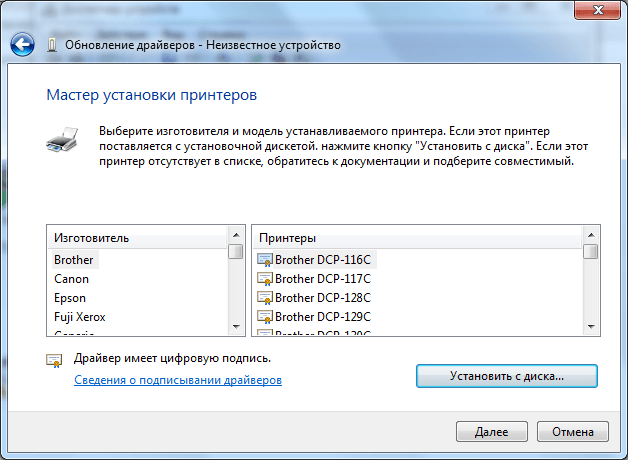
In the next window, you must click the “Have from disk” button.

In the window that appears, click “Browse”. 
Now we indicate the path to the folder that you unpacked. Next, click on the “.inf” file with the left mouse button, and then click “Open”.

Click "OK".

In the next window, select the printer (by left-clicking) and then click “Next”.

You don’t need to change anything in this window, just click “Next”.

When we do these manipulations, the driver installation will begin. Now we wait for this process to complete on your computer. A window will appear asking you to share this printer with network users. We don’t need this, so we leave the selected top option as default and click “Next”. It is possible that this window will not appear for you. Then the window will look like this:  Here you need to click “Done”. Now go to the folder where the devices and printers are located (it was described above how to get here) and right-click on the printer that was just installed. Click “Remove device” (the drivers will remain in the system).

After this, we connect the printer to the computer, turn on the printer and Windows will automatically install the necessary driver for your device.
Installing the driver through device manager
If the method described above did not help you, then in this case we want to offer another. Traditionally, the downloaded driver needs to be unpacked. Most often, the built-in Windows archiver is sufficient for this purpose. We have already discussed this archiver above.
Now you need to do the following: connect the printer to your PC or laptop. Open Start, write “Device Manager” in the search bar and press “Enter”;
You will see a summary of all devices connected to your computer. Your printer will be located in the "Other Devices" section called " Unknown device" Right-click on this device and select “Update drivers...”.

In the “Driver Update” window, select the item to search for a driver manually (item 2).

Select the driver selection item from already installed drivers.

In the device type selection menu, select “Printers” and click “Next”.

And the final step: in the “Add Printer Wizard” window, select “Install from disk”, then “Browse” and specify the path to the .inf file from the unpacked folder with the driver.
After which your printer will be installed on your computer or laptop.
Before you reinstall Windows on your computer, you should take care to save all the necessary data that is located on the OS drive (usually drive C). In this article you will learn how to save drivers when reinstalling.
If you don’t have to take special care of the programs, since after installing a fresh Windows they can be easily reinstalled, then trouble can happen with the drivers. You will have to search for a long time and select what you need software for devices. An unaware user may encounter difficulties, and a professional will have to spend a lot of time. In general, the best option would be to save the drivers when reinstalling and then simply restore them.
Each external or internal device in a computer has its own software, a driver that allows it to work normally. Some drivers are installed with Windows. The rest must be installed separately. If a driver is not installed on the device, it will not work or will not work correctly.
How to save drivers when reinstalling
To save drivers when reinstalling, you need the Driver Genius program. Download link below. Download it and install it on your computer. When starting, an Internet connection is required, as the program must be updated.
Remember that if you change from one version of Windows to another, then backup copy drivers may not be suitable for a freshly installed OS, since many drivers are written separately for each version of Windows. For a backup to be restored normally, you must run it on the same Windows versions, on which it was created.
- According to the instructions in the archive, activate Driver program Genius.
- Launch it and click “Back Up Drivers”. Scanning of installed drivers will begin. Wait for the process to complete.
In the next window, in the “Select the backup type” list, select “Auto-Installer Archive”. This is the most convenient way save the drivers when reinstalling, since deploying a backup will not require any unnecessary manipulations. That's why I recommend him. In the same window, select a location to save the driver backup. Obviously, the backup does not need to be saved on the same disk partition on which you have installedWindows. To select a location, click the “Browse” button. Click the “Next” button and wait for the reservation to complete. It's not very long. At the end, click the “Finish” button.
 Wait for the driver backup to finish
  Finish copying
 Then make sure that the backup copy is saved in the selected location and begin reinstalling Windows. After Windows reinstallation run the backup file, select necessary drivers and install them.
 Deploy driver backup


