How to save jpeg in Photoshop. How to properly save images in Photoshop? How to quickly save in Photoshop
Instructions
A beginner should not delve too deeply into the theory, but you should definitely know that JPEG is a format with a compression algorithm. A file of this format can have different extensions, for example? .jpeg, .jfif, .jpg, .JPG, or .JPE. It is very convenient because it takes up much less space than a similar image in TIFF or BMP format. Unlike the latter, it has less information about the image. This may not be too noticeable when viewing the original file on a monitor, but when the photo is printed in a laboratory or processed, the result may be of lower quality than formats with complete information.
The way you save JPEGs depends greatly on your needs. Before saving the picture, decide whether you will process it, print it on photo paper, or whether you just need to post the picture on a page on the Internet.
For subsequent processing or printing in the darkroom, save the image at its maximum quality and size. When saving the image you are looking for, open the File menu and select Save as. Select the directory where the file will be saved. Enter the name in the first line, and select the JPEG format in the second line and click the Save button. If you have manipulated the file, a dialog box will pop up in front of you to select the quality of the saved image. You should select the maximum quality using the slider or the corresponding number 12. Confirm your choice by clicking Ok. If you have not manipulated the image, then after saving it, the dialog box for selecting JPEG quality will not open.
When saving a photo for publication on the Internet, modern resources themselves can change the size and quality of the downloaded JPEG. However, in some cases you have to do this yourself. Before saving the picture, change its size by going to the Image menu and selecting Image size. Make sure the Constrain Proportions box is checked. Select a unit of measurement that is convenient for you: centimeters, pixels, inches or millimeters, enter the required value of one of the sides in numbers and click Ok (in most cases, images from 800 to 1500 pixels on the larger side are used for web pages). Save the result, but select a lower quality. With values ranging from 8 to 10 and a small image size, visual differences from the original size are minimal, but the file size is significantly reduced.
also in Adobe Photoshop There is a special module for optimizing and saving images for web pages, which may be more convenient. From the File menu, select Save for Web (Save for Web). In the dialog box that opens, you will be presented with a window for viewing the saved image and several settings options. Select the 4-up or 2-up tab. The program will present you with four or two possible options optimized image. To save the appropriate one, just click on the picture and click Save. If you are not completely satisfied with the options, then first use the tools located to the right of the image.
Today we will talk about how to properly save and optimize an image in Photoshop and in what format it is best to do this. But right choice saving format greatly affects the quality and appearance pictures, as well as the weight of the picture in kilobytes. This is especially important for those who take into account traffic consumption. So, let's deal with jpg, gif and png in order.
1. In what formats to save pictures?
After you have opened your favorite photo in Photoshop and somehow worked some magic on it or, in general, created a collage of your own from scratch, you have to save this file on your computer. There are three most common formats for saving a file.
jpg format. Perhaps the most common format. Suitable for preserving complex graphic images with many colors and shades and rich texture. That is, it is best to save photographs in this format. Among its disadvantages are that it does not support transparency and is very sensitive to red. 
gif format. This format is very good for saving files with a limited number of colors. For example, text pages, tables, diagrams, logos, simple pictures. It turns out much clearer and weighs less. Plus, the format supports transparency and animation. However, the format is becoming obsolete and is already inferior to the png format. 
png format. Similar to the previous format, but more advanced and compresses images more efficiently. PNG is very convenient for saving clipart to transparent background. Exists in two png-8 formats (for simple pictures, supports 256 colors) and png-24 (for more complex images, supports colors well). 
2. Save using the “Save as...” function
You can save the picture using the good old method through the menu “File” -> “Save as...” or the key combination “Shift+Ctrl+S”. In the drop-down menu, select the file format in which we want to save the file. (See the picture below) This method is used when the saved image will remain on your computer and is not intended for publication on the Internet. 
3. Save using the “Save for Web…” function
If your picture is intended to be posted on the Internet, then it is better to use the “Save for Web” function. With this method, the image is saved better and of higher quality specifically for the Internet, and plus there are several convenient options. Select “File” -> “Save for Web...” from the menu or the key combination “Alt+Shift+Ctrl+S”. A dialog box will open.
In order to save a picture in jpg format, select the JPEG format in the drop-down menu (1). Set the preservation quality (2) from 75% to 95%. I always give it 75%. Set, if necessary, the required dimensions of the picture (3). The boxes on the left show the original size of the picture (4) and the size of the optimized picture (5). After that, click “Save”. 
In order to save a picture in gif format, select the GIF format in the drop-down menu (1). Select the number of colors to save (2). Set, if necessary, the required dimensions of the picture (3). The boxes on the left show the original size of the picture (4) and the size of the optimized picture (5). After that, click “Save”. 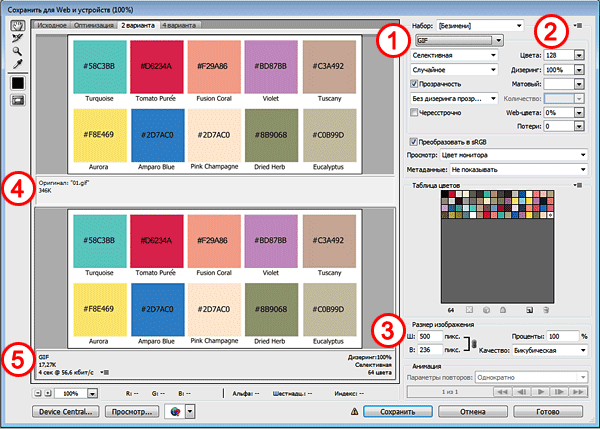
To save an image to png format in the drop-down menu (1) select the PNG-8 format. Select the number of colors to save (2). Set, if necessary, the required dimensions of the picture (3). The boxes on the left show the original size of the picture (4) and the size of the optimized picture (5). Check the Transparency checkbox (6) to make the background transparent. After that, click “Save”. 
If it is not immediately clear in which mode to save, it is best to try all the saving modes, determining by eye the optimal combination of image quality and its weight after optimization. In general, it is useful to experiment with the settings to understand how a particular function works.
Preparing any digital image readable by the Adobe Photoshop graphic editor, be it a PSD file, TIF image or large JPEG image, for publication on a website, forum or in social networks, as well as for shipment by e-mail. In other words, "japeg" for the Internet. It worked out in rhyme.
Of course, the image formats that Photoshop can read are hardly limited to the three mentioned above. And what’s nice is that most can be converted to JPEG. Regardless of the source format, there are two ways to "japegize" Photoshop. The opportunity to choose is doubly pleasant. Both ways are different. External differences are detectable with the naked eye; I will specifically highlight the differences in purpose (“Which path to follow?”).
In this tutorial I will introduce two step by step instructions with the necessary theoretical inclusions. It is designed to show you how to optimally save your virtual drawing, collage or photograph in a widely used JPEG format. The latter is most effective for images with smooth color transitions.
To consolidate and expand the acquired knowledge, as well as to develop skills, I have prepared appropriate exercises. I suggest you complete them and then publish your results in the comments to this lesson. Test your skill in the field!
First way
1 step
I open the original image in Photoshop. In my case, this is a file called “Example.psd” containing a drawn ball.
On the keyboard I press the key combination “Ctrl”, “Shift” and the key marked Latin letter“S” or select “File” from the main menu (“File”) > “Save As...” (“Save As...”). A dialog box titled “Save As” appears.
Step 2

I choose the location of the future JPEG image. In the “File name” field, enter a new name for the image, if necessary. In the “File type” drop-down list, select the “JPEG (*.JPG, *.JPEG, *.JPE)” format.
I leave the parameters below unchanged, making sure that “standard” sRGB is specified and selected as the color profile embedded in the future JPEG image. If this is the case, then I move on to step 4.
If something else is specified instead of sRGB color profile, such as ProPhotoRGB or AdobeRGB, I will convert the original image to the sRGB color space before starting this tutorial to ensure colors are displayed consistently across most devices. I'll do it this way.
Step 3

I press the “Esc” key on my keyboard to close the “Save As” window.
I select “Image” > “Mode” from the main menu. If the checkbox is checked opposite “8 bits\channel” (“8Bits\Channel”), then select “16 bits\channel” (“16bits\Channel”). Increasing the color depth is desirable so that conversion from one color profile to another occurs accurately. Visually, changes in color depth are unlikely to be reflected in the original and final images.
Then I select “Edit” > “Convert to Profile” from the main menu. A dialog box appears with the title Convert to Profile.
In my case, the original color profile (“Source Space”) that describes the colors in the drawing is called “Adobe RGB (1998)”. I select the value “sRGB IEC61966-2.1” in the “Destination Space” drop-down list. I check the conversion parameters - they are located below: the “Tool” (“Engine”) parameter is set to “Adobe (ACE)”, “Method (rendering)” (“Intent”) - “Relative Colorimetric”, set There is a checkmark next to the “Use Black Point Compensation” option; there is no checkmark next to the “Flatten Image to Preserve Appearance” option.
If you increased the color depth (I did this a little earlier), then the “Use Dither” option will be grayed out. If in open image There is only one layer (when you open JPEG images or “simple” TIF images, this is usually the case), then the “Flatten image to preserve appearance” option is also inactive.
I click the “Done” (“OK”) button. The Convert to Profile window disappears.
Step 4

A new dialog box with the title “JPEG Options” appears in the main program window. The “Quality” parameter allows you to set the ratio between the quality of the output image and the amount of space that the image will occupy in the computer’s memory. Thus, the price for reducing volume is the degradation of the quality of the original image. The lower the Quality parameter value, the smaller the size of the JPEG image.
In the example under consideration, I will focus on a value of 6.
To evaluate the quality of the image before saving, I’ll check the box next to the “Preview” parameter.
Step 5

I will set the value of the second parameter - “Format Options” - equal to “Standard Optimized” (“Baseline Optimized”). The volume of the future JPEG image has decreased, but the image quality remains the same.
Step 6

I click the “Done” (“OK”) button in the “JPEG Options” window and check the result.
I compare the volumes of the original PSD image (~ 3000 Kb) and the final JPEG image (82 Kb). Thus, the JPEG file turned out to be approximately 36 times smaller than the original image with visually equal quality. Comfortable!
Please note that the size of the final JPEG image remains the same as the original PSD image, it is 2480 pixels × 2480 pixels.
Second way
1 step

I open the original image in Photoshop.
I press the key combination “Ctrl”, “Alt”, “Shift” and the key designated by the Latin letter “S” on the keyboard, or select “File”> “Save for Web...” from the main menu.
A new dialog box with the title of the same name will appear.
Step 2

Step 3

I set the “Quality” parameter to maximum.
Step 4

I reduce the image size using the “Image Size” parameter.
This is an optional operation, but it helps to significantly reduce the size of the future JPEG image, most often with minimal loss in quality. On the one hand, reducing the size will lead to a natural decrease in volume and, on the other hand, to a decrease in detail. The latter, in turn, limits my ability to print the final JPEG image. If I don't plan to print the last one, I'll forget about the restrictions.
IN in this example I enter the value 600 in the “Width” field. The value in the “Height” field will automatically change. Also, the size of the output image will automatically change relative to the size of the original image, specified in the “Percent” field. Changes occur automatically and the “Percentage” field is in an active state if the “Width” and “Height” parameter fields are connected, as evidenced by the corresponding icon located to the right of the named fields.
In the preview window on the left I will evaluate the size and quality of the image. And I can find out the approximate volume of the latter by the number indicated, usually in kilobytes (Kb) or megabytes (Mb) under the left corner of the window.
Step 5

I check the box next to the “Optimized” option.
Step 6

If I want to further reduce the volume of the output image, then I reduce the value of the “Quality” parameter. I recommend sticking to values between 45-90.
In this case, I will choose a value of 75.
As a result, on average, with an Internet access speed of one megabit (1 Mbits), the time it takes to download my drawing from the Internet will be one second. It is indicated under the volume value of the future JPEG image.
At the same time, visually the picture turned out to be of quite acceptable quality, the tonal transitions are quite smooth.
Step 7

I check the box next to “Convert to sRGB” and select “Monitor Color” from the drop-down list below.
Step 8

Finally, I check the box next to the “Embed Color Profile” option.
Actions in the 7th and 8th steps are desirable so that the future JPEG image is displayed approximately equally on different devices.
Step 9

In the dialog box that appears with the title “Save Optimized As,” I select the location of the JPEG image and set its name, if necessary. I click the “Save” button in the active window. Both windows disappear. Now I can evaluate the result.
I close the original image. In the dialog box that appears asking you to save changes, select “No”.
The image obtained by the second method can be conveniently used for publication on the Internet. And the image obtained by the first method can, in addition to publication on the Internet, be printed. Since the size of the image did not change, it was not subject to interpolation, which means its quality is a priori higher than the quality of the image obtained by the second method.
I will tell you more about interpolation and its impact on the degradation of digital image quality in the lesson “What is interpolation?”

To consolidate the acquired knowledge, I suggest that you not only save several of your own photographs in JPEG format, but also complete the exercises attached to this lesson. The latter cover the challenges you may encounter in your photography career.
Those who are new to Photoshop are probably wondering why it provides two types of saving their work - “Save As” and “Save for Web & Devices”? In addition, there is a whole list of graphic formats... This will be discussed below.
Let's first touch on graphic formats. Let's look at the most common of them and for what situations they are best suited.
PSD (Photoshop Document)
PSD is Photoshop's proprietary format, it business card. It is simply comprehensively developed, since: it supports the “layered” structure of ready-made or not-quite graphic works, clipping paths, information about channels and changes made in them without loss of quality when resaving multiple times.
As a rule, this format is chosen if the work is not yet finished, or if you want to save the sequence of operations performed, individual elements located on layers, effects, etc. However, the size of such a file is much larger than a similar picture, but saved in “jpg”. We will talk about it further...
JPG (JPEG, Joint Photographic Experts Group)
The most common and popular image format. I’m not afraid to say, but most of all users of photographic equipment remain in it, starting from simple amateurs and continuing with “advanced” amateurs. Pros also use it, but mainly only at the final stage of creating a photograph, after their photograph has repeatedly migrated from one graphic format to another at all stages of processing. Pictures in jpg format also have absolute superiority on the World Wide Web.
Regarding this format, I would recommend the following. If you are saving a photograph, and it also has a bright one, color palette, then feel free to select “jpg”. Just remember that “jpg” has nothing to do with layers, in addition, with further resaving of the image, its quality will gradually deteriorate, due to the fact that from time to time the compression algorithm provided in it will constantly “clean up” the image from the existing colors. Once you save the final image as a “jpg”, do not edit it again.
The quality of the image in the jpg format is controlled, and in close connection with the “weight” of the image. The higher the compression percentage you apply, the more colors will be removed from the image, which in turn will significantly reduce the size of the saved image. The race to save space on the disk does not go unnoticed and the image loses its attractiveness - noise appears, especially at the boundaries of color transitions, small details (flying hair, thin lines, etc.)
GIF (Graphics Interchange Format)
This format is convenient in cases where you are working with a file with a non-critical color scheme, i.e. We are talking about 256 colors. In the case of "gif", I would recommend using it for images in which the drawn elements are presented primarily in one color, without gradient halftones (black, green, blue, pink, etc.). True, you will not lose anything if you save your image in the 8-bit “png” format, but we will talk about it below. "gif" also supports transparency, but again, it is not intended for saving layers. Together with that this format is the only tool for creating graphic animation.
PNG (Portable network graphics)
There are two options for saving in the “png” format - in 8-bit and 24-bit format. This operation is carried out through the menu File>Save for Web & Devices...
Briefly about each option.
“png (8 bit)”, like “gif”, distinguishes only 256 colors, which already makes it the most unattractive means for saving photos. 8-bit “png” is optimal in cases with pictures with gradient transitions, since the algorithm provided in this format compression is more loyal to shades. Just like “gif”, 8-bit “png” supports transparency, but is no longer suitable for creating animated images.
"png (24 bit)" compared to the 8-bit version, as well as "jpg" and "gif" has one important advantage - it is the only one that can maintain translucency, that is, if "gif" and "png (8 bit) " are capable of only two transparency values - transparent/opaque, then the 24-bit version provides a much larger number of intermediate values. This quality is mainly in demand in the field of web design. You are unlikely to need it in everyday work with images.
And one more thing.. All of the listed formats, with the exception of “psd”, can be opened in any standard image viewer, and also uploaded to the Internet without any problems.
And now a few words about the saving methods offered in Photoshop. So, File>Save As... To save in “psd” only this method is provided, in the same way you can save in “gif”, “jpg” and “png (24 bit)", but it is advisable to resort to this type of saving only in cases , when the size of the final image is not important to you.
The saving method through the menu File>Save for Web & Devices..., in turn, is not suitable for the “psd” format, but with other formats this operation goes like clockwork. The main advantage in this case is the possibility of very fine tuning quality of the output image, and hence control of file size. Also convenient is the option to preview the result of saving an image while still selecting the optimal compression parameters. And what's more important with the gif format - the File>Save for Web & Devices saving method... you can save an animated gif!
Adobe Photoshop is a popular multifunctional graphics editor. Many users encounter it, especially when processing photographs and pictures. How to save a document in Photoshop? This is one of the main functions of the graphic editor. Next, all possible methods of saving pictures will be considered. The tips offered to your attention will greatly facilitate the process of working with Photoshop. They are easy to learn and apply in practice.
Normal saving
How to save a photo in Photoshop? The first option available in graphic editor, is the "Save" command. It is usually used when processing a previously opened document. When the command is executed, the previously existing object will be replaced by the edited image.
- Open the photo and edit it as you wish.
- Click on the "File" button. It is located on the toolbar at the top of the screen.
- Click on the "Save..." button.
Important: if the user created a graphic document from scratch, after the actions taken, a save log will appear on the screen. Here you need to specify the name of the document, its storage format and its intended location on the computer.
Option "Save as..."
The second way to save graphic files is to use the "Save As..." command. This technique is similar to the previously studied algorithm of actions. It features a variety of saving options. The method is perfect for duplicating pictures.

- Click on "File" after editing the document.
- Select the "Save as..." command from the menu that appears.
- Specify the name of the document to be saved.
- Select a saving format. It is located in the "File Type" line.
- Specify the location where the graphic document will be saved.
- Click on "Save".
- Specify photo parameters. Usually here you choose the image quality and format type. You can specify standard or enhanced optimization, or with a gradual improvement in the quality of the image as it loads.
- Click on the "Ok" button.
It is done. We have explored another way to save documents through Photoshop. To quickly activate the option, you can press Ctrl + Shift + S.
With closing the file

- Go to the tab with the selected picture.
- Place the cursor over the upper right corner of the tab with the corresponding document.
- Click on the cross with the left mouse button.
- Agree to save the document by clicking “Yes”.
Important: If you click No, Photoshop will close without saving any changes to the document. "Cancel" will return the user to the editor without any changes.
For Web resources
Photoshop is often used to create graphics for Web sites. All that remains is to correctly save the document. What is needed for this?
- Select "File" - "Save for Web...".
- Specify the graphic set and saving format.
- Set background parameters.
- Specify the quality of the photo and its size.
- Click on the "Done" button.
Quick access to the option is carried out using the combination Alt keys+ Shift + Ctrl + S.
Saving background and pictures without it
How to save the background in Photoshop? This is a fairly simple task. The point is that the user can use any image as a background. All that remains is to set it as the mentioned element of the picture.

Creating a background in Photoshop is done like this:
- Open or create a graphic document.
- Click on the "Add new layer" button.
- Copy the image used as the background.
- Paste the image onto the created new layer.
Now all that remains is to make the necessary adjustments to the image, and then move the background layer to the very bottom.
How to save a picture without a background in Photoshop? To do this, you will need to create a document in .gif or .tiff format. It is preferable to work with the first option. To do this, you will have to activate the "Save for Web..." option, and then check the "Transparent" box in the saving options.


