How to install a new hard drive in a computer. Methods for connecting a second hard drive to a computer
Make sure you are using a computer with Windows control. Technically, the hard drive can be replaced with Mac computer, but this is very difficult and fraught with consequences (breakdowns). But working with computer components running Windows is much easier.
Buy a hard drive that is compatible with your computer. Find and buy a hard drive that will work on your computer model.
Turn off your computer and unplug it from the electrical outlet. If possible, turn off the computer using the power supply button on the back of the case; Also unplug the computer from the electrical outlet.
Remove side panels computer case. You can use a Phillips screwdriver to do this, but most new cases have thumbscrews. Remove both panels to secure the hard drive with screws on both sides.
Remove the old disk. To do this, disconnect the data and power cables from it, unscrew the screws on both sides hard drive, and then pull it out of the housing.
- You may have to unplug cables from other devices and/or remove some cards to get to the hard drive.
Install new disk. Remove the disc from its packaging and insert it into the special compartment in computer case. The holes on the sides of the drive enclosure must line up with the holes on the sides of the bay.
- If possible, insert the drive into a larger bay - this will keep the drive cooler.
Secure the hard drive. After inserting the hard drive into the bay, secure it with screws. We recommend tightening two screws on both sides of the drive. If you do not secure the hard drive, it will move and become hotter, causing damage.
- Tighten the screws, but not excessively, to avoid damaging the drive.
Connect the drive to motherboard. New hard disks use narrow SATA cables to connect the drives to the motherboard. For connection, use any of the two plugs of the SATA cable.
- If you are connecting a primary hard drive, the SATA cable must be connected to the first SATA connector. Typically, this connector on the motherboard is labeled "SATA0" or "SATA1". Detailed information look in the instructions for the motherboard.
Connect the hard drive to the power supply. Most new power supplies have SATA plugs; Old power supplies have Molex plugs (4-pin) - in this case, buy a Molex-to-SATA adapter.
- Make sure the cables are connected securely.
In this article we will look at the most quick ways installations hard drives, we will study the basics of partitioning, types of partitions, their hierarchy, the basics of working with the FDISK utility and much more.
ATTENTION
This material provides examples of creating partitions, images and formatting disks. Executing them can lead to complete destruction of data on the specified disk.
Installing a new hard drive
Main component personal computer carrying out storage system files and user data is the hard drive. It can be compared to a wallet or handbag - it stores what you should always have at hand. The new drive that comes from the manufacturer is most likely low-level formatted and does not contain any data. For that,
In order to store data on it, after installation and connection it is necessary to “partition” the disk into partitions and format these partitions.
Creating partitions
The very first stage of working with a new hard drive is the definition of sections. Partitioning is the act of dividing a disk into logical sections, allowing one physical disk to represent multiple disks. When partitions are defined, a master boot record (MBR) is created in the first physical sector of the hard disk. When the computer is turned on, it calls procedures stored in basic system input/output (Basic Input/-Output System, BIOS). These procedures access the main hardware devices of the system ( hard drive, floppy drive, keyboard, video card). After these procedures are completed, the BIOS reads and executes the instructions found in the master boot record. In addition to these commands, the MBR contains a partition table. The content of its four elements corresponds to different types of sections.
Types of Partitions
When creating partitioning scripts, you must know the type of partition and its features in advance. There are three various types sections: primary, extended and logical. Each physical disk can have up to four primary partitions, and only one of them can be active, that is, bootable. The active partition is automatically assigned the letter C.
Each primary partition can contain only one secondary partition, which can create up to 24 logical partitions (or 23 logical partitions, if the main partition containing them is active). Each logical drive is assigned a drive letter (the letters A and B are reserved for floppy drives).
Section Hierarchy
Hierarchy of sections: primary, secondary and logical. They can only be created in this order. And deleting partitions is done in reverse order. In order to create scripts that perform partition detection, you must become familiar with the FDISK utility developed by Microsoft Corporation.
FDISK
The FDISK (Fixed DISK) utility is a program that an experienced administrator should know very well. If I had 5 cents every time I used this utility, I would be very rich. FDISK is the most common utility that allows you to make any changes to hard drive partitions, but despite its popularity, most of its capabilities are not documented. Microsoft includes the FDISK utility in all versions of DOS and Windows. It allows you to create, delete and view the contents of a partition table. If you have ever used FDISK during installation new hard manually, then YOU know how labor-intensive and time-consuming a process it is, during which you have to wait while the disk integrity check is performed. Additionally, FDISK provides limited scripting support command line.
Limitations when creating scripts
Creating scripts using the FDISK utility is like playing roulette: you may get lucky, but usually you will lose. The FDISK utility does not support most command line options and does not always understand input redirection commands (such as FDISK< COMMANDS.TXT). И хотя интерфейсная часть программы, основанная на использовании меню, позволяет удалять разделы, это невозможно сделать из командной строки. Подобно тому, как вы это делаете в казино, где вы должны знать, когда пора забирать свои фишки и перейти на следующий стол. В нашем случае - это переход на использование утилиты Free FDISK.
Free FDISK
If FDISK was a used car, you could just stick it in new engine and ride on. This is exactly what the Free FDISK utility does. She happens to be official version FDISK for FreeDOS (http://www.freedos.org) and provides additional features. Free FDISK has the same standard interface and command line options, but it includes Extra options allowing you to compose scripts as a batch file. Once the partitions on your hard drive are defined, they must be formatted.
Formatting
Formatting is the process of preparing a disk for writing and reading. To format both floppy and hard drives, use the F0RMAT.COM utility. Formatting creates a file allocation table (FAT) and a new root directory to allow files to be stored and retrieved. In essence, a file system is created.
FAT represents the disk in clusters consisting of 512-byte sectors. A cluster is the smallest unit of volume used to store data. Its size is determined by the file system. Beginning with Windows versions 95 OSR2 Windows 9x/2000 operating systems support two types of file systems: FAT16 and FAT32. FAT16 is a 16-bit file system in which, depending on the size of the partition, a cluster can reach a size of 32 KB. FAT32 is a 32-bit file system that makes better use of disk space by using 4 KB clusters. You need to choose file system, which will be compatible with various operating systems, and will also ensure data security and efficiency of their placement.
NOTE
The Windows NT operating system does not natively support FAT32. Instead, Windows NT/2000 uses a file-based NTFS system(New Technology File System).
After produced hard formatting disk, you can install the operating system on it.
Creating a disk image
Creating a disk image is the process of creating exact copy hard drive of the corresponding computer and saving it in a disk image file (image file), usually compressed. The disk image can be stored on any medium (hard drive, CD-ROM, ZIP) and can be recreated on any computer. This allows, after installing a standardized software and operating system settings to “copy” the Disk, which significantly saves time. The basic principles of creating a disk image are very similar to simply copying a disk.
Tools
Preparing new computers for use can take up the lion's share of an administrator's time. Finding a way to simplify the imaging process when replacing old computers with new ones can save you hours of work time. And with a large number of computers, automation of this process is not only desirable, but simply necessary.
Using utilities such as PowerQuest's Drive Image Pro or Symantec's Norton Ghost, an administrator can "capture" a disk image in just a few minutes.
In the next issue we will talk about directly creating partitions and formatting disks.
To be continued…
People often ask the question on the Internet: “I bought a new HDD and connected it. Why can't I see the new disk in the system? The fact is that after physically installing the hard drive into a computer or laptop, it is necessary to programmatically initialize and mark it. So, how to set up a connected new hard drive in Windows 7? Nothing could be simpler.
Update 2016: Despite the fact that the illustrations were taken a long time ago from Windows 7, these instructions are also suitable for Windows 10 and 8.
Step 1. Right-click on the system shortcut "Computer" and select "Manage":
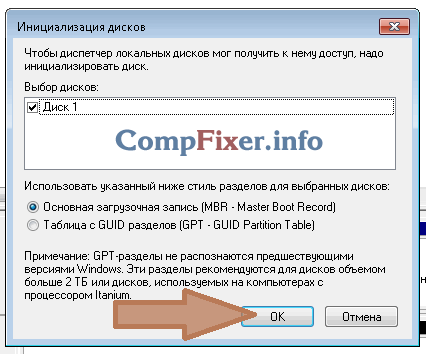
Step 2. In the window that opens on the left, select “ Disk management". After this, a dialog box should open on the right side “ Initializing the disk". Click “OK” in it:

_____________________________
Attention! If you click on " Disk management" dialog box does not open, right-click on the left side of the disk image in the area that says "No data" or " Not initialized" and select " Initialize disk". (See 2 pictures below.)


The task is to call the same window “ Initializing the disk". In it you must make sure that the checkbox next to “Disk n” is checked and click OK.
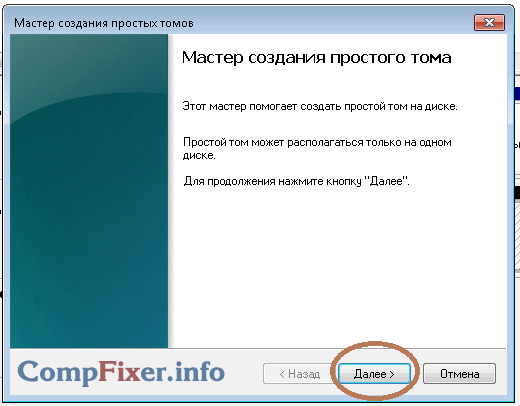
Step 3. Right-click on the right side of the new disk image and select " Create a simple volume»:

Step 4. Click "Next":
Step 5. Select the partition size. By default, the maximum partition size is set. Those. the partition will occupy the entire hard drive. If you want the new disk to have several partitions, then at this point select the size of the first partition. For example "10240". Then the new partition (aka “partition”) will occupy 10 GB of disk space.
If to create the first partition on a new hard drive you did not select all the available space (which was the default), then after the created partition there will be unallocated space on the disk. To create additional partitions in the unallocated area, repeat these instructions With steps 3 .
After selecting the partition size, click “Next”:

Step 6. Select a drive letter. Click "Next":
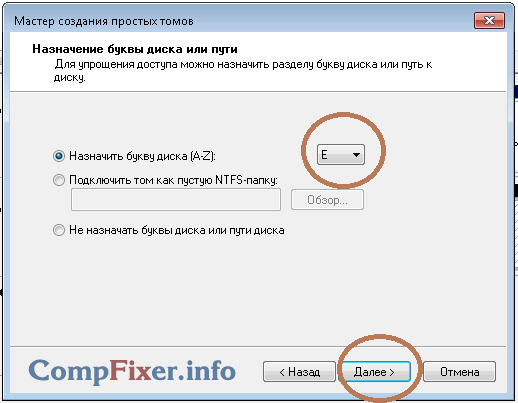
Step 6. In most cases, the file system type should be left “NTFS”. Select the volume label, such as "Games" or "Archive" and click "Next":

Step 7 Click "Finish" to exit the Disk Initialization Wizard:

After this, you will see that the disk has begun to format:

Wait until the caption “Good…” appears on the right side of the disk image instead of the word “Format”:

Now you can open “Computer” and check if a new section with the desired letter has appeared.

The marking is done. You can use the drive!
Every user has a problem with storing data over time, and many solve it by purchasing extra hard disk. HDDs are inexpensive and are great for storing large amounts of information. You can easily install multiple hard drives into a computer case to increase the available space, but you not only need to insert a new solid-state drive, but also configure it correctly. The computer does not see the hard drive immediately after connecting it with wires to the motherboard, and in the operating room Windows system Several steps need to be taken to correct the current situation.
Why doesn't my computer see the new hard drive?

The Windows 10 operating system does not allow installation new hard drive into your computer and start working with it right away. Before you start using a new drive, you need to check whether it works and is detected by the system. There are several reasons why the computer does not see the new hard drive:
- The disk is not installed correctly or is incorrectly connected to the motherboard and power supply;
- The hard drive does not work due to mechanical damage;
- There were problems detecting the device by the operating system.
Making sure that the Windows 10 operating system sees the hard drive and you can start setting it up is quite simple. To do this, right-click on the start button in the lower left corner and select the “Device Manager” line. Next, a menu will open in which you need to double-click with the left mouse button on the “Disk devices” section. 
Find the new one that was connected to the computer in the list of available disks and check its status:
- If it is not displayed, you should check that the HDD wires are connected correctly to other computer components;
- If there is red or yellow next to it Exclamation point, this means that problems have occurred with media identification, and they should be eliminated (most often in such a situation, you will need to download separate drivers for your hard drive model);
- If there are no extra icons next to the new hard drive, it means that it is connected normally and no problems have been identified.
When the hard drive is connected normally and information about it is available in Device Manager, you should proceed to setting it up.
How to set up a new hard drive in Windows 10
Set up a new hard drive in operating system Windows 10 is pretty simple. If it is detected correctly, you must do the following to make the drive available for data storage:

If planned regular use new hard drive, be sure to do so during operation, otherwise the drive will quickly become unusable. If desired, after initial settings you can always go back to the Disk Management menu and create new volume on the hard drive, format it for a different file system or change the drive letter.
Buy internal hard SATA drive. Do this if you don't already have such a disk.
- It's better to buy a hard drive made by the same company as the computer (such as HP).
- Some hard drives are not compatible with some computers. Before purchasing a hard drive, find your computer model and hard drive model (for example, search for "HP Pavilion L3M56AA SATA Compatible") to see if they will work together.
Turn off your computer and unplug it from the electrical outlet. Do not work inside your computer while it is turned on, as you may damage the components or cause injury.
- Some desktop computers turn off within a couple of minutes. In this case, wait until the computer fans stop working.
Open the computer case. This process depends on the computer model, so read the instructions for the computer or find the relevant information on the Internet.
- In most cases, you will need a Phillips screwdriver.
Ground yourself. This will prevent you from accidentally damaging sensitive internal components of your computer (such as the motherboard).
Find an empty hard drive bay. The main hard drive is installed in a special compartment of the computer case; Next to this compartment there should be a similar empty compartment in which you will install second hard disk.
Insert the second hard drive into the bay. The bay is located below or above the main hard drive bay. The disk must be inserted so that its side with connectors for connecting cables is directed into the computer case.
- In some cases, the disk must be secured with screws.
Find the connector for connecting hard disk. Follow the main hard drive cable to find out where the hard drive connectors are on the motherboard. (The motherboard is a large board that other boards and devices connect to.)
- If the main hard drive cable looks like a wide, thin ribbon, it is an IDE hard drive. In this case, you will need an adapter to connect the second hard drive to the motherboard.
Connect a second hard drive. Connect one end of the cable to the second hard drive, and the other to the connector on the motherboard (this connector is located next to the connector to which the main hard drive is connected).
- If your computer's motherboard only has IDE connectors (connectors a few centimeters long), buy a SATA to IDE adapter. In this case, connect the adapter to the motherboard, and the cable of the second hard drive to the adapter.
Connect the second hard drive to the power supply. Connect one end of the power cable to the power supply and the other to the second hard drive.
- Typically, the power supply is located at the top of the computer case.
- The power cable plug looks like a wider SATA cable plug.
Make sure all cables are connected securely and correctly. Otherwise operating system The computer does not recognize the second disk.
Connect your computer to power and turn it on. Now you need to make Windows recognize the second hard drive.
Open the Disk Management window. Right click on the Start menu
In the lower left corner of the screen and then from the menu, select Disk Management.
- You can also click ⊞ Win + X to open the menu.


