How to create a text file in Windows 10. Help with working with the WindowsWord editor
Notepad is one of the standard programs- Windows OS components. It means that this program must be attached to any version of this operating system. Actually, here we can already see one of the main advantages of Notepad - the absence of the need additional installation. The notepad is already in the system, you just need to find it and open it.
Also among the obvious advantages of the program, in addition to accessibility, is its obvious ease of use. There is no possibility of detailed customization and formatting of text, however, if you need to quickly write down text without waiting for Word to launch, this program is the best solution.
Notepad is especially popular among experienced users, since this text editor allows without much additional software edit and view system files programs.
The tenth version of the Microsoft OS, by tradition, also has this simple program in its functionality. Notepad did not acquire any particularly revolutionary functionality, however, with the advent of new version The number of ways in which you can launch it has also increased. Below we will look at absolutely all these methods.
Using the Search tool
The first, simplest and most obvious way.

On a note! If for some reason there is no “Search” icon on the bottom panel, you can open it by right-clicking on the “Start” icon. IN open menu you just need to select “Find”.

Via the Start menu
Another one of the simplest ways.

Note! You can pin Notepad to the main Start interface using the context menu (right-click on the icon).
Via folder location
You can also launch Notepad by finding the location of the program files in the computer's memory.

Note! Using the context menu, you can create a shortcut for this program and place it on the desktop or in any other convenient place for quick access.

Using the command line
The most sophisticated, but no less reliable way. Suitable for more experienced users, as it involves manipulation of the main console. It also helps if none of the previous methods for some reason it doesn't work. Let's break it down in three simple steps.

Ready! Now you are familiar with all the ways to launch this program.
Working in Notepad
The functionality of this program, although minimal, still allows you to make some basic changes to the text.


Creating a text file
If you need to create text file using Notepad in a specific folder, the sequence of actions is as follows:

Video - How to find notepad in Windows 10
There are many different files in different formats on your computer. We use some files from these formats often, while we work with others extremely rarely or never at all. But there are also those in the computer that you simply need to know and be able to use. And one of them is doc files. These are the most various documents, with which all users who decide to master a computer begin their work. Of course, if you use your computer only for games and communicating on the Internet, then you can easily do without Word. But in this case, you can hardly be called a confident user. After all, a confident user is one who knows how to perform basic operations on a computer (create a folder, copy, delete) and work with popular programs, including Word and Excel. In this review I will tell you how to use free program WindowsWord for viewing and editing Doc files.
Open the program. We need to open a new one Text Document. To do this, click on the file, as shown in the picture

then click open button as shown below

We get this usual file as a result:

Saving the file is also very easy. You need to press the button with the floppy disk and the file will be saved

Now let's look at the document search function. After all, if a document is more than a dozen pages long, a search is often required. To do this, on the top toolbar we find the edit tab and search in it, as shown in the figure or simply by pressing Ctrl+F


There you can enter the words you are looking for.
But let's not forget that we are editing the text. Therefore, it is very important for us to work with the font. The WindowsWord program has a special Font window, which can be opened by clicking on the button in the top Font toolbar. Here you can easily change the font, font size, writing style (bold, bold, italic, strikethrough), as well as the font color and font background color. This is what the window looks like


Now let's look at working with tables. Everything is very simple here, to create a table, click on the table tab, create a table as shown below
In the window that opens, select the number of rows and columns, as well as the table scale

If you right-click on a table field, in the menu that opens you can choose: cut, copy, paste, change font, paragraph, list parameters, you can add a row above or below, and also add a column to the left or right, split a cell and view the properties of the entire tables


You can also easily change the document size from A4 to A5, A6, or even set your own page size. The size button is at the bottom of the toolbar
With this I will finish my review of the main functions of the new free editor WindowsWord. As a result, I can say that it is very simple and easier to use Microsoft Office In my opinion. And it’s more suitable for beginners, because... There are not a huge number of buttons that are so easy for a beginner to get confused about. Great for general editing. Main advantages: ease of use and freeness of this text editor.
Just recently released new program, which performs all office functions, but does not require additional activation and is quite easy to use in practice. We will talk about the basics of working with it below.
First steps
So, you have installed the program, it step by step installation described in the previous article. What's next? Double-click on the desktop icon that looks like this
A program window opens in front of us. It is quite unremarkable, no different from those that you may have seen before, but its interface is convenient and everything you need and often use is located in front of your eyes, which makes it easy to navigate.
At the top in front of us there is a toolbar, just below there is a white field, which is analogous to a blank sheet of paper and on which you actually need to type and edit text, and on the left you can view the number of pages and their thumbnail image.
Toolbar
This is what the entire toolbar looks like:
As you can see, its uppermost part has the following tabs:
When you click on any of them, a context menu pops up, consisting of various tools that help when working with text. This way you can click on each tab to visually familiarize yourself with the interface.

Below are icons for the most frequently used functions that are used when working with text documents. They are organically sorted into sections, which makes it easy for even an inexperienced user to navigate.
We will not list them all, since there are quite a lot of them, but we will deal with the main tasks.
Preservation
The first thing you need to constantly remember when working with documents is saving; without this function, all your work will be done in vain. It looks like this on the toolbar. And then select the location to save the document according to the standard procedure.

Settings
Once you become more familiar with all the features, the toolbar (or quick access toolbar) can be customized based on how often you use the features you need to always have at your fingertips. This will organize your work and make it even more efficient.
Editing documents
The program contains all the standard editing functions:
Many more useful things can be found in the WindowsWord program, but its main feature is its ease of use and clear interface. Inspiration to you!
IN Windows editor word contains a set of all the necessary functions for creating/editing text.
For quick editing document, it is useful to use the Quick Access Toolbar at the top right of the screen. All important actions: “Create”, “Open”, “Save”, “Print”, “Paste”, “Undo/Redo”, “Bullets”, “Numbering”, “Indents”, editing text in a document, as well as styles fonts, style options and scaling are always at hand.
To create a new document, you need to click the “Create” button in the upper right corner of the quick access panel, or perform the action: “File” -> “Create”. To edit an existing document, you must click on the “Open” button, or the action “File -> “Open”, and then select the desired file and confirm your choice.


You can save the document by clicking on the floppy disk icon on the quick access panel, or by using the action: “File” -> “Save”. To save a document in different formats, you need to go to: "File" -> "Save as..." and select required format.


You can print the entire document, or a specific page by clicking the "Print" button in the form of a printer icon on the panel, or through "File" -> "Print...". You will be prompted to select a printer, print range, and number of copies.

If you need to find a specific word or sentence in the text, you can use the "Find..." button on the quick access panel, or go to: "Edit" - Find.
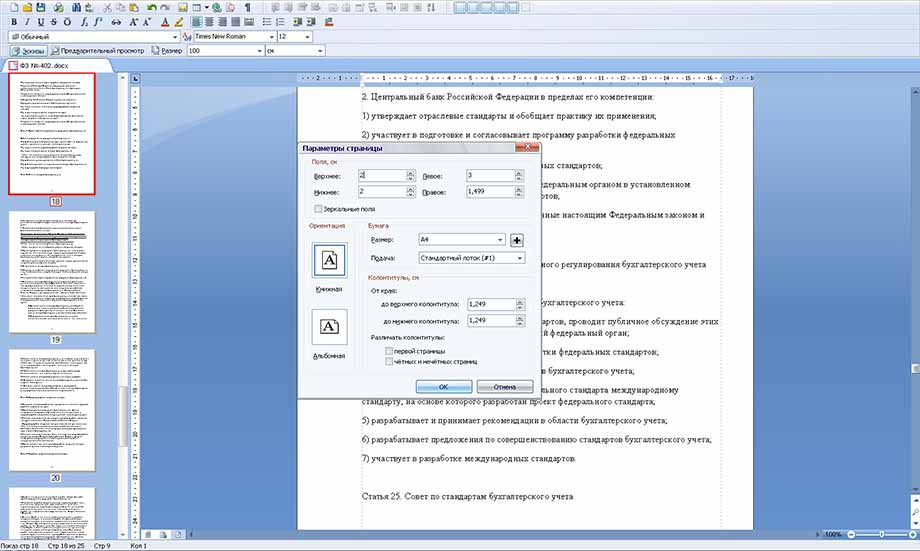
Setting the page parameters, margins, headers and footers and paper parameters can be found by following the action: “File” -> “Page Settings”, and in the window that appears, set the desired value. Then confirm by clicking “Ok”.

Often when editing there is a need to cancel a completed action or return it. For this case, there are “Undo” and “Redo” buttons on the panel and in the “Edit” tab.
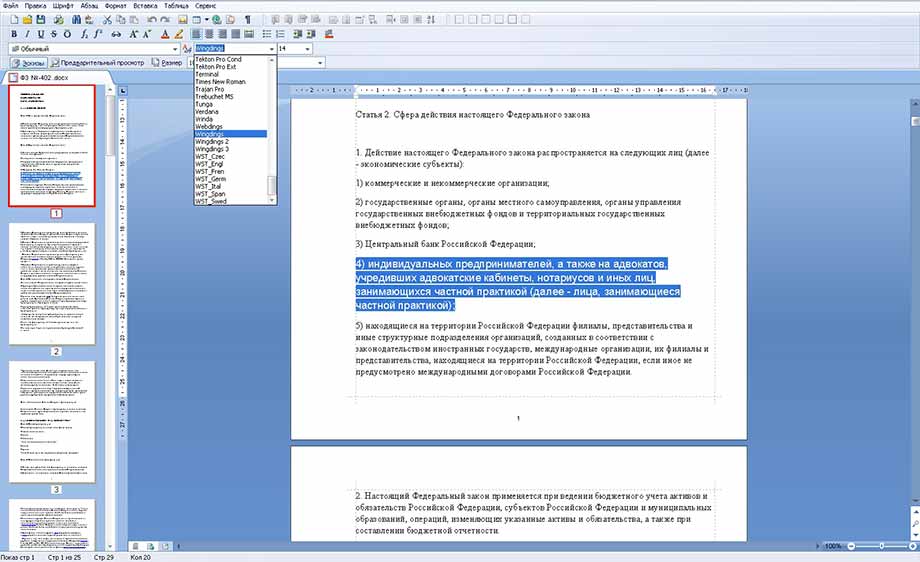
Changing the font style, style, size, color and background of the text is possible in the "Font" and "Format" tabs. For quick changes, there are columns of styles and text size on the quick access panel.

When working with paragraphs, you can edit text along the edges, width, center, and distribute it along the length if you use the “Paragraph” tab

If you need to create a bulleted/numbered list, you can use the "Paragraph" -> "List" tab.

The "Insert" tab will allow you to insert into the document: a file, a picture, horizontal lines, hyperlink, page number, text field, number of pages and different types footnotes

When working with tables, you must use the "Table" tab, or the table icon on the panel for quick placement with the selected number of cells. Even after placing the table, you can add columns and rows to it from any side, as well as delete, merge and split cells. To do this, you need to select the table and right-click, and in the window that appears, select the desired action.
When working with large amounts of text, you can use the Thumbnails on the left side of the screen to quickly navigate through pages. The current page and its number are highlighted with a red frame.

How to use the WindowsWord editor
The WindowsWord text editor is an indispensable program in the office and at home. It is easy to use and performs a full range of necessary functions for creating and editing text files.
The main program window consists of several parts:
Control panel at the top of the window,
Navigation bar on the left,
The text field itself is in the form of a white sheet,
At the bottom there is a panel with document statistics and a choice of display scale.
Main screen

File menu

At the top of the control panel there are drop-down menus with a variety of functions.
Create

After starting the program, you will see blank sheet, which can be edited, is a new document. To create another new document, in the “File” menu, click on the “Create” item - a new empty file will open.
To open an existing document, select the first item “Open” in the “File” menu, after which a dialog box will open asking you to go to a specific directory (folder) and select the desired document. In addition, you can select in the same window the type of documents that will be displayed: doc, docx, rtf, etc.
Open file

After finishing editing the document, save it using the “Save As” item in the “File” menu or press the key combination Ctrl+s. In the window that appears, select a folder, a name for the file and its format.
Save as

Page settings

If you need to create your file on a sheet other than the default A4, go to the File menu, Page Setup. There you can change the size, orientation, margins and footers of the sheet.
Seal

The “Print” item in the “File” menu provides the ability to print the finished document by selecting a printer, required pages document (print range) and number of copies.
The next drop-down menu in the program is “Edit”. The items in this menu are provided with icons to help you understand the menu functions.
The first part contains “Undo” and “Redo” - that is, each of your actions in the current document can be canceled or, if it is still necessary, returned as it was. It is convenient to use the hotkeys Ctrl+z and Ctrl+y, respectively.
The second part contains the functions “Cut”, “Copy”, “Paste” - these are actions with text and images that are done on selected elements. This helps you work not only with text and images from one document, but also copy, cut and paste from another file or browser
Edit menu

Find

You can find and replace a phrase or word in the text using the corresponding item in the “Edit” menu.
Replace

Menu Format

Background (window)

(Effect)

Line numbers

Adding elements is done through the “Insert” menu. A picture can be added through the “Picture” item dialog box.
Insert menu

Hyperlink

Symbol

Add symbols of mathematical formulas and other symbols that are not on the keyboard using the “Symbols” item.
You can add a table and change its parameters through the “Table” menu, where all the necessary functions are present
Menu Table

Insert table

Menu Service

In the “Service” drop-down menu there are only two items “Spell Check” and “Settings”.
Spellchecking

The “Spell Check” item helps to avoid spelling, punctuation and other errors in the text of a document by simply pointing out them or suggesting correction options.
Settings

The “Settings” item will help you configure the program, change the design, select the language and spelling nuances. For example, by selecting " Appearance- Skins”, the user can choose the design theme of the program itself to suit his taste. The default is Windows.
After saving all changes, you can close the program in three ways:
Selecting "Exit" from the "File" menu,
By clicking on the cross icon in the upper right corner of the window,
Using the key combination Alt+F4.
Scaling

To see the entire document or zoom in on a fragment of it, use the right side of the bottom panel of the reactor window. To change the document display scale, move the slider or click on “+” or “-”.
Windows Word is a new convenient text file editor available for free download. The program is suitable for creating and editing files with text information, reading books and the like. The editor looks like this:

Once you launch the application, you can start creating a new document, and then use the function to save it. It is extremely simple and similar to the same function in any other Windows applications: File -> Save, or File -> Save As...

Or you can open an existing file in order to familiarize yourself with its contents and/or edit the information contained in it. This is also done in the standard way: File -> Open -> Name of the file you are looking for.


Like any reputable editor, Windows Word, among other things, has the function quick search words or text fragments open file. To open the search window, you can press the key combination Ctrl + F, or the button with the image of binoculars. In the window that opens, you must enter the word or phrase that you want to find in the text. You can also select search functions: case-sensitive or case-insensitive, search only for matches of the entire word, search below or above the current cursor position. After this, you need to click on the “Find Next” button, and matches in the text will be highlighted in blue.

Editing text information in Windows Word is subject to the same rules as working with texts in any other editor. In addition to directly editing texts, using this editor you can add hyperlinks, pictures, tables to the file. This can be done either through the “Insert” and “Table” menus, or using the corresponding buttons on the panel. Using the sequence of actions Insert -> Symbol, you can insert symbols of the Greek alphabet, mathematical formulas, and many others into the document.

Of course, Windows Word also provides a large number of options for changing the text style. You can choose the font, text and background color, make the font bold, italic, underlined or strikethrough, subscript or superscript. All this can be done both through the “Font” menu (“Type”, “Size”, “Text Color”, “Text Background Color”), and using the corresponding buttons.

The Windows Word editor also has a convenient “Paragraph” menu item, with which you can format the text: select the distribution of lines to the left, right, justified or centered. Also through this menu item you can add numbering, bullets, change indents and spacing. The same can be done using the buttons on the panel, as well as by dragging the corresponding sliders on the main work field.
A document opened in Windows Word can also be sent for printing. This can be done either through the File -> Print menu, or using the button with the image of a printer. It is also possible to preview open document before printing to get a better idea of how it will look on paper.
I bet many of you haven't heard of WordPad. If you've heard of it, you haven't used it, or you've simply forgotten it exists. Why? Well, if we need a basic text editor, we use Notepad. If we need an advanced text editor, we use Microsoft Word. But somewhere in the middle, with more capabilities than the humble Notepad but less capabilities than the mighty Word, stands Wordpad - which is completely free!
WordPad is a text editor with basic formatting options, and it's included with every version of the OS from Windows 95 to Windows 10. WordPad has always been there, but it's almost never used. In this article, let's figure out how to use Wordpad on Windows 10 and reset WordPad settings if something goes wrong.
Below are some tips to help you master WordPad.
To use Wordpad on Windows 10, enter "" in the search bar on the taskbar and click on the result. This will open WordPad.
Also, you can also use the command Execute.
Click Win+R, and write on the line write.exe or and press Enter .
The Wordpad executable file is wordpad.exe and it is located in the following location:
C:\Program Files\Windows NT\Accessories
The program shortcut can be found in the following places:
C:\ProgramData\Microsoft\Windows\Start Menu\Programs\Accessories
allows you to create, edit, save, open, view and print text documents. You can use bold, underline and italic formatting, change font color and size, create bulleted lists, insert images, and much more. Just play around using the simple ribbon menu.

WordPad, along with other built-in tools, is currently available in the Windows Store as universal application. You can now download the text editor Wordpad from the Windows Store and easily open and edit documents created in Microsoft Word.
What is the file extension for Wordpad?
Wordpad uses the file extension .rtf or Rich Text Format, to save files by default. But it can save documents in .docx(Office Open XML) odt(Open Document) .txt(text).
How to Uninstall WordPad Using the Options App
Since you can use or purchase a subscription to Office 365, or other word processing solutions such as , most users no longer use WordPad. As a result, instead of complete removal Microsoft applications makes it an optional feature that can be removed or reinstalled using the Settings app.
Use these steps to remove WordPad editor from Windows 10:
Step 1: Open "Options"

Step 2: Go to settings group "Applications".
Step 3: On the left side of the window, click

Step 4: "Additional Features".
Step 5: Select the WordPad item and click the button Delete.

Step 6: Restart your computer.
After completing these steps, your main word processing application will be removed from your computer.
How to install WordPad using the Options app
Use these steps to install WordPad using additional functions on Windows 10:
Step 1: Open "Options" by pressing the Win I key combination.
Step 2: Go to settings group "Applications".
Step 3: On the left side of the window, click
Step 4: Under Apps & Features, select the option "Additional Features".
Step 5: Click the button "Add component".

Step 6: Select the WordPad item.
Step 7: Click the button Install.

Once completed, the WordPad application will be installed on your device.
In case you can find options to install or uninstall, most likely you are not using Windows version 10 (20H1), in which WordPad is an optional feature.
How to return WordPad settings to default?
Now let's see how to reset WordPad to default settings in Windows 10. But before you start, you can create a system restore point or backup copy registry
- Press the keyboard shortcut Win+R and in the window Execute enter Regedit to open Registry Editor.
- Continue to the next section:

- In the left panel, find the section " Options", and Delete it.
Now when you open Wordpad, you will see it with default settings.
Let us know whether you use Wordpad or not in the comments below.
Hello, if you have looked at my blog page, it means you need help communicating with your computer. I will help with all I can. The topic of today's discussion is “How to create a txt file?” I was surprised to see in the comments to one of the articles this question, since the actions performed when creating basic formats such as txt, doc, xls have been brought to automaticity. And if such a task needs to be completed, I just do it without thinking about how exactly. I looked at the query statistics on Google. It turned out that many people ask similar questions - how to create a txt file on Windows 7, 10 and other operating systems (MacOS, MS-DOS, Linux), how to create a txt text file on the command line, in a folder, in Word, how create a txt file on your phone. After searching in my head and on the Internet, I collected everything I could find on this topic. This is how this article was born, which I decided to start with the most common operating system - .
Windows
So, let's talk about how to create a .txt file on computers with operating windows system 10, 7 and earlier, outdated, but fully functional versions. Friends, it seems to me that it would be quite appropriate to first explain what a text file with the txt extension is, and only then move on to talking about how to create it.
Definition
A file is an original item on a computer that contains some information. It has a name and an extension. With the name, I think everything is clear and there is no need to explain. An extension is a continuation of the name, indicating to the system the format of the document and which program to open it with. Format is the specificity of the information that is in the content, that is, text, graphics, tables. A text file in txt format is a document containing only pure text, without any formatting or pictures, which can be opened by any text editor (by default, the standard Notepad program), and we will look at how to create it in detail below.

Context menu
The simplest and most common way to create a text file, which I use, like most Windows users, contains the following steps:

The text document is ready. You can open it with two quick clicks or through the corresponding context menu item, which is called up by right-clicking on the document.

Folder
Friends, although you can create a txt file anywhere using the method described above, let me tell you how to do this using the resources of a specific folder:
- We go to the desired folder.
- At the top of the window, select the “File” section and open its menu.
- Among the proposed options, select the “Create” action and then “Text document”.

Word
As I already mentioned, a text file is opened by Notepad by default, but you can create a txt document with other text editors, as well as convert it from existing documents with the docx extension. You can get a document with a given extension from a doc or docx element in three ways:
- The first method is to open Notepad (located in the list of standard programs in the Start menu) and copy the contents of the docx document into it.
- Second way:
- Right-click on something.docx and select the “Rename” action.
- We delete the existing extension and write txt instead.
- Press Enter to confirm.
- We answer the system’s warning question about the danger of changing the extension in the affirmative.
- Third way:
- Open the existing docx document in Word or another text editor.
- Open the “File” menu and select “Save As”.
- In the list of suggested options, select “Other formats”, which will open a new window.
- At the bottom of the window there are two lines “Name” - you need to set it and “Type” - here you need to install the extension.
- By clicking on the arrow in the corner of the “Type” line, we open the list of possible extensions and set “Plain text (*.tхt)”.
- Confirm saving the document in the specified format by clicking the “Save” button.
By the way, the third method is quite suitable not only for changing the extension of existing documents, but also for creating a new one in the required format.

Command line
You can also create a txt file using the cmd.exe application. This is not so simple and not always clear, and you also need to know the commands. But still, I’ll tell you about this briefly, maybe someone will find it useful. So, using the command line, you can create two types of txt files - empty and filled, that is, with content.

Empty
To create an empty file with a txt extension using the command line, you must first launch it. There are several ways to do this, here are the simplest:
- Press Win and R, which will open the “Run” window, enter the command cmd.exe and press OK.
- From the Start menu, select Command Prompt (Admin).
- In the Start search bar, type cmd and run the found application as administrator.
- copy con filename.txt – will create the desired document in an open directory; to make it appear in another place, along with the name, enter the full path to the desired folder.
- echo off > C:\111.txt, where "echo" is the "create" command, "off" means no text, and C:\111.txt is the name and path to the location.
With text
Using the same commands, but with some modifications, you can create a .txt file and immediately write data to it:
- Enter copy con filename.txt, then write the required text, press CTRL and Z, press Enter and get what you need.
- In the second command - echo off > C:\111.txt - the required text must be written instead of “off”.
By the way, if you are looking for an answer to the question “how to create a file with a txt extension in MS-DOS?”, then check out the methods described above, as they are also relevant for this operating system.
Linux
Friends, let's talk about how to create a txt file in operating system linux. This can be done using the terminal, which is analogous to the command line. There are several commands, I will tell you about the shortest ones. So, as is the case with command line on Windows, to create a .txt text file on Linux, you will first need to launch a terminal. To do this, press three keys simultaneously - CTRL, ALT and T. Then enter one of the following commands:
- For zeros - > a or >a (a space is optional), where a is the name of the document that will be created in the current folder. If you need to create several similar documents at once, then instead of “> b > c > d > e > f > g” it will be more convenient to write touch b c d e f g.
- For filled ones - echo tekst > h or the same, but without spaces (no difference) - echo tekst>h. In this case, we will get a document with the name h and the text tekst in the current folder.

MacOS
It's time to talk about how to create a txt file on devices running MacOs. There are, as always, a lot of ways. I'll tell you the simplest one:
- We launch the terminal - the easiest way is through search bar Spotlight (press spacebar and CTRL at the same time, write “Terminal”).
- Enter the command $ touch some_text_file.txt, but only after going to the desired directory.

Android
Very often people ask on the Internet how to create a txt text file on Android. My answer is that this cannot be done with the resources of the phone itself. Needs to be installed special applications, of which there are plenty in the service Play Market– “Simple text editor” (analogous to notepad), Text Editor. There are those in which the text can be dictated by voice, and it will be converted into the desired format (Speech text editor). Or, conversely, the application converts selected text fragments into speech and reads them in voice (Text Editor).

FAR Manager
Among the most popular search queries Google also has this one – “how to create a txt file in far”. I’ll tell you about this in a nutshell - I’ll help people. For creation the required document V FAR Manager perform the following actions:
- Press two keys at the same time, one of which is SHIFT and the other F4.
- An empty creation prompt appears.
- We write any name and put the required extension - 12345.txt and get what we wanted.

Friends, so I shared everything I wanted. It turned out to be quite a lot of information. I hope it is useful to someone. If something is unclear, write in the comments, we will figure it out together. Moreover, I myself enjoy this process, since in search of comprehensive answers to your questions I learn a lot of new and useful things for myself. Goodbye.


