WordPress application form. Forms for WordPress - fast, simple, effective! Setting up a contact form
By default, WP does not have such functionality, but plugins and specially designed configurations for the engine come to the rescue.
WordPress feedback form using Contact Form 7 plugin
I will analyze the free Contact Form 7, which has been translated into Russian. As standard it includes:
- Mail address
- Telephone if desired
- Message text
- Captcha
Add captcha reCaptcha
We install the plugin as standard through the WordPress admin panel, this is what it looks like in the panel.
CF7 in search
Let's set up reCaptcha from Google, go to the integration section, and click on the link google.com/recaptcha. Must have a Google account.
 Recaptcha link
It will transfer it to the service, set up the items as in the screenshot, enter the domain correctly, and click send at the bottom.
 Linking captcha to the site
Copy the data for the captcha, both keys.
 Access keys
Let's go back to WordPress plugin and click the Integration Settings button.
 Integration
We enter the keys copied from the reCaptcha service, write them in the appropriate sections and save them.
 Saving settings
Creating a Form
Go to settings and create new uniform. We erase the standard markings.
 Erase standard inscriptions
Enter the name of the new project and click the Text button, because the name will be entered as text without rules.
 Text field
A pop-up window will appear, customize it according to your needs.
 Tag generator
 - The type determines whether the visitor is required to fill out the field, I set it to yes
- We don’t change the name, it’s a unique identifier
- Default value, entered the phrase that I will see inside
- Use instead of a placeholder, that is, until nothing is entered, the inscription will be displayed
- I do not recommend using the Akismet field
- To add styles, enter class or id, made pole-name
- Insert the tag into the general field
Similarly, we press the e-mail button, we see the same interface.
 Mail generator
You can enter your email via text, but then you will lose the correctness checking function. The plugin will check if there is an @ sign.
Add a text area and phone section (optional), the principle is the same.
 Phone and text area buttons
Previously, we set up captcha integration in WordPress, in basic version CF7 does not have a button to insert captcha; a shortcode was created for this and placed under the other elements.
All that remains is to add a submit button, select from the list and configure its output.
 Send button
The result is the following code.
 Final CF7 code
Setting up sending a letter
 Changing email settings
- Field tags created earlier
- Mail address where letters will be sent
- From and subject, fill in as desired
- Additional headers, completely cleared
- We write in the body of the letter what we want to receive by email after sending. For example, I typed Mail and inserted the corresponding tag opposite this word.
- Click Save at the bottom
 Preservation
Test the remaining notification and settings tabs; you can change the text displayed in different situations.
Inserting a form on a website
A short code has been generated at the top of the page, copy it.
 Shortcode
Go to any entry and paste it.
 Put shortecode into the page
After clicking the View button, it will transfer to the site displaying the work done.
 Final version
A good thing about WordPress theme developers is to make a product that supports CF7 in advance, which makes life easier and does not require registration CSS styles into the site code. My theme supports the plugin and displays a very nice image. If you are not satisfied, then a class was assigned to each field, use it to change the design. I checked the theme and the emails arrive quickly. For other methods, read the link.
I will attach video instructions to all the material, showing not only the creation process, but also how do beautiful design forms, because the whole process cannot be described in text.
Make the fields horizontal in a line
I looked on the Internet and was horrified by how many manipulations were being done. I won’t show you how to fully customize the design; this is the topic of any large manual. We go to edit the form and wrap the fields that we want to line up horizontally in a div with a class, look at the code.
I want to line up the Name, Mail and Phone fields. Don't forget to save the changes.
 Wrap it in div
Login to WordPress admin Appearance> Theme editor > style.css we write styles for the back WordPress communications to the end of the file.
Flex-form(display:flex;) @media only screen and (max-width: 655px)(.flex-form(display:block;))
 Prescribing styles
It is clear from the styles that the div with the flex-form class has been assigned the display:flex property; it specifies the arrangement of elements in a line, without additional parameters the space is divided equally.
The second entry shows when the screen resolution has reached 655 pixels, the form changes its property from flex to block and the form will begin to be displayed as before with fields below each other. This limit of 655 varies individually, the style is made to mobile devices the feedback seemed fine.
Popup feedback form
Positive action on accepting applications from CF7. The plugin for displaying the popup window will be Popup Maker. I will not describe it, the link to the material is located in this paragraph. In addition from that article.
How to add to elementor
To insert a form in elementor you need to use the shortcode section. The form was created according to the instructions above, which means there is a shortcode from CF7. Let's go to page creation in Elementor and look for a shortcode in the element search.
 Finding an element in elementor
 Elementor processed the request
Using the theme setting
Most WordPress templates do not have tools for creating automatic feedback. But our templates from WPShop have a built-in function that is displayed using a shortcode. Let's look at the example of Root. I move on to creating a page, then look at the snapshot.
 Add-on in ROOT
- Enter the text [ contactform ] (without spaces inside the brackets)
- Click preview
A page will open with an already adapted, marked up and laid out form, through which the visitor can receive feedback from the administrator.
 ROOT built-in function work
Feedback via widgets
It's easy to insert feedback into widgets. The text widget will help, move it to the active zone and write the shortcode into it.
 Using the text widget
We set the title, enter the configuration in the text area, go to the blog and see how the feedback is processed.
 Form in widget
Feedback without a plugin
If you prefer methods without a plugin, then there are excellent instructions, I found them on the Internet, if the owner of the code shows up, I will be happy to provide a link.
Open the function.php file for editing, write the code on how to use it at the very bottom.
/*feedback code*/ add_shortcode("art_feedback", "art_feedback"); function art_feedback() ( ob_start(); ?>
We created a form in WordPress HTML markup and linked it to a shortcode. I think this approach will be convenient, because the block can be displayed anywhere.
Go to page creation in the WordPress panel, write , click on view.
In Gutenberg, you insert a line into any text block.
 Recording the output
Going to the site, we will see an ungenerated form, the fields work, but the letter will not be sent, because the PHP handler is not attached.
 Bad appearance
Now let's customize the appearance, paste this code into the style.css file of the active theme.
#add_feedback ( margin: 20px 0 0; position: relative; ) #art_name, #art_email, #art_subject, #art_comments ( padding: 10px 5px; display: inline-block; width: 49.548%; border-radius: 3px; border: 1px solid #ddd; font-size: 0.9em; ) #art_subject ( width: 100%; margin: 5px 0; ) #art_comments ( width: 100%; ) #add_feedback .button ( border: none; padding: 10px 20px; color: #fff; font-size: 1em; margin: 10px 0 0 0; border-radius: #2f94ce; input:focus, #add_feedback textarea:focus ( color: #444; box-shadow: 0 0 3px rgba(68, 68, 68, 0.2); ) .error-text ( background: #F59E9E; padding: 15px 0px; text -align: center; color: #fff; ) .error-name, .error-email, .error-comments ( display: inline-block; font-size: 11px; position: absolute; top: -30px; color: white ; border: 1px solid red; padding: 5px 10px; background: red; box-shadow: 0 0 3px 0px rgba(0, 0, 0, 0.3); ) .error-name:after, .error-email:after, .error-comments:after ( content: ""; position: absolute; left: 20px; bottom: -10px; border: 5px solid transparent; border-top: 5px solid red; ) .error-comments ( top: 16%; left: 0; ) .error-name ( left: 0; ) .error-email ( right: 4%; ) .message-success ( background: rgba( 0, 128, 0, 0.5); color: #fff; text-align: center; border-radius: 3px; .required:after ( content: "*"; position: absolute; left: 20px; bottom: -10px; ) #art_name:focus::-moz-placeholder, #art_name:focus:-moz-placeholder, #art_name:focus :-ms-input-placeholder, #art_email:focus::-webkit-input-placeholder, #art_email:focus::-moz-placeholder, #art_email:focus:-moz-placeholder, #art_email:focus:-ms- input-placeholder, #art_comments:focus::-webkit-input-placeholder, #art_comments:focus::-moz-placeholder, #art_comments:focus:-moz-placeholder, #art_comments:focus:-ms-input-placeholder, #art_subject:focus::-webkit-input-placeholder, #art_subject:focus::-moz-placeholder, #art_subject:focus:-moz-placeholder, #art_subject:focus:-ms-input-placeholder ( color: transparent )
We update style.css on the server and see how the feedback on the page has changed.
 Layout block
Create a file feedback.js and place the code in it. Upload to the hosting in the js folder of the active theme.
JQuery(document).ready(function ($) ( var add_form = $("#add_feedback"); // Reset field values $("#add_feedback input, #add_feedback textarea").on("blur", function () ( $("#add_feedback input, #add_feedback textarea").removeClass("error"); $(".error-name,.error-email,.error-comments,.message-success").remove(); $("#submit-feedback").val("Submit message" )); // Submit field values var options = ( url: feedback_object.url, data: ( action: "feedback_action", nonce: feedback_object.nonce ), type: "POST", dataType: "json", beforeSubmit: function (xhr) ( // When submitting, change the label on the button $("#submit-feedback").val("Submit..."); ) , success: function (request, xhr, status, error) ( if (request.success === true) ( // If all fields are filled in, send the data and change the label on the add_form.after(" button
").slideDown(); $("#submit-feedback").val("Send a message"); ) else ( // If the fields are not filled in, display messages and change the label on the button $.each(request.data, function (key, val) ( $(".art_" + key).addClass("error"); $(".art_" + key).before(" "+val+""); )); $("#submit-feedback").val("Something went wrong..."); ) // If the submission is successful, reset the field values $("#add_feedback").reset( ); ), error: function (request, status, error) ( $("#submit-feedback").val("Something went wrong..."); ) ); // Submit add_form.ajaxForm( options); js folder on the server
Now we load the second part of the code into function.php.
/*second part*/ add_action("wp_enqueue_scripts", "art_feedback_scripts"); function art_feedback_scripts() ( // Processing fields wp_enqueue_script("jquery-form"); // Include the script file wp_enqueue_script("feedback", get_stylesheet_directory_uri() . "/js/feedback.js", array("jquery"), 1.0 , true); // Set the ajax object data wp_localize_script("feedback", "feedback_object", array("url" => admin_url("admin-ajax.php"), "nonce" => wp_create_nonce("feedback-nonce" ),)); ) add_action("wp_ajax_feedback_action", "ajax_action_callback"); add_action("wp_ajax_nopriv_feedback_action", "ajax_action_callback"); function ajax_action_callback() ( // Array of errors $err_message = array(); // Check the nonce. If the check fails, then block sending if (! wp_verify_nonce($_POST["nonce"], "feedback-nonce")) ( wp_die("Data sent from the wrong address"); // Check for spam. If the hidden field is filled in or the check is canceled, then block sending if (false === $_POST["art_anticheck"] || ! empty($_POST[ "art_submitted"])) ( wp_die("This is spam"); ) // Check the name fields, if empty, then write a message to the error array if (empty($_POST["art_name"]) || ! isset($_POST ["art_name"])) ( $err_message["name"] = "Please enter your name."; ) else ( $art_name = sanitize_text_field($_POST["art_name"]); ) // Check mail fields if is empty, then we write the message to the error array if (empty($_POST["art_email"]) || ! isset($_POST["art_email"])) ( $err_message["email"] = "Please enter your email address mail."; ) elseif (! preg_match("/^[[:alnum:]]*@+\.(2,4)$/i", $_POST["art_email"])) ( $err_message["email "] = "The email address is incorrect."; $email_to) ( $email_to = get_option("admin_email"); ) $body = "Name: $art_name \nEmail: $art_email \n\nMessage: $art_comments";<" . $email_to . ">" . "\r\n" . "Reply-To: " . $email_to; // Send a letter wp_mail($email_to, $art_subject, $body, $headers); // Send a message about successful sending $message_success = "Message sent. I will contact you shortly."; wp_send_json_success($message_success); ) // Just in case, kill the ajax process again wp_die(); )
We check the form for functionality. The problem may arise if you have not loaded the js file correctly into the WordPress theme, and the path to it is not specified correctly, namely in the second code in the // Include the script file section.
 Fill out and send the letter
Such a letter arrives in the mail with feedback.
 What comes after sending
Great, we did it, we were able to create a feedback form in WordPress using three different methods, if you have any questions, ask, we’ll sort it out. Good luck!
I like it I don't like it
From the author: Greetings, dear readers. If you needed a feedback form for your WordPress website, then this article is just for you. After reading the article, you will learn how to make a feedback form on WordPress, and do it easily, quickly and efficiently.
So, to solve this problem we will use a feedback form plugin called Contact Form 7. I don’t know why the author chose this name, or rather the serial number in the name, perhaps this is his lucky number
Be that as it may, the Contact Form 7 plugin for WordPress is one of the most popular plugins among plugins for creating a WordPress feedback form, and among any others. And indeed, more than a million installations - the figure speaks for itself. The plugin's rating is quite high - 4.5 stars, which eliminates all doubts about its use. In addition, the plugin is already Russified, so you don’t have to translate form fields and messages into Russian.
INSTALLING THE CONTACT FORM 7 PLUGIN FOR WORDPRESS
Well, let's go through the standard installation process. By the way, if you have never installed plugins before, then be sure to read the article “WordPress. Installing plugins”, where you will find all possible ways to install plugins.
In the site admin panel, go to the Plugins - Add new section and enter the name of the plugin in the search bar - “contact form 7”. The first feedback form plugin found is the option we need.
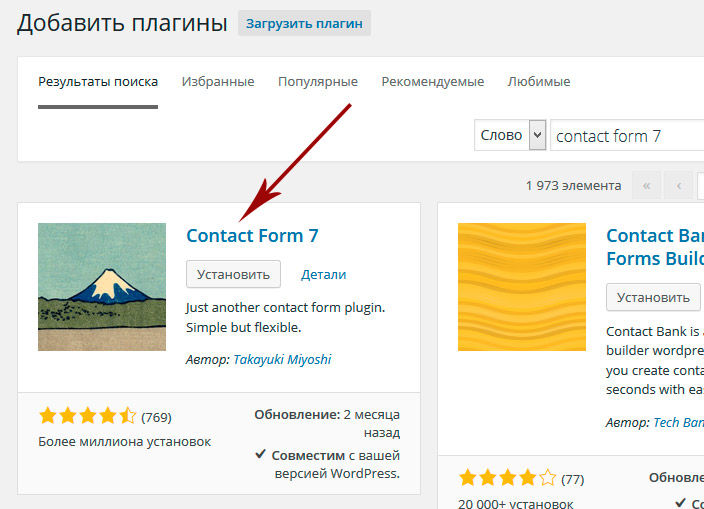
Click the Install button and activate the plugin. After installation, a new Contact Form 7 section with several items will appear in the menu.
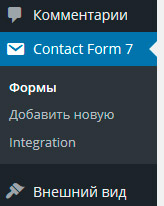
The first Forms item contains a list of current forms on your site and allows you to manage them: edit or delete. The finished form is nothing more than a shortcode (short code) that can be inserted into a post, page, or even widget. This shortcode will be expanded on the page into full form code. The plugin already comes with an example of a feedback form, let's copy its shortcode and paste it, for example, onto the contact page. After that, let’s go to the page and see a ready-made working WordPress feedback form on it.

We can try to fill out the form and send it, the letter will be delivered to the email address specified in the administrator’s profile settings. Please note that the Contact Form 7 plugin doesn't just offer the usual standard contact form. No, the plugin allows you to flexibly configure it. In addition, the form is sent without reloading the page, which is an additional plus. And, of course, validation of form fields, the ability to specify required fields, is another huge plus.
SETTING UP A FEEDBACK FORM FOR WORDPRESS
Well, we used a ready-made form. What about changing it? Is this possible and is it easy to do? The answer is yes to both questions. For example, I want to remove the Subject field from the form, how can I do this? Let's move on to editing the form in the Forms plugin menu and see the following picture.

In order to remove the topic, it is enough to remove the 2 corresponding lines circled in the screenshot. The second line is interesting here: . As you may have guessed, this is nothing more than a shortcode, which is deployed in the form field. In this case, this is a field of type text with the value of the name attribute - your-subject.
If, for example, we are talking about the text area below, then its shortcode looks like this: . Here textarea is the textarea tag of the form, and your-message is the name of this form element. It's simple.
Here you can ask a completely logical question: what to do with other form elements? How to find out which shortcode is responsible for, say, a drop-down list? There is nothing complicated here either. There are buttons above the template field of the editable form, by clicking on which we will add the necessary elements to the form.

Well, if difficulties still arise, then the documentation for the plugin will help you, where you can find many examples.
So, as an example, let's remove the subject of the message and add a list with options for selecting the subject of the message. To create a drop-down list, click on the drop-down menu button. In the modal window that opens, fill out the form. The key is the Options field, in which we enter options for the drop-down list. Each option is on a new line. Other form fields should be intuitive. For example, if we check the Field type (Required field) checkbox, we will make the created form field required to be filled out. The Allow multiple selections checkbox allows you to create a list with the ability to select multiple options, and the Insert a blank item as the first option checkbox will create the first empty option in the list. The Id and Class fields speak for themselves - these are fields for adding id and class attributes, which allow you to further design the field.

After creating a list with the required options, a new field will appear in the form template.

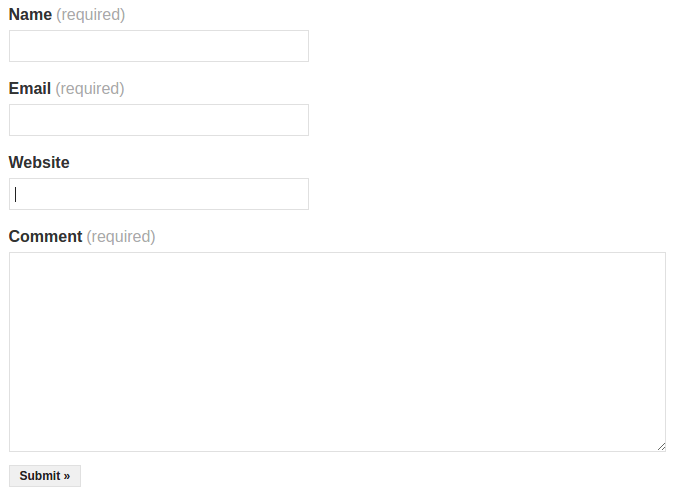
We save the template and try to test the new feedback form. On the site, the form has indeed changed; instead of a topic text field, there is now a drop-down list with options for choosing a topic.

Let's try to fill out and submit the form. The form is sent, but oops... the received email does not have a selected subject option. How so? How to correct this misunderstanding? Don't worry, it's easy to fix. Go to edit the form and switch to the Letter tab.

In this tab, you configure the format of the letter that comes to email from the feedback form. In the screenshot in the first circled area we see a list of shortcodes (form field names) that are used in our feedback form. It is the values of these fields that are substituted into the letter template. We see in the second marked area that the Subject field retains the name from the previous field. The Message Body field also contains the same shortcode. Let's replace them with the appropriate tag from the list above - . By the way, here we can also change the recipient’s email, it is written in the To field. We can also change other settings below, they are all signed and clear.
We save the changes and try to resend the letter. Now the feedback form works as expected - an email with the selected subject is sent to your email.
In the next Form Submission Notifications tab, we can configure success or error messages that occur when submitting the form.
SECURING THE FEEDBACK FORM
What about spam, you might ask, is a reasonable question? The author of the plugin took care of this too. In the plugin settings section there is an Integration item.

Here we can set up Google's reCAPTCHA service. To do this, you will need to follow the specified link to the corresponding Google service and then follow the instructions to get the necessary key and integrate the captcha with your site.
For those who do not want to use the reCAPTCHA service, the plugin offers protection from robots in the form of a question/answer field. To add this field in the form template, click on the quiz button and fill out the form in the same way as we did for the drop-down list. Enter the question and answer through a vertical line.

After this, a new field will appear in the feedback form with one of the options for the questions that you typed. Now, for the form to be submitted, you must provide the correct answer to the question.
As you can see, creating a feedback form on WordPress is as easy as shelling pears. The Contact Form 7 plugin allows you to build a form for almost any purpose. This could be a feedback form, an application form, etc. Yes, as I said above, the form can be inserted not only into a post or page, but also into a sidebar widget. To do this, just create a Text widget and insert the shortcode of the desired form into it. Well, new forms, as you guessed, can be created in the Add New plugin menu.
That's all for me. Play around with the Contact Form 7 plugin for WordPress, try creating different forms, believe me, there are still a lot of possibilities to explore. If you have any questions, then, as always, I’m waiting for them in the comments. Good luck!
An online form is an indispensable tool for absolutely any website. This is the most important source of communication with your website visitors. Forms allow you to collect feedback, conduct surveys, create email subscriptions, collect customer payments, and much more. If you know programming, you can easily create a form for the site. Otherwise, there are many good plugins that can be easily installed on a website and used to create forms.
stepFORM
stepFORM - WordPress plugin for creating forms of any complexity based on a visual designer. It has built-in spam protection, collection of responses to email and CRM, integration with Google Analytics and Yandex.Metrica, cost calculation using formulas, accepting payments via PayPal, Wallet One, Yandex.Money and Yandex.Cash, using the form via the link in social networks and much more.

uCalc
uCalc is a popular WordPress plugin for creating calculation forms of varying degrees of complexity. The plugin is perfect for forms in which it is necessary not only to receive information from site visitors, but also to make automatic calculations using formulas or accept customer payments for the sale of goods or services. The plugin can be connected in a few clicks and does not require programming knowledge. A calculation form is added when editing a page or publication.

Contact Form 7
Contact Form 7 is one of the most popular plugins for creating forms on WordPress. With this plugin you can very flexibly customize the contents of forms and configure sending data by email. Forms include ajax submission, as well as Captcha and Akismet against spam.

WPForms
WPForms allows you to create beautiful contact forms, subscription forms, payment forms and other forms for your website in minutes. WPForms will look great on all devices (mobile, tablet, laptop and desktop).

Ninja Forms
Ninja Forms helps you create online forms for WordPress in minutes by simply moving form fields using your mouse. For developers, you can use built-in hooks, filters, and custom field templates to do everything you need at any stage of form creation or submission using Ninja Forms as the foundation.

Form Maker
Form Maker creates responsive forms for WordPress through a simple and intuitive interface. The plugin allows you to create various questionnaires with any fields, options for questions and answers. It only takes a few clicks to create forms and a couple of minutes to customize them with available themes, styles, and display options.

Caldera Form
Caldera Form is a free and powerful plugin for WordPress that creates responsive forms using a simple visual editor. The plugin has many free, convenient add-ons for both beginners and web developers. Antispam, AJAX, notification emails, and database record tracking are enabled by default.

Visual Form Builder
Visual Form Builder is a plugin that allows you to create and manage all kinds of forms for your website in one place. Creating a fully functional contact form takes just a few minutes, and you don't have to write a drop of PHP, CSS or HTML.
This list includes the most popular WordPress plugins for creating online forms. If you use other interesting plugins that are not on this list, write in the comments.
Almost every time a webmaster develops a new website, he has to choose the best (for specific needs) WordPress plugin for contact and feedback forms. This usually happens because the client does not always like a simple contact form, and sometimes there is a need for several forms on one site at once.
The feedback form is one of the most important elements of a WordPress site, because without it you lose a great chance to always keep in touch with your readers, partners, and customers. Plus, you're missing out on a lot of opportunities to attract new customers. The WordPress contact form plugin makes it easy to add a contact form to your website. I'm not even talking about various corporate and sales sites where sometimes very specific forms are required not only for simple contacts.
In this article, I will list the most popular plugins in completely random order. The article will certainly be supplemented over time with the best solutions.
Contact Form 7 is the most popular (currently over 12,000 downloads and counting) WordPress contact form plugin. The plugin boasts AJAX submission, built-in , Akismet spam filter and the ability to upload files. The plugin is completely free and can be easily customized using simple HTML.
Pros: If you need a simple contact form, this plugin is what you're looking for as it's easy to install and configure with a simple settings page. With just one line of code, you can insert a contact form into any post or page.
Cons: Technically this plugin doesn't need any work, but it would be nice to have a few to choose from. If you want to change the appearance of the form, you will have to play with the CSS.

Fast Secure Contact From is another popular plugin that has already been downloaded over 3.5 million times. It allows blog owners to easily create and add contact forms to WordPress sites. You can also use the form to send invitation requests for a regular or video call.
The plugin has an admin interface with which you can create an unlimited number of forms and view their previews. Using captcha and Akismet Fast Secure form, it blocks attacks based on the most popular spam tactics.
Pros: Unlike other similar plugins, Fast Secure form does not allow users to register a profile, but it does offer other great features such as scheduling, online meetings, support for multiple email addresses, etc.
Cons: The current version of the plugin lacks a simple interface, but the author of the plugin recently released a beta version in which the interface is much better. Thus, the interface problem is not so acute.
Contact Form by Contact ME

Contact Form is a free plugin with basic functionality, but it requires you to register on contactme.com. Registration is completely free and does not require any effort from you. The developers of the plugin claim that it is an order of magnitude better than many popular contact form plugins, including contact form 7!
Pros: the plugin has some useful functionality - the option to send notifications to your mailbox and smartphone, the ability to add arbitrary code or scripts to the form, and the fact that it places a logo for the card, company contact information, and even links in the form to profiles on social networks and much more.
Cons: In order to use the plugin you will have to create a profile on the Contact Me website. Even though registration is simple and free, it still doesn’t make you happy when you are forced to do something.

Initially, the FormCraft plugin was created and developed only in the premium version. Relatively recently, the authors made a separate, free version - FormCraft - Form Builder.
As in the premium version, FormCraft - Form Builder allows you to easily and quickly design different forms in a special and very convenient drag & drop editor. Naturally, there are fewer possibilities here, but for ordinary users it will be enough.
The premium version of FormCraft can boast of setting up script logic, auto saving, more than 20+ additional custom fields, popup and fly-in forms, export to CSV and other joys.
One of the best plugins today, both in premium and free versions.

The Visual Form Builder interface will pleasantly surprise you, as the plugin allows you to create and manage all types of forms on your website from one place. In one click you can add new fields, reorganize existing ones, and apply an antispam solution. To change the order of fields, you can use drag & drop technology.
Pros: While Visual Form Builder is similar to the other contact form plugins listed here, it has its own interesting features - the ability to rearrange elements with a simple drag-and-drop, exporting input data in a CSV file, customizable confirmation messages, a submission form that supports entering multiple emails.
Cons: If your WordPress site is a very large one, you may be better off using another plugin as this one stores the form input in your WordPress database.
nForms – WordPress Form Builder

Drag and Drop Builder provides you with a simple multi-column contact form template, with Ajax submission and validation. You can even display the form using a popup plugin. It is possible to display the form using a shortcode, a regular PHP function, or a widget.
If you need more than just a contact form, then nForms is the plugin you can use.

Gravity Forms is the most complete solution for adding a contact form to your website. Thanks to its set of cool features, this plugin can be called the most progressive and advanced premium WordPress plugin currently available. You can use the visual editor to create complex feedback forms for your website. There is also a convenient feature that makes it easier to use long forms, allowing them to be embedded in multiple pages, and how complete the form is is shown by a fill indicator.
Pros: Gravity Forms can offer you completely exclusive functionality that is not available in other similar plugins, such as the option to create order forms (including real-time costing), dependent fields to hide or show fields, sections, pages or even submit button of user choice.
Pros: Compared to other plugins presented here, this one is on the pricey side, but again, Gravity Forms offers much more than just a contact form. If you are looking for a simple feedback form, then there is no point in spending money on this plugin.

Mapped Contact Form Pro WordPress uses a different algorithm to display the form on your website. This is a great solution for a business or company as it can be used to mark branches or offices on site. The plugin is also ideal for those who use maps on their websites.
You can enter your address for each location that appears in the contact form. The plugin is easy to use and can be placed on any post or page with a simple shortcode.

Another popular form builder lately. Very powerful, with an excellent, intuitive editor (like paid plugins), in which you can build your form simply by dragging and dropping the necessary blocks and customizing them. It has a whole set of pre-prepared fields and blocks. All fields are immediately edited when created in the language you need. By default, it has only a standard contact form for feedback and a corresponding shortcode.
Pros: Excellent functionality. When creating a new form, you can use a convenient switch to quickly preview and test your “designs”.
Cons: Lots of block settings can be daunting for newbies. In addition to the main functionality, it has a lot of plug-in premium modules for working with various services for accepting payments, mailings, and other things. Although, this can be considered a plus, of course.
Ninja Kick: WordPress Contact Form

The most original contact form from the entire collection. It differs in that it is displayed as a separate panel - a slider on the left or right side of the site. It looks extremely impressive. It has many settings, but mostly regarding its appearance. Setting up the fields themselves is minimal here. However, you can use a shortcode from the popular Contact Form 7 and it will work.
Interesting plugin and form itself. You can read more in .
Let's sum it up
Now is the time to choose the right extension for your website. Contact Form 7 or FormCraft - Form Builder are probably the best solutions for a regular blog, but for large sites offering different services, I would recommend using Gravity Forms or Ninja Forms. For those who like to “stand out,” Ninja Kick: Contact Form is perfect.
I love simple and beautiful things. I needed a beautiful feedback form for my WordPres blog, but the contact forms I used (the most popular Contact Form 7 and Jetpack Contact Form) are, unfortunately, ugly. And I don’t want to waste time on their design. Therefore, I decided to find a ready-made stylish feedback form and it must have a captcha, otherwise it will be filled with spam. So, I had a very simple goal - to find a WordPress contact form that satisfies the following requirements:
- presence of captcha,
- free,
- stylish, beautiful.
I selected all the popular WordPress plugins to create a feedback form, with a large number of positive reviews and active installations. At the same time, I made sure that they were updated recently. I must admit that I spent no more than 5 minutes installing and studying one plugin with a contact form, and if I couldn’t set up a beautiful feedback form right away, then I moved on to the next contact form. Therefore, I admit that I may have missed a good plugin with a contact form that satisfies all the requirements, the setup of which is not immediately obvious. Below you can see screenshots of all the feedback forms I reviewed.
WpForms Lite
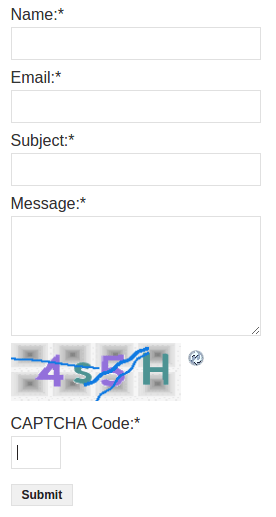
Popular, free, understandable, but ugly feedback form, too simple, and there are no additional ready-made designs. There is Recapcha Google. The paid version, which starts at $49, allows you to integrate your contact form into email marketing services like Aweber, accept payments, and much more. This contact form is American, but I wouldn't say so.

Caldera Forms
More difficult to set up than WpForms, but nicer. There is a captcha, but it did not appear for me. The design of the feedback form is average.

Jetpack Contact Form
A feedback form from the creators of WordPress; when activated, the Add Contact Form button appears in the editor. No captcha, lots of spam! Ugly.
Contact Form 7
The most popular and sophisticated feedback form, rich in functions and settings, but ugly - you need to spend time on design.
Fast Secure Contact Form
I didn’t like the design of this feedback form - it’s ugly!
Form Maker by WD
Free, there are many beautiful feedback form templates. A real candidate! But I couldn’t set up ReCaptcha, so I didn’t use it.

Ugly feedback form! Very limited functionality - nothing...

Contact Form by BestWebSoft
Ugly! Very limited functionality of the feedback form - there is nothing...

Ninja Forms
This is a regular feedback form with a standard design, but something about it caught my attention, if I don’t find anything decent, I can try using it. There is Google ReCaptcha integration.

Huge-IT Forms
You can change design themes with different designs for the same contact form. The designs are nice, there is a captcha. Only in my admin panel the plugin’s layout was creeping apart, if you don’t pay attention to this, then it’s a worthy contender.

Formidable Forms
This feedback form doesn't have fancy designs, but the basic design is more or less acceptable, so I started using it.
Table with an overview of WordPress feedback form plugins
The results of my searches for the feedback form are summarized in the table below.
| Plugin | Number of active installations | Number of reviews | average rating | My impressions |
| WpForms Lite | 200 000 | 600 | 5 | Popular, free, understandable, but ugly. Recapcha Google. The paid version, which starts at $49, allows you to integrate your contact form into email marketing services like Aweber, accept payments, and much more. The American wpbeginner.com praises this contact form as the best, but I wouldn’t say so. |
| Caldera Forms | 70 000 | 250 | 4.5 | More difficult to set up than WpForms, but nicer. There is a captcha, but it did not appear for me. The design is average. |
| 90 000 | 500 | 4.5 | Free, there are many beautiful form templates. A real candidate! But I couldn't set up ReCaptcha. | |
| Contact Form & SMTP Plugin by PirateForms | 200 000 | 30 | 4.5 | Ugly! Very limited functionality - nothing... |
| Contact Form by BestWebSoft | 200 000 | 300 | 4 | Ugly! |
| Ninja Forms | 900 000 | 800 | 4.5 | This is an ordinary form with a standard design, but something about it caught my attention, if I don’t find anything decent, then I can try using it. There is Google ReCaptcha integration. |
| Huge-IT Forms | 30 000 | 70 | 4.5 | You can change design themes with different designs for the same contact form. The designs are nice, there is a captcha. Only in my admin panel the layout of the plugin was creeping apart, if you don’t pay attention to this, then it’s a worthy contender. |
| Formidable Forms | 300 000 | 200 | 4.5 | There are no fancy designs in this form, but the basic design is more or less acceptable, so I started using it. |
Conclusions: the best WordPress feedback form
To be honest, I didn't find what I was looking for. Of the eleven most popular feedback forms reviewed, only two contact forms have beautiful design templates: Form Maker by WD and Huge-IT Forms. But on the first one I didn’t have the captcha installed, and on the second one the layout in the admin panel was falling apart. The developers don't seem to care about the design and therefore all other feedback forms come without a design and are therefore ugly and you will have to customize the design yourself by editing the CSS.
Nevertheless, I chose the Formidable Forms feedback form, since it still has at least a basic (the developer tweaked it a little!), but stylish design, has reCaptcha and is free. Everything worked for me right away!
If you know a free and beautiful feedback form for WordPress with captcha, please share it in the comments.


