Add a shortcut to my computer to the desktop. How to add a My Computer icon to the Windows desktop
Habits play an important role in a person's life. So, in relation to working on a computer, many are accustomed to the "My Computer" folder on the desktop. However, by default, after Windows installations it is not displayed there. And at least add My computer to the work Windows table not difficult, many do not manage to do this right away, due to the large number of system settings, the set of which may differ significantly from the version and edition operating system... For such users, this article is intended, in which we will look at how to add "My Computer" to the Windows desktop of all relevant this moment versions of the system.
How to add "My Computer" to the desktop in Windows 7 or 8
For Windows 7: Professional, Enterprise and Ultimate, as well as Windows 8, the method for adding the My Computer shortcut to the desktop is the same:


How to add "My Computer" to the desktop in Windows 7 Home Basic, Premium and Starter
The above method will not work in initial Windows versions 7, since they simply do not have the "Personalization" item. However, adding My Computer to the desktop in Windows 7 Home Basic, Premium, and Starter is also easy:


This method can be used not only for the initial versions of Windows 7, but also for all others. It may seem simpler than the previous one, so it is used more often.
How to add "My Computer" to the desktop in Windows 10
In Wndows 10, due to the fact that the system has changed a lot, the settings for desktop icons are opened a little differently:


In some releases of the operating system, it is not so easy to get to the explorer. Over the years, users have become accustomed to having all the shortcuts they need at hand. Here's how to get the My Computer icon back on the Windows 10 desktop.
We cannot find out where the "My Computer" icon is located in Windows 10. In fact, this is not a shortcut to an ordinary folder, but a link to a PC management service. If you open it, then an explorer will appear. But the context menu will allow you to get into the settings not of the folders, but of the entire system. You can change the name of your PC and other parameters, connect a disk from the network, display an icon on the panel below, etc.
How to enable display of shortcuts
So, if there is no shortcut, do this:
The first way
- On the unoccupied place of the main screen, click pkm and select "Personalization".
2. On the Themes tab, scroll down to the Desktop Icon Options link.
 3. Click and put the necessary checkboxes.

This is the easiest way to add a My Computer shortcut to Windows 10 in six clicks. You will learn about that in our other article.
Second way
There is another way to get to this window so that the This PC icon appears on the Windows 10 desktop.
- In the search area, type "Control Panel".
 2. Change the display mode to Category.
 3. Select "Design and personalization".
4. Click on the option responsible for navigation.
 5. On the right side, select "Themes" and then, as described.
Another option, how to bring "My Computer" to the Windows 10 desktop, is to run the command
Rundll32 shell32.dll, Control_RunDLL desk.cpl, 5
Hold WIN + R and type it in exactly this syntax.

Third way
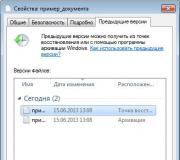
And the last option is to use the Registry Editor. The expediency of this step is questionable, but it also helps to display "My Computer" on the Windows 10 desktop. We do not recommend changing the registry unless it is absolutely necessary. If you want to give it a try, keep a copy: "File" - "Export".
- Again, take the command execution window and type regedit in it.
 2. Next HKEY_CURRENT_USER \ Software \ Microsoft \ Windows \ CurrentVersion \ Explorer \ Advanced
 3. For the HideIcons parameter, type in a zero value. To do this, right-click and select "Change".

 4. If it doesn't exist, create it. To do this, in a free field, right-click and "Create" - "DWORD Parameter (32 bit)".
 5. Enter a name and then change the value.

Now you can find the shortcut of this computer in Windows 10 in its proper place. But only after a reboot. Read about how to find it in another article.
How to open My Computer in Windows 10
This is also implemented in different ways. The usual one is to make two clicks one after the other on the left button of the manipulator.
You can also enter using the menu, which is called by the right key on the shortcut and select "Open".

For convenience, you can move the icon to a convenient place - move the mouse pointer over it, hold down the left button and drag. To set the display of the icon - release the manipulator.
Here's everything you can do with an icon.
Under certain circumstances, the user may not be able to see the My Computer icon on the desktop. This happens, for example, due to a software failure or after reinstalling the operating system. Returning the icon to your desktop is easy and takes only a few seconds. The method works for both Windows 7 and Windows 8 (on XP, the algorithm will be slightly different, but it does not change the essence of it).
There are two ways. I will start with what is more, in my opinion, "correct".
Open the desktop and right-click on an unoccupied area. Select "Personalization".

A window will open in front of you. On its left side there are several items at once. Select Change Desktop Icons.

In the window that opens, you will see several different items. Here you need to put a tick next to the "Computer" item and click OK.

Now we look at the desktop and see the icon that has disappeared until now.
As I wrote above, you can use another method, by the way, faster. To do this, click on the "Start" button, find the shortcut "Computer", click on it and drag it to.

Everything, nothing more is required from you.
A computer shortcut is a file that serves as a pointer to an object, program or command. In other words, using a shortcut, there is no need to look for a file / program to run it, just click on the shortcut on the desktop and the file / program will be launched. There are shortcuts that are originally present in the Windows system - these are Computer / My Computer, Network / network and Basket... By default, when installing the system, only a shortcut appears on the desktop Basket, the rest of the shortcuts must be brought to the desktop manually, this will be discussed in this article.
How to display the shortcut My Computer and Network Neighborhood on the desktop in Windows XP.
Right-click on an empty area of the desktop, select " Properties".
In the opened window Properties: Screen, go to the tab " Desktop"and press the button" Desktop customization".

In the window Desktop elements in field Desktop icons put a checkmark in front of the labels of interest to us (or remove, if it is necessary to delete the label). Click " OK".

After that, all the shortcuts that you have marked with a tick will appear on your desktop.
How to display the shortcut My Computer and Network Neighborhood on the desktop in Windows 7 Professional / Professional, Enterprise / Corporate, Ultimate / Ultimate / Windows 8.
Right-click on free space desktop, select " Personalization".

In the personalization window that opens, select " Change desktop icons".

In the window Desktop icon options in field Desktop icons select the shortcuts we are interested in and put a tick in front of them (or uncheck the box to remove shortcuts from the desktop). Click " OK".

After this procedure, changes will occur on the desktop according to your settings.
How to display the shortcut My Computer and Network Neighborhood on the desktop in Windows 7 Home Basic / Home Basic, Home Premium / Home Premium, Starter / Initial.
On home versions of Windows 7, the " Personalization"Unfortunately, no. And the above method will not help.
In order to display the Computer shortcut on the desktop, you need to click the " Start", right-click on" Computer"and choose" Display on Desktop".

After this simple procedure, the shortcut Computer will appear on the desktop.
To display network connection on the desktop, you must click "Start" - "Control Panel".

In the Control Panel window, select View: Small icons, right click on Network Control Center and general access and select " Create shortcut".

After that, a shortcut for Network Connections will appear on the desktop.
How to create shortcuts for installed programs.
In order to create a shortcut of any installed program, you need to go " Start- All Programs"select the program you are interested in, right-click on it and select" Send - To Desktop (Create Shortcut)".

I really hope that thanks to this article you will make the necessary shortcuts and will spend less time launching the applications you need.
It turns out that this label was made separately for a reason. First, this shortcut can't add in the usual way, to add it you need to follow the instructions below. Secondly, there are items that are not on the other labels. This is " Control"(Managing your device)," To plug network drive " and " Disconnect network drive". It is clear that it is very convenient to have such useful features without opening additional dialog boxes... Anyway, this is probably the most demanded section file system on almost every device. That is why many of you have come here.
There are 2 options to bring a computer icon to the desktop. The first one is suitable only for Windows 7, we will consider it. And the second one can be used both on Windows 7 and on Windows 8, 10, we will consider it below.
In order to return the pictogram to its rightful place, the following instructions must be followed:
How to put an icon in Windows 7 and 8
Since the instructions are the same in Windows 7 and 8, this article has combined them into a single section. Let's start.