1s 8.3 periodic directory details. Where is the program code used to work with directories?
Purpose of directories
The directory stores a list of possible values of a particular object or attribute. Directories are used in cases where it is necessary to exclude ambiguous entries.od information. For example, in order for the buyer, seller, storekeeper and director to understand what kind of product we are talking about, everyone must call it the same. And in this case we need a reference book. Usually on trading company it looks like a price list.
The 1C:Enterprise 8 system allows you to maintain an almost unlimited number of necessary directories. Each directory is a list of homogeneous objects: positions, employees, clients, goods, etc. Each such object is called a directory element.
From the user's point of view, it should be borne in mind that in the Configurator it is not the directory itself that is created as a list of values, but a template for the directory, its template, is developed. During the configuration process, the structure of information that will be stored in the directory is described, a screen and, if necessary, printed representation of the directory is developed, and various features of its behavior are specified.
Directory details (fields)
As mandatory details, each directory has Code And Name. The directory element code can be either numeric or text. The 1C:Enterprise 8 system provides ample opportunities for working with directory element codes: automatic assignment of codes, automatic control of code uniqueness, and others.
In addition to the Code and Name, any additional information about a directory element can be stored in the 1C:Enterprise system directories. To store such information in the directory, you can create additional details(fields). Using the directory details mechanism, it is easy to organize, for example, an employee file. For example, the Employees directory will almost certainly have the details Position, Salary, Appointment Date and others. The 1C company anticipated programmers and introduced two mandatory (predefined) details into all directories: Code and Name. Indeed, almost any real-life object contains these attributes. For example, for employees the code is Personnel Number, and the name is Last Name, First Name and Patronymic (full name). In addition, the use of codes (when using automatic numbering) makes it easy to understand which element was entered earlier and which was entered later into the database.
Data types
For each directory attribute, you must specify a data type, for example, “number”, “string”, “date”, Boolean (True or False). These are basic types, but complex data types can also be specified. For example, the Position attribute has the Position data type. In this case, the values of this attribute will be selected from the Positions directory. This is how it is implemented simplest connection between directories, when the values of the details of one directory are selected from the elements of another directory.
Hierarchical directories
The list of directory elements in the 1C:Enterprise 8 system can be multi-level. In this case, all directory lines will be divided into 2 types: “simply” directory elements and directory groups. Groups allow you to move to lower levels of a multi-level directory. The use of multi-level directories allows you to organize the entry of information into the directory with the required level of detail. Elements and groups of elements in a multi-level directory can be transferred from one group to another.
Subordinate directories
A subordination relationship can be established between directories. In terms relational databases data, a one-to-many relationship is established between the tables. In this case, each element of the subordinate directory will be associated with one of the elements of the owner directory. Sometimes you can say that the elements of one directory belong to the elements of another. For example, the system may have a Contract directory. Then it can be made subordinate to the Clients directory. This means that the client owns the contracts and one client can have multiple contracts.
Table parts
Starting from version 1C 8.0, the platform has implemented the ability to specify one or more tabular parts for a directory element. This feature is recommended to be used to reflect information related to a given element, but which does not have its own object entity (for which it is recommended to create subordinate directories). For example, for the Employees directory, tabular sections Education and Family Composition can be created. Working with tabular parts is similar to working with subordinate directories, except that tabular parts cannot be used as attribute values for other objects.
Where is the program code used to work with directories?
Since to execute program code we need to access the database, these pieces of program code must be placed in procedures and functions (or modules) executed on the server side. For more information, see the section.
1. Link to the directory
To work with a directory from any module, you must first create a link to this directory.
RefEmployees = Directories . Employees ; // or option 2
Directories = Directories ["Positions"];
2. Creating and recording a new directory element
NovEl = Directories. Employees . CreateItem();
NovEl. Name = "Petrov Petrovich";
NovEl. Salary = 25000;
NovEl. Write(); // this is the moment when writing to the database occurs
3. Creating and recording a new directory group (for a hierarchical directory)
New = Directories.Employees. To create a group ();
New Write();
// or option 2
New = Directories ["Employees"]. To create a group ();
New Name = "Working";
New Write();
4. Search for a directory element
// if the element is found, then it is returned, otherwise the value Undefined is returned
FoundSotr = RefCotr . FindByCode(123);
//search by code FoundSotr = RefCotr . FindByName ("Ivanov Ivan Ivanovich");
//search by code //by name FindByDetails
("Salary", 5000); //by details
If FoundCotr
= Undefined Then
//element not found
endIf;
5. Deleting a directory element SprSotr = Directories. Employees ;
Ref. Delete (); //directly deleting the current directory element Ref. SetRemoveMark
Ref. Delete (); //directly deleting the current directory element(True); //mark for deletion
(Lie);
//unmark for deletion
//you can check if an element is marked for deletion //the MarkDelete property is of type Boolean (True or False) Mark = SprSotr .
FlagDeletion
; //note: this is a property
= Undefined Then
If Mark = True Then
//element is marked for deletion 6. Enumerating directory elements();
Selection = Directories.
Employees.Select
// start searching through the directory elements in a loop
//actions with the next element...
EndCycle;
endIf;
7. Parent. Iterate over elements within a group. A group in 1C terms is a “parent”. FoundSotr = RefCotr . GroupWorking
= SprSotr . 7. Parent. Iterate over elements within a group.);
("Working");
Selection = SprSotr . Choose (
// start searching through the directory elements in a loop
Bye Selection. Next() = 1 Loop
Report ("Employee" + Selection. Name);
//element is marked for deletion Tax Benefits. Select(, Employee); //here employee - link to the employee directory element
("Working");
//actions with the next element
Report ("benefits" + Sample. Name);
// start searching through the directory elements in a loop
9. Transaction
When creating many directory elements, you can enclose a cycle in a transaction to speed up the work. In this case, the actual creation of all elements will occur only with the CommitTransaction() command. When using transactions, the action will either be completed entirely (all elements of the directory are created) or not performed at all (in the event of any failure, not a single new element will be created, everything will remain the same as before the transaction was started). Transactions are widely used in the banking industry. After all, no one wants that when sending money, it is successfully debited from your account, but due to some failure does not reach the addressee.
endIf;
StartTransaction();
For Nom = 1 To 100 Cycle
New = SprSotr . CreateItem();
New Name = "New" + String(Nom);
New Write();
// start searching through the directory elements in a loop
CommitTransaction();
The user's work with reference books and documents in 1C consists of filling out fields on the form.
1C details are directory and document fields that are displayed on the form for the user to fill out.
Let's take a closer look at the topic of details in 1C.
What are 1C Details
Each directory and 1C document consists of a set of fields. Such fields are called 1C details (for a 1C programmer).
In the configurator, in the 1C configuration tree, open any directory or document and you will see the Details branch. This is a list of directory details (fields).

Look how the same 1C details look on the 1C directory form.

Each 1C attribute has properties that indicate what type of value is stored in the attribute (string, number, etc.) and how the user will work with it.
Right-click on any 1C attribute and click Properties. A list of properties of the selected attribute will open in the window on the right.

Main properties of 1C details:

Standard 1C details
As you noticed, on the directory form there are 1C details that are not listed in the configurator: group, name, BIC.

The directory list form also contains 1C details that are not in the list: deletion mark.

These are standard 1C details. What it is? Everyone has a default set of 1C details. For directories this is, for example, code and name. For documents this is the date and number.
Standard 1C details can be viewed as follows:
- Go to the editor of the 1C object (directory or document) by double-clicking on it with the mouse
- In the editor that opens, select the Data tab
- Here you can configure the standard details Code and Name of the directory
- Click the 1C Standard Details button to view the full list.

General 1C details
Starting with version 1C 8.2.14, a new 1C Object has appeared in 1C - General 1C Details. Using it, you can add a property (field) that will be present in many directories and documents at once.

Properties of general 1C attributes:
- Auto use – adds general props 1C to all directories and documents at once
- Composition - allows you to add general 1C details only to the necessary directories and documents (auto-use is then set to Do not use).

How to add 1C details
Right-click on the 1C Details branch of the desired directory and select Add.

We need to enter the Name of the 1C attribute, for example “Office Address” and the synonym “Office Address”. Leave the default type as String, but check the Unlimited length checkbox.

Let’s add another 1C attribute in the same way, only we’ll select the Boolean type and call it “Works on Weekends”.
How to display details on form 1C (thick client 1C)
Let's expand the Forms branch of the same directory. To open the form, select the element form and double-click on it with the mouse.

Drag the edge of the shape with your mouse and stretch it (optional).

In the configurator panel, click the “Data placement” button. You can also use the Form / Data Placement menu.
You see that our details are not displayed on the form. Check them. And also the Insert labels and Place automatically checkboxes.


How to display details on the 1C form (1C thin client)
Let's expand the Forms branch of the same directory. Select the shape of the element and double-click on it with the mouse.

On the Details tab, expand the Object line. You will see a list of details that were previously added to the directory.

Now just drag the required attribute from the right window to the left one and it will appear on the form.


Form 1C details
In the thick client, the form has its own details. They are located on the Details tab.

These details are not saved in the database, but they can be used on the form for the fields that are needed to work with the form.

For example, you added a checkmark to the form. When you click it, something happens on the form. The meaning of the checkbox does not matter to you (you do not need to write it down) - it is used only to switch the form when working with it. In this case, you do not use the directory attribute as data, but the form attribute.

Periodic details 1C
In 1C version 7.7 there were periodic details. Their meaning is this: the meaning of the props is different on different dates. For example, the value on September 1 is one, and on October 1, another. Same props.
In 1C 8 there are no periodic details. This is implemented as follows:

In 1s 7.7, directories had interesting details - periodic, they could remember the value of the details based on time, working with them was not very convenient, but, in the absence of alternatives, it was necessary. After switching to 8, many programmers were surprised to discover the absence of periodic details in reference books.
Typical tasks that are solved with the help of periodic information registers are the storage of time-bound information. The information can be heterogeneous, such as prices for items, positions held by an employee in different periods of time, and tax accounting parameters of the enterprise. In 8, the analogue of periodic details is the consolidated periodic registers.
In order to repeat the functionality of 7.7, you need to do the following:
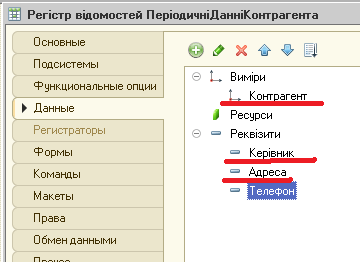
Create a consolidated register “Periodical Data of the Counterparty”, indicate that this is a periodic register of information with a frequency of one day.
Now we need to add a type on the “Data” tab - the “Account” dimension, which coincides with the directory in which we want to implement functionality similar to the periodic details. In the “Details” branch we add those details that are time-bound. For the counterparty, this may be a legal and physical address, main telephone number, name of the manager, main fax, etc.
After saving the configuration, you can access the information register through the side menu (in managed application mode), see screenshot.
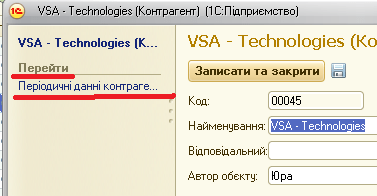
In mode regular application via the "Go" button

But if we look at the completed register, we will notice that it is quite difficult to understand what information is relevant, since we see the entire set of data as a whole, and not just the current one. this moment information.
 When there is a lot of information and one can easily make a mistake, it is advisable to show current information in the counterparty’s card. Here you can’t do without programming.
First, let’s add a group to the form, which we’ll call “Contact Details” and add two details to it: “Manager” and “Telephone”

And in the form module, we will assign actions to obtain current data to the “On Opening” event:
& OnClient Opening Procedure (Refusal) //Insert in place of the collector data=RetrieveCurrentData();attempt Director = dani. kerivnik;
exception endtry ; //Insert in place of the collector attempt phone = data. telephone; exception endtry ; End of Procedure The function for obtaining current data is as follows: function OtrimatiCurrentData() //((QUERY_CONSTRUCTOR_WITH_RESULT_PROCESSING // Danish fragment of constructor prompts. // If you revise the constructor again, manually making changes will be lost!!! Request = New Request; |Request. Text = " SELECT | Periodic Counterparty Data Summary of the Latest. Counterparty,| Periodic Counterparty Data Summary of the Latest. Kerivnyk, | Periodic Counterparty Data Summary of the Latest. Addresses,| Periodic Counterparty Data Summary of the Latest. Telephone FROM | Register of Information. Periodic data of the Counterparty. Slice of the Latest AS Periodic Data of the CounterpartySlice of the Latest|WHERE | Periodic Counterparty Data Summary of the Latest. Counterparty = & Counterparty" ; Request. SetParameter(" Account ", object. Link); Result of Request = Request. Execute () ; SelectionDetailedRecords = Result of Request. Select(); data= new structure; While SelectionDetailedRecords. Next() Loop// Insert a selection sample SelectionDetailedRecords
//SelectionDetailedRecords.Kerivnik;
tribute Insert(" ker_vnik ", SelectionDetailedRecords. Kerіvnik) ; tribute Insert(" phone ", SelectDetailRecords. Phone) ; Report(SelectionDetailedRecords. Phone) ;
EndCycle ;

Return of tribute;


